
Today: while loop, if statement, ==, left_clear(), bit puzzles, make-a-drawing strategy
We'll work a bunch of little problems today, you may want to review them later. Or you could start the homework, and then if you get stuck, go back and review the related problems on lecture.
Now we'll start looking at the "loop" structure which is a big jump up in power for our code.
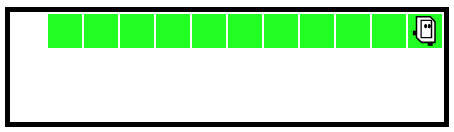
Bit starts at the upper left square as usual. Move Bit forward until blocked by a wall, painting every moved-to square green.
Follow the link to the go-green problem. The code there is complete, so run it and watch it run a few times to get a feeling for what the loop looks like. We'll look at the details below.
> go-green
The loop is a big increase in power, running lines many times. There are a few different types of loop. Here we will look at the while loop.
while bit.front_clear():
    bit.move()
    bit.paint('green')
We need to explain a few components that go into the while-loop.
The while loop depends on a Python "expression". An expression is a piece of code that, when it runs, returns a value to that spot in the code.
Here's is a line of Python code that assigns a value to a variable, and the right side of it is a mathematical expression:

When that line of code runs, Python "evaluates" the expression, reducing it to a value. We also say that the expression "returns" that value. A nice way to visualize the evaluation is an arrow going through the expression, showing the value coming out, like this:

bit.front_clear() ExpressionIn Bit's world, the way forward is clear if the square in front of Bit is not blocked by the black edge of the world or a solid black square.
Bit has a function front_clear() which acts as an expression, with a True or False value coming out of it. The function front_clear() checks the square in front of Bit, returning True if the square is clear for a move, and False otherwise.
Here are visualizations of how the bit.front_clear() expression works when it runs, with the True or False return value coming out of the expression:


The while-loop syntax has four parts: the word while, a test expression, a colon, and then the indented "body" lines of code inside the while-loop:
while test_expression:
    code
    code
    code
The while loop has a test and a body. and the sequence it follows is pretty reasonable.

The diagram is busy looking, but basically it works like this: the loop runs the lines of code in the body again and again, until the test is False. Here's the detailed sequence of actions:
1. The loop evaluates the test-expression at the top. Does it return True or False? In this case, the test is bit.front_clear() (next section). (True and False are the "boolean" values, see the guide chapter: booleans).
2. If the test evaluates to True, the loop runs all the lines in the body, from top to bottom. After running the body, the loop goes back to step (1), checking the test again.
3. Eventually the test evaluates to False, the loop is done, and the run continues after the loop.
> go-green
Run the go-green function, and watch it to see how the while loop runs the body lines many times, until bit reaches the wall. In particular, use the "step" button to advance one line at a time as bit is on the next-to-last square and then the last square, seeing the test return True for all squares but the last.
Position bit a few squares from the end with the steps slider. Step to line 5 and stop. What line comes after line 5?
Step to line 3. What line comes next? It depends on where bit is actually. Run to the end to see both cases.
When the while test is True, bit keeps moving forward, and when False bit stops. We think of this as "True = Go". Later when we're writing code to advance bit through some other situation, we'll use "True = Go" as a mnemonic to think about what test we need.
Using bit.front_clear() as the test and bit.move() in the body moves bit forward until its blocked. That's a common situation, in which case it's easy to simply use the loop from go-green as an idiomatic phrase of code, also known as a "pattern".
while bit.front_clear():
    bit.move()
while bit.front_clear():
    bit.move()
    bit.paint()
while bit.front_clear():
    bit.paint()
    bit.move()
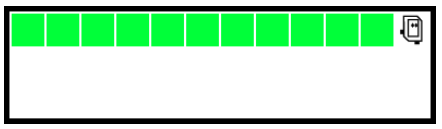
Starter code for this problem does the blue already, add code for the green squares.
For this problem, move bit to the right side of world. Paint every square blue, except the very first and last squares, which are painted green. The starter code paints most of the squares blue. Add code to paint the green squares.

...
    bit.paint('green')  # One paint before the loop
    while bit.front_clear():
        bit.move()
        bit.paint('blue')
...
def green_ends(filename):
    bit = Bit(filename)
    bit.paint('green')  # One paint before the loop
    while bit.front_clear():
        bit.move()
        bit.paint('blue')
    bit.paint('green')  # One paint after the loop
Look at Case-3 and then Case-4. Turn off the "Play on Run" option just for this case, so when you click Run, the world stays at the start, waiting for you to click Step. See how the while test behaves on Case-3 and then Case-4. For Case-4, the while-test is False the very first time! The result is, the loop body lines run zero times. This is fine actually. There were zero squares to move to, so looping zero times is perfect. This is an example of an "edge" case, the smallest possible input. It's nice that the while loop handles this edge case without any extra code.
The Bit system tries to recognize and terminate an infinite loop. Sometimes that does not work, and you have this infinite loop code running in your browser. In that case, often it will be fixed to close any other experimental server tabs, then shift-reload the problem tab. If that does not work, you can restart your browser to fix it.
For a loop to work, each run of the body needs to get closer to being done (i.e. close to being able to the test being False). With these bugs, bit is not making progress and so it never ends.
Here is a buggy Green Ends - instead of move() have bit do right() and the left() - a sort of "waggle dance" like bees do in the hive. Notice that bit waggles but never moves forward. Bit can do this for eternity, and never leave that first square! Everyone has days like that.
    while bit.front_clear():
        bit.right()    # waggle dance!
        bit.left()
        bit.paint('blue')
Run the code - you will see a message about a timeout, suggesting that this code does not seem to reach an end.
move vs. move()Python syntax requires the parenthesis () to make a function call. Unfortunately, if you forget them, which is easy to do, Python does not call the function. So the code below looks right, but actually it's an infinite loop. Bit never moves. Try it yourself and see, then fix it.
    while bit.front_clear():
        bit.move
        bit.paint('blue')
For extra practice, here are some more problems along the lines of All-Blue:
> red2
> go-back
> Bit Loop Section - problems using 1 or more loops
The while-loop is power. If-statement is control, controlling if lines are run or not (for more details see the guide chapter: if/comparisons).
We'll run this simple bit of code first, so you can see what it does. Then we'll look at the bits of code that go into it.
For reference here is the code:
def change_blue(filename):
    bit = Bit(filename)
    while bit.front_clear():
        bit.move()
        if bit.get_color() == 'blue':
            bit.paint('green')
The syntax of the if-statement has four parts.
True or False
:
if test_expression:
    code
    code
    code

The loop gives us the power of running lines many times, and the if-statement gives us control about running the lines once, or skipping them depending on the test.
There are more complex forms of if-statement, and the test is not limited to exactly True/False, and we will get to those refinements later in the quarter.
Aside: you might imagine that that the if-statement is checking the test constantly as the program runs, and if it ever becomes True, runs the body instantly. That's not how it works. The test is only checked when the if-statement line runs. When the computer is off running other lines of the program, the test is not being checked.
Here are the key lines of change-blue. The "if" line has a lot of parts, so we'll look at them in turn.
    ....
    if bit.get_color() == 'blue':
        bit.paint('green')
    ....
bit.get_color()bit.get_color() VisualizationSuppose bit is on a squared painted 'blue', as on the first line below. When bit.get_color() is called in that situation, it returns the color of the current square, e.g. 'blue'. The special value None is returned if the square is blank (as on the last line).

1 + 2          -> 3
7 + 4          -> 11
== Compares Two Values - Boolean6 == 6 -> True 6 == 7 -> False 'red' == 'red' -> True # == used in if/while tests if x == 6: # run in here if x is 6 ...
Putting this all together, we can read the change-blue code word by word to see what it does.
while bit.front_clear():
    bit.move()
    if bit.get_color() == 'blue':
        bit.paint('green')
Q: Usually we start with English and translate into Python. Here we do the reverse — what is the translation of the code in the loop into English?
A: For each moved-to square. If the square is blue, paint it green.
!=!=Translate each if-test into English
if bit.get_color() != 'red':
    # if the square is anything other than 'red'
    # e.g. 'green' or 'blue' or None

if bit.get_color() != None:
    # if the square is anything other than None
    # e.g. 'red', or 'green', or 'blue'
> change2
What if we want to change 2 colors?
'red' -> 'green'
None  -> 'blue'
This demonstrates a loop with 2 if-statements in it.
Most of the time you want the regular if-statement. There is an if/else variant you need sometimes (showing this for completeness):
There are two sets of lines
if test-expression:
    code-a   # run if test True
    code-a
    code-a
else:
    code-b   # run if test False
    code-b
    code-b
Homework: only use "else" where the problem statement specifically mention "else". Mostly just use regular if-statement.
See guide for more if/else details: Python-if
If a square is blue change it to green, otherwise change it to red. Use an if/else structure.
This shows a case where else is appropriate: if the square is green there's one action to take, and otherwise (for any other color), there's a different action to take. We're always doing one of the two actions, just switching between the two.
bit.right_clear()Here bit is facing the right side of the world. So bit's right side is towards the bottom of the world. In this case, bit.right_clear() returns True.

Here the square to bit's right is blocked, so bit.right_clear() returns False.

not
if bit.right_clear():
    # if right is clear

if not bit.right_clear():
    # if right is not clear,
    # aka blocked
On the experimental server, the Bit Puzzles section has many problems where bit is in some situation and needs to move around using Python code. We'll look at the Coyote problems, and there are many more problems for practice.
These problems have a lot of detail in them. Don't try to work it in your head, or just keep hitting the run button in the hopes it will work.
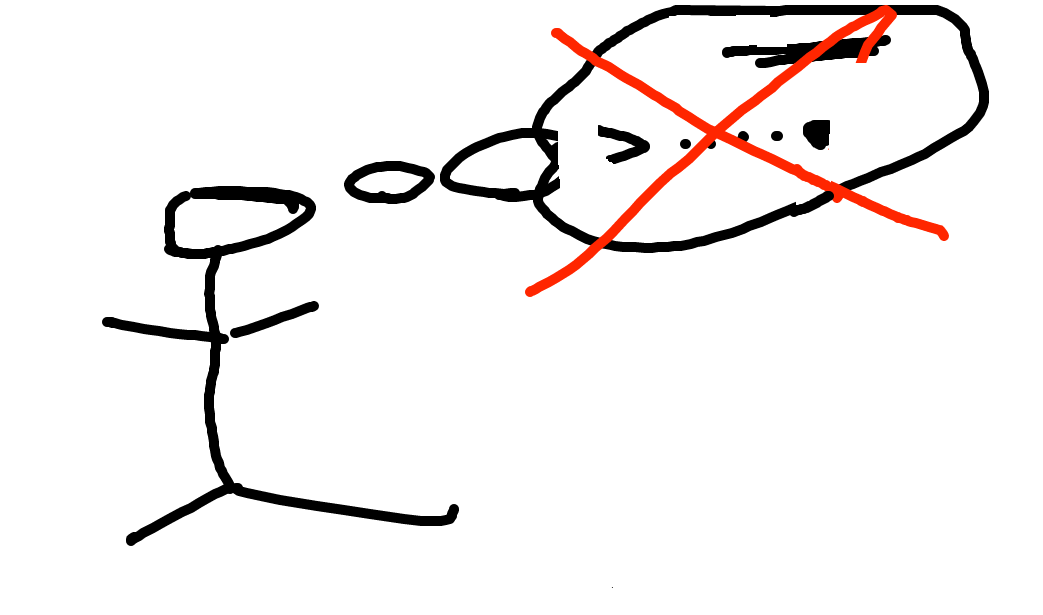
Don't do it just in your head - too much detail. Need to be able to work gradually and carefully.
Draw the start state and what you want. Then use the drawing to see the details, work out the code. The drawings do not need to be fancy, but it's easier to trace through your plan and the details on a sketch than in your head.
If you looked at the desk of a professional programmer, you would likely find little sketches like this scattered about.
We will demonstrate this drawings-process for the problems below.
We'll say Bit is the coyote from the old RoadRunner cartoons. In the cartoons, the coyote is always running off the side of the cliff and hanging in space for a moment.
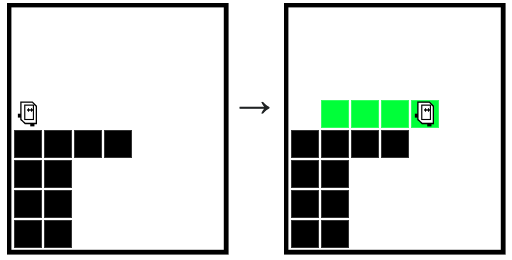
For this problem, we want Bit to run forward until a space appears beneath, painting every moved-to square green.
while ??? :
    bit.move()
Question: What is the while-test to move off the cliff?
Put what the bit state we have and what we want on the drawing. Look at the drawing to think about the code to make the "want" part a reality.
Remember, True = Go, so we want a test that is True when there is a solid square below bit.
Guess: what about bit.right_clear() - put those T/F values on the drawing as something we have. They are the exact opposite of what we want - which is close! How to fix? Add not before the expression to invert T/F
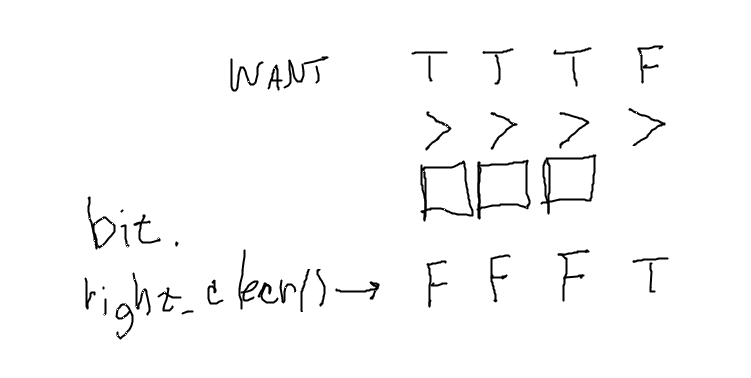
Answer:
while not bit.right_clear():
    bit.move()
The drawing pulls the details together, lets us figure out a tricky line of code.
Look at Coyote2 - it starts with a horizontal leg across, followed by a vertical leg down to the ground.
> coyote2
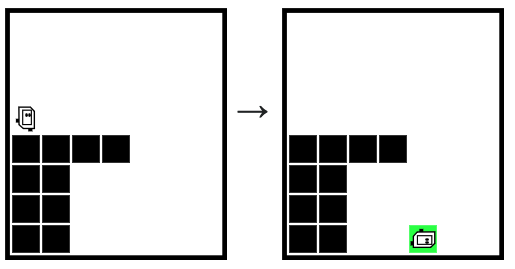
When bit goes along in a line and stops, we'll call that one "leg" of the movement.
This problem has two legs — one horizontal, then one vertical.
The rule for coding these in CS106A is: use one while loop for each leg. So in this case, 2 while loops, one loop after the other. The end point for each leg be encoded by the test at the top of each loop.
Code can fail in so many ways, we have a preference for doing things in the most direct, straightforward way we can think ok. Or put another way, it's the old "keep it simple, stupid" KISS principle. In this case, we want you to use one while loop for each leg, and put the logic about stopping in the while-test. Your homework solutions should also use one-loop-per-leg.

Coyote2 Solution code — one while loop for each linear move. The while-test for the horizontal loop-1 is not bit.right_clear(). The while-test for the vertical loop-2 is the plain bit.front_clear().
def coyote2(filename):
    bit = Bit(filename)
    # Loop 1 - horizontal leg until square has space below
    while not bit.right_clear():
        bit.move()

    # Loop 2 - turn to face down, then vertical leg down
    bit.right()
    while bit.front_clear():
        bit.move()
    bit.paint('green')
A common mistake for these problems goes like this: a while loop is written with an incorrect test, like say bit.front_clear() for loop-1, which will not stop on the right square. Observing that Bit does not stop in the right place, the student will add an if-statement to turn right within the loop, attempting to switch to the vertical leg, e.g. if bit.right_clear(): .... However, this will go awry later, since the code is still inside the original while with the wrong test.
The correct approach focuses on getting each while-test working correctly, so bit stops exactly on the right square. Only then work on code for the next leg. Notice in the solution above how the lines after loop-1 are not indented within loop-1, they are after it. The loop-2 lines can proceed independently, as loop-1 has been left behind.
notThese are all in the "puzzle" section. Reminder: all lecture examples have a Show Solution button if you get stuck.
> climb
> encave (a little harder, like a homework prob)
> blue-dip
This is a more complicated problem. We'll work it out with drawings at every step to keep the details straight. In part we're showing the solution code, but more importantly we're showing the process for working through something this complicated.
Before:
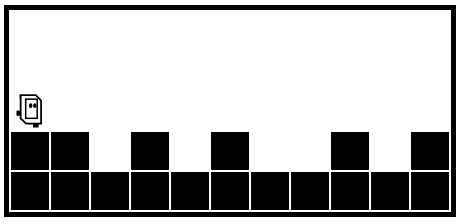
After:
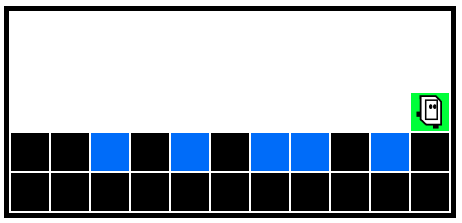
We'll use a while loop to go all the way to the end. That's easy. Then put an if-statement inside to detect and handle each dip.
def blue_dip(filename):
    bit = Bit(filename)
    while bit.front_clear():
        bit.move()
        # If dip - handle Dip here
Say we have the code to go the right side. The difficulty is detecting each dip - we want an if-statement with a test that is true when we are over the dip.
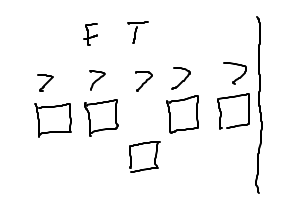
A: Test is bit.right_clear()
if bit.right_clear():
    # handle dip in here
Figure out the code to go into the dip square and paint it blue. On the drawing, put what we have, work out the steps towards what we want.
Aside: Can't just tell the computer what you want the result to look like! You have this dumb robot and you need to spell out the needed steps.
Make a drawing to work out the steps. Key lesson of this example!
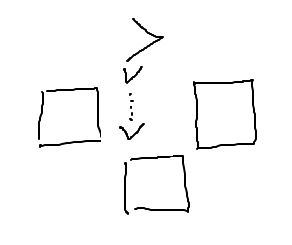
Steps to move into dip: turn right, move, then paint blue. aka:
bit.right()
bit.move()
bit.paint('blue')
There's a bunch of detail here - bit's location, direction, blocks all around. We are using the drawing to keep those details clear, and work out the code steps with the drawing, vs. trying to do it in your head. We use the drawing to work out the code. This is the way to solve these problems. If you come to office hours with some broken bit situation, we will typically as you to make a drawing just as a first step - it's how we get these things working.
If you go to the desk of a professional programmer, you would not be surprised to see little sketches on scraps of paper, working out the details of some problem.
What's the opposite of this strategy? Clicking the Run button, being annoyed that it's not working. Changing the code at random here and there in the hopes that this fixes it. This is not the way!
We need to go back up to the previous square so the while-loop can continue. Use the drawing to work out the code to go up one.
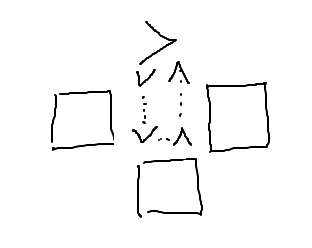
We are in the dip, facing down. Steps to get back up: turn left twice, then move (or could turn right twice and move, either way, we are doing a 180)
bit.left()
bit.left()
bit.move()
def blue_dip(filename):
    bit = Bit(filename)
    while bit.front_clear():
        bit.move()
        # Clear square below
        if bit.right_clear():
            bit.right()  # Down and paint
            bit.move()
            bit.paint('blue')
            bit.left()   # Move back up
            bit.left()
            bit.move()
Try running this form
> blue-dip
The above is pretty close but it has one problem which you may have spotted earlier, and in any case it does not work right when run. Look at how we move bit back up again:
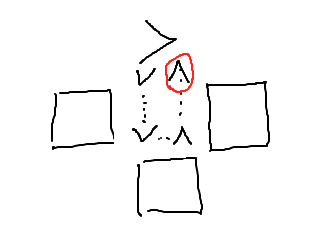
Bug: The while loop assumes bit is facing the right side of the world and just moves bit forward. Our move-up code leaves bit on the correct square, but facing up which is the wrong way. Bit should be facing the right side of the world. Think of it this way - before we went down into the dip, bit was facing the right side of the world. Coming out of the dip, we need to set bit back the way things were, and then the while loop can continue as it did before. This is a slightly subtle bug, and nobody should feel bad for an instant for writing it this way. The normal path is to have a few bugs, run the code, and then fix the bugs.
bit.right()We need a final bit.right() to face the right side of the world. There's also a final paint after the loop to paint the last square green (not indented).
def blue_dip(filename):
    bit = Bit(filename)
    while bit.front_clear():
        bit.move()
        # Clear square below
        if bit.right_clear():
            bit.right()  # Down and paint
            bit.move()
            bit.paint('blue')
            # Move back up, face right
            bit.left()
            bit.left()
            bit.move()
            bit.right()
    # Paint last square green
    bit.paint('green')
The point is not to write your code perfectly before it runs. The point is that you can't just keep clicking the Run button when things don't work. A drawing helps provide a path through the details, building and debugging the code step by step. Even very experienced programmers make little drawings like this to work out their ideas.