Software Development Process
We started by drawing up a rough state diagram representation of what the robot should do, along with sketches of expected behavior (drive paths, tape sensor alignment). We agreed on these plans as a team before starting any software development work; this allowed us to keep our overall framework for the whole duration of the project.
We then used Github for version control and collaboration between team members. While we actively used only a small subset of the Github features, it was very helpful to have a commented history of commits along with diffs of the different versions, which allowed picking up a team mate's changes very quickly.
We then used Github for version control and collaboration between team members. While we actively used only a small subset of the Github features, it was very helpful to have a commented history of commits along with diffs of the different versions, which allowed picking up a team mate's changes very quickly.
Control Software Design
All commits of our code are available here: Team && 0x01 Repository.
We started with a complete skeleton code structure that provisioned for all parts of our envisioned state machine and kept modular code hidden, using lots of wrapper functions: this allowed getting a good idea of the final code and modular requirements before we knew specifics about our design: we started with stubs for the sonar sensor module, the bumpers module, the IR/tape sensor module, the motor module, and the servo module. As we progressed with our mechanical and electronic design, we fleshed out the stubs with real code.
We started out separating events and actions in our state machine (using a setState() function that contained actions to be performed when a certain state should be set); while in theory elegant, this ended up cluttering our code a little.
Using modular files in Arduino turned out to be much harder than expected (TL/DR: Arduino preprocesses all code before passing on to gcc, adding its own header files etc. This doesn't always work as expected). After much trouble shooting, here is what worked for us:
#define H_MOTORS
/* Your declarations here */
#endif
We started with a complete skeleton code structure that provisioned for all parts of our envisioned state machine and kept modular code hidden, using lots of wrapper functions: this allowed getting a good idea of the final code and modular requirements before we knew specifics about our design: we started with stubs for the sonar sensor module, the bumpers module, the IR/tape sensor module, the motor module, and the servo module. As we progressed with our mechanical and electronic design, we fleshed out the stubs with real code.
We started out separating events and actions in our state machine (using a setState() function that contained actions to be performed when a certain state should be set); while in theory elegant, this ended up cluttering our code a little.
Using modular files in Arduino turned out to be much harder than expected (TL/DR: Arduino preprocesses all code before passing on to gcc, adding its own header files etc. This doesn't always work as expected). After much trouble shooting, here is what worked for us:
- modular files are named module.cpp (*.cpp ending be the important part. Even if your main file is c, modules must be named *.cpp!). Modular files can contain private and public methods (functions); the "static" keyword in module files allows creating module-global variables that are not visible outside the scope of the module file
- modular header files are named module.h. They expose all public declarations of functions and compiler constants. If the module uses Arduino functions, its header file should #include <Arduino.h>.
- The modular file module.cpp includes the header file: #include "module.h". The header file uses a compiler directive to be included only once:
#define H_MOTORS
/* Your declarations here */
#endif
- The main file (main.ino) includes only the header file: #include "module.h"
State Machine
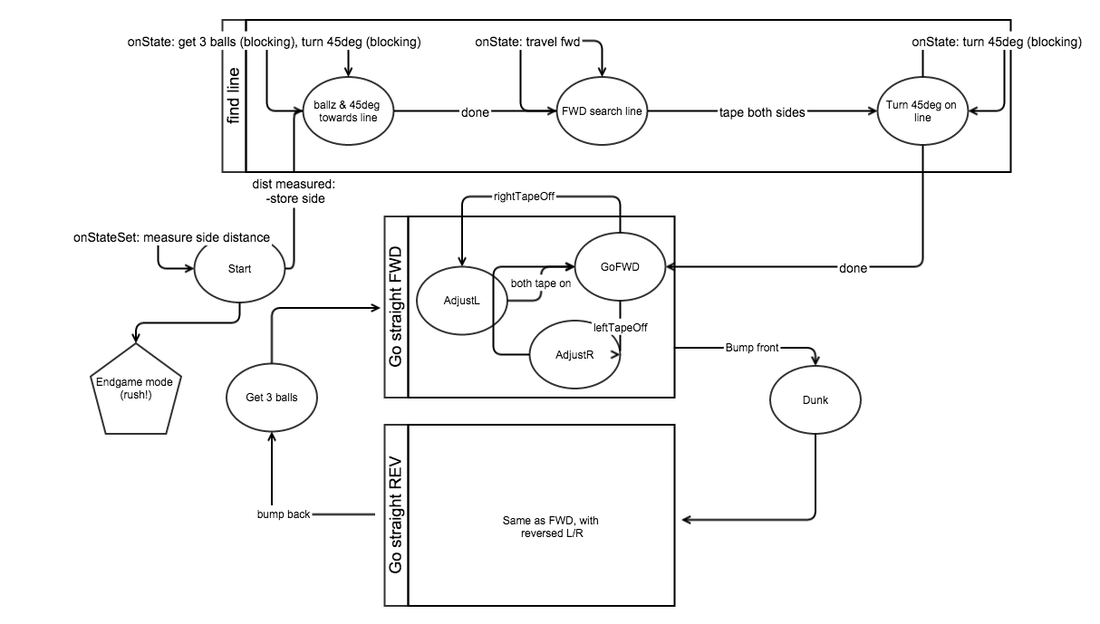
We started with a fairly generic state machine that we simplified and stripped down as we went along, realizing that some states were redundant (or, in the case of line following, that we wanted to have immediate responses that were only slowed down by state changes).
Our initial state machine is represented in the following diagram (onState is a pseudo-event that is triggered every time a state is set):
Our initial state machine is represented in the following diagram (onState is a pseudo-event that is triggered every time a state is set):
Our final state machine was simpler, shown in the following diagram:
