Today: color-logic examples
>
Logic-Color Examples
Grayscale (recall)
- Grayscale
- Color is gray when red == green == blue
- e.g. 220 220 220
- e.g. 50 50 50
- e.g. 0 0 0
- Try it in rgb-explorer
(a) Convert Color To Grayscale
- Many techniques, we'll use the "average" technique
- Have pixel 50/100/150 - how to make gray?
- Compute average of red/green/blue values for a pixel
- Set red/green/blue to that number
- e.g. pixel 50/100/150
average of these is 100
set red/green/blue all to 100 - medium gray!
- e.g. pixel 25/50/75
average is 50, set all to 50
this pixel is dark gray
- Grayscale captures the light/dark of pixel, but without hue
# Convert pixel from color to grayscale
# - parenthesis required here
# - using int div //, regular / works too (float)
average = (pixel.red + pixel.green + pixel.blue) // 3
pixel.red = average
pixel.green = average
pixel.blue = average
Color If Logic
- Say we have this stop sign
- Detect areas of an image based on color, e.g. red
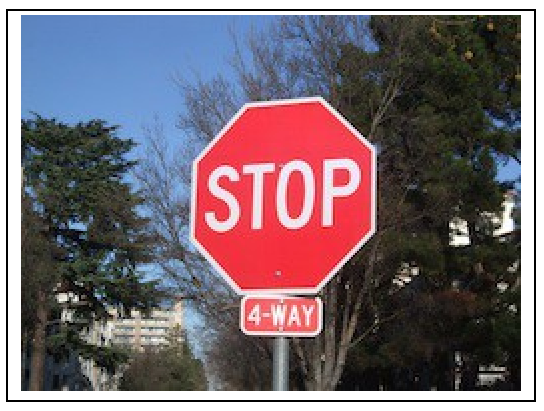
b. Red Detect red > 100
- First try using red value with >=
- Color detection - think about the "hurdle" in the if-test
- e.g.
if pixel.red > 100:
- Starts with hurdle value of 100
- Adjust value to get best results
- Q: To make this more selective, make 100 bigger or smaller?
- A: bigger. Later with < need to think for a second to get the direction correct
- Does not work that great:
Bright areas and red areas both have big red numbers
- redish pixel: 220, 50, 50
- white pixel: 220, 220, 220
- Best can do here is maybe hurdle of 160
c. Red Detect - Average
- Improvement: compare red value to average of red/green/blue values
- "redish pixel"
the red value is above the average of this pixel
- "blueish pixel"
the blue value is above the average of this pxiel
red >= average * 1.0
- Adjust the 1.0 "hurdle" factor by eye - 1.2 looks good
- The average technique works great to select the red stop sign pixels
- Experiment: for detected pixels, reduce only red and green, leaving blue unchanged
result is blue stop sign
- Experiment: for detected pixels, swap red and green values
d. Curb Repair 1
- Detect the red curb - adjust factor
- Set it to flat gray
- Does not look great
- How to make this look good?
e. Curb Repair 2
- Change the detected curb pixels to grayscale - looks great!
- Use the average value instead of the fixed 180 value - !!!
- Meaning of this code
Drain the color, but keep the brightness
Bluescreen
- Demo Google search: blue screen movie image
- Also known as Chroma Key (wikipedia)
- Video is just a series of still images, 20-60 per second
- Have image with special color
- Have back background image
- 1. Detect colored area in an image, e.g. the blue area
- 2. Replace colored pixels with pixels from back image
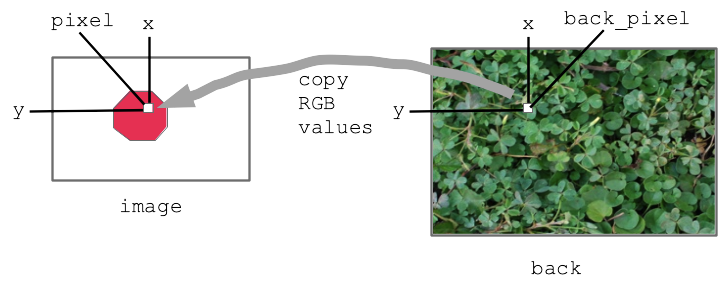
Bluescreen Algorithm Outline
- Two images we'll call image and back
- Detect, say, red pixels in image
- For each red pixel (make a drawing)
Consider the pixel at the same x,y in back image
Copy that pixel from back to image
i.e. copy RGB numbers from back pixel to image pixel
- Result: for red areas, copy over areas from back image
- Adjacent pixels in back are still adjacent in new image, so it looks right
Here is the output we are going for with this bluescreen algorithm:
Before:
After:
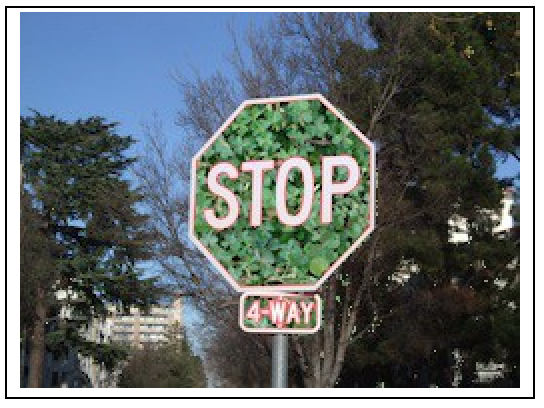
Diagram:
Bluescreen Stop Sign
>
Bluescreen Stop Sign
Solution code
def stop_leaves(front_filename, back_filename):
    """Implement stop_leaves as above."""
    image = SimpleImage(front_filename)
    back = SimpleImage(back_filename)
    for y in range(image.height):
        for x in range(image.width):
            pixel = image.get_pixel(x, y)
            average = (pixel.red + pixel.green + pixel.blue) // 3
            if pixel.red >= average * 1.6:
                # the key line:
                back_pixel = back.get_pixel(pixel.x, pixel.y)
                pixel.red = back_pixel.red
                pixel.green = back_pixel.green
                pixel.blue = back_pixel.blue
    return image
Bluescreen Monkey
If Sufficient time, in-class exercise/demo. Observe: the bluescreen algorithm depends on the colors
in the main image. BUT it does not depend on the colors of the back image - the back image can have any colors it in. Try the different background-cases for the monkey.
>
Bluescreen Monkey