Type "255 255 0" at this thing
turns red/green on blue off
Image Code - Pixels, Coordinates, RGB
Image is made of pixels
Pixels are in a x,y coordinate scheme
Origin (0, 0) at the upper left
Origin at the upper left is very common on computers
x = 0 is the left column, growing to right
y = 0 is the top row, growing down
Each pixel:
Small
Square
Shows one color
Color is encoded as 3 RGB numbers
Image with 1 million pixels = 3 million numbers
Each pixel has its 3 RGB numbers
# Load an image from the filesystem
# into RAM in variable named "image".
# Now the image can be manipulated by code.

image = SimpleImage('flowers.jpg')
Best Loop Form: for
There are many loop forms
#2 most useful loop: while
#1 most useful loop: for
for x in collection:
    # use x in here
    x.do_something()
Loop over any collection of things
Runs the loop body once for each thing
Called "foreach" in many computer languages
The variable name, e.g. x, can be any name the programmer chooses
def red_channel(filename):
"""
Creates an image for the given filename.
Changes the image as follows:
For every pixel, set green and blue values to 0
yielding the red channel.
Return the changed image.
"""
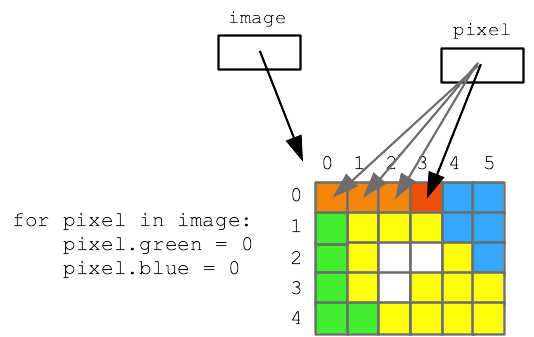
for pixel in image:
pixel.green = 0
pixel.blue = 0
return image
Filename is like 'flowers.jpg'
image = SimpleImage(filename) loads image data into memory
image is a variable, points to image data
for pixel in image: Loop runs lines once for each pixel in image
pixel variable points to each pixel in turn
return image return xxx returns a value back to our caller
Parameter = information from caller in to called function
Return = information sent back from called function to caller
Q: how many times does first line run? How many times do the lines in the loop?
A: once, once for each pixel
Demo red_channel()
Experiment: green channel, make every pixel black
See how for loop runs over the image
See how pixel.red accesses red/green/blue numbers
Side trip about math
Minimal Math
Math expressions
1 + 2 * 3 Returns 7
Or suppose I have a variable red with a value 0..255
red * 2
Operators: + - * /
Precedence holds: * / evaluated before + -
Talk about math in detail soon
Update Variable: x = x + 1
Update the value of a variable
Variable is on both left and right of =
This changes the variable in a relative way
Code rule:
1. first "evaluate" right side expression, after the =
2. assign that value back into the variable
x = 6
x = x + 1
# what is x now?
image1-b. Make Image Darker
Relative change of red/green/blue on each pixel
Try making even smaller, image get darker
See below about "shorthand", re-write with *=
    for pixel in image:
        pixel.red = pixel.red / 2
        pixel.green = pixel.green / 2
        pixel.blue = pixel.blue / 2
        # or shorthand form:
        # pixel.red /= 2
Relative Variable Shorthand: += -= *=
Shorthand way to write x = x + 1
x += 1
Shorthand for x = x * 2
x *= 2 # double x
Works for all operators, such as += -= *=
Handy because relative math on a var is so common
This just make the code more compact, not changing the underlying math
>>> x = 10
>>> x += 3
>>> x
13
>>> x *= 2
>>> x
26
Loop over image, write code to change pixels - "foreach" loop
a. recover hidden image
b. 5-10-20 puzzle
5-10-20 puzzle: red, green, and blue values are too small by a factor of 5 10 20. But we do not know which factor goes with which color. Figure it out by experimenting with code to modify the image with various factors.
Strategy Note: Detail Oriented
"Detail Oriented" - frequently seen on the resume!
Mostly your brain is not paying much attention and that's fine
Problem (c) below
Your really need to slow down and work the details
Do not do it in your head
Make a diagram to plot how the details fit together
Then write the key line
Image Coordinate System
Previously loaded image into memory like this. Now look at the x/y coordinate scheme of the pixels.
image = SimpleImage(filename)
image.width, image.height - int number of pixels
e.g. image.width is 200, image.height is 100
(like pixel.red - these are Python "properties")
Origin x=0 y=0 is at upper left
x grows right
y grows down
This coordinate scheme is like typesetting lines of text
Say width is 100, what is range of x values?
0..99 inclusive (max x is 1 less than width)
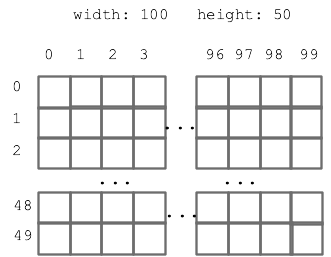
width 100, height 50 drawing, (x, y) pixels:
(0, 0) pixel at upper left
(99,0) at upper right
(99, 49) at lower right
These x,y values are all fundamentally int There's no pixel at x=2.5
Using a float value to address an x,y will fail with an error
image.get_pixel(x, y)
An image function that accesses one pixel
image.get_pixel(x, y)
Returns a reference to the pixel at x,y
Store reference in a variable, use .red .green on it
Typically we use "pixel" as the variable name for this
# Sets the .red of the origin pixel at x=10 y=20 to 0
pixel = image.get_pixel(10, 20)
pixel.red = 0
for x in range(10):
Today: want to write a loop where x = 0, 1, 2, 3, ....
1-parameter range(n) function
range(10) represents the series:
0, 1, 2, ... 8, 9
Start at 0, go up to but not including the n parameter
a. and b. are examples, c. is a key example, d. is for next time
Previously we used foreach to access every pixel. Here
we'll use nested-range loops - another form of iteration.
Understanding nested loops is step up in programming power.
Generating all x,y numbers for an image
Say image width is 100, height is 50
x range: for x in range(image.width): 0, 1, 2, .. 99
y range: for y in range(image.height): 0, 1, 2, .. 49
Used nested loops to make all x,y combinations
Nested Loops
Nested loops are a little more advanced
Each run the loop body is called an "iteration" of the loop
What happens if we place a loop inside another?
An "outer" loop
An "inner" loop
a. Darker nested-loop Example
Nested loop code:
    image = SimpleImage(filename)
    for y in range(image.height):
        for x in range(image.width):
            pixel = image.get_pixel(x, y)
            # use pixel.red here
Use nested y/x loops to hit every pixel in an image
Nested loop sequence:
1. Outer loop does first iteration, e.g. y = 0
2. Inner loop does all its iterations, x = 0, 1, 2, 3 ...
This gives us all y=0 coords: (0, 0), (1, 0), (2, 0), .. (99, 0)
3. Outer loop does second iteration, y = 1
4. Inner loop does all iterations again: x = 0, 1, 2, 3 ...
This gives us all y=1 coords: (0, 1), (1, 1), (2, 1), .. (99, 1)
The effect is going through the rows top to bottom. Each row going left to right - like reading English text
Demo: add in inner loop: print('x:', x, 'y:', y) See a line printed for each pixel, showing the whole x,y sequence
Only do this with small images like we have here
Otherwise it's too much output
Demo: try making x too limited, range(image.width - 20)
Demo: what if we swap the roles of the y/x loops?
It works fine, just a different order of the pixels
Goes through the columns left-right. For each column, top to bottom
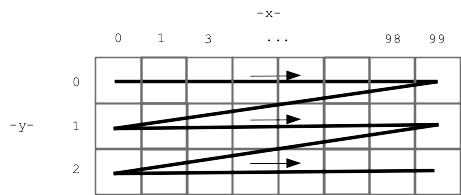
Here is a picture, showing the order the nested y/x loops go through all the pixels - all of the top y=0 row, then the next y=1 row, and so on.
Note: How to Make 2 Pixels Look The Same?
Suppose variables a and b refer to two pixels in an image
Make pixel b look the same as a .. how?
Pixels look the same if they have the same RGB numbers
Make b look the same as a with three =
b.red = a.red
b.green = a.green
b.blue = a.blue
The following approach looks reasonable but does not work - changes the variable b to point to the same pixel as a
b = a
b. mirror1
This problem will have two images in it
Can call get_pixel() to obtain pixels in both
Create a blank "out" image, twice as wide as original image:
out = SimpleImage.blank(image.width * 2, image.height)
This problem:
1. Create "out" twice as wide as original
2. Copy original image to left half
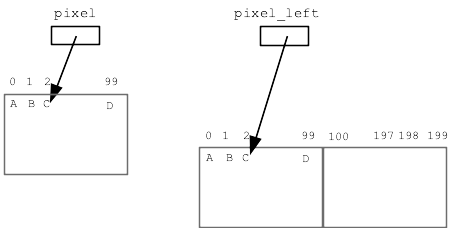
Look at the get_pixel() calls
"pixel" is in original image
"pixel_left" is in out image (left half)
def mirror1(filename):
    """
    Code is provided - this is an example.
    Read the original image at the given filename.
    Create a new 'out' image twice as wide as the original.
    Copy the original image to the left half of out, leaving
    the right half blank (this is a halfway-point to the image2).
    """
    image = SimpleImage(filename)
    # SimpleImage.blank(width, height) - returns a new
    # image with size given in its 2 parameters.
    # Here, create out image with width * 2 or first image:
    out = SimpleImage.blank(image.width * 2, image.height)
    for y in range(image.height):
        for x in range(image.width):
            pixel = image.get_pixel(x, y)
            # left copy
            pixel_left = out.get_pixel(x, y)
            pixel_left.red = pixel.red
            pixel_left.green = pixel.green
            pixel_left.blue = pixel.blue
            # right copy
            # nothing!
    return out
c. mirror2
mirror2 Pydoc: Like mirror1, but also copy the original image
to the right half of "out", but as a horizontally reversed
mirror image. So the left half is a regular copy,
and the right half is a mirror image.
(Starter code does the left half).
This is the key exercise for today
Same as (b) + place left-right swapped mirror image on right half
A complex problem with coordinates, make a drawing
Choose concrete numbers to work out an example
e.g. say original width = 100
Make diagram, say 4 ABCD "source" points
Variable names - fit the narrative
pixel - in source image, at x,y
pixel_left - left side of out
pixel_right - right side of out
Key question"
For each x in the original image, which is the x for pixel_right in the out image?
What is the pixel_right x,y for each?
A: (0, 0)
B: (1, 0)
C: (2, 0)
D: (99, 0)
Figure out the formula to compute out pixel_right x,y from source x,y
(Demo: go through points, figure out formula)
(Demo: put in wrong formula, see bad x,y error message)
Strategy: concrete numbers + drawing .. work out code details
Diff slider draws yellow bars where the output seems wrong to the system
ABCD Table Solution
A: (0, 0) out: (199, 0)
B: (1, 0) out: (198, 0)
C: (2, 0) out: (197, 0)
D: (99, 0) out: (100, 0)
Looking at above, work out that formula is
out_x = out.width - 1 - x
mirror2 Solution Code
def mirror2(filename):
    """
    Like mirror1, but also copy the original image
    to the right half of "out", but as a horizontally reversed
    mirror image. So the left half is a regular copy,
    and the right half is a mirror image.
    (Starter code does the left half).
    """
    image = SimpleImage(filename)
    out = SimpleImage.blank(image.width * 2, image.height)
    for y in range(image.height):
        for x in range(image.width):
            pixel = image.get_pixel(x, y)
            # left copy
            pixel_left = out.get_pixel(x, y)
            pixel_left.red = pixel.red
            pixel_left.green = pixel.green
            pixel_left.blue = pixel.blue
            # right copy
            # this is the key spot
            # have: pixel at x,y in image
            # want: pixel_right at ??? to write to
            pixel_right = out.get_pixel(out.width - 1 - x, y)
            pixel_right.red = pixel.red
            pixel_right.green = pixel.green
            pixel_right.blue = pixel.blue
    return out
Aside: Parameter Passing Example
We've talked about parameters - "passing information in" to a function call
Old simple example - pass in 'blue' as the parameter to a call of paint() function
e.g. bit.paint('blue')
Now we have a complicated example:
out.get_pixel(out.width - 1 - x, y)
def get_pixel(x, y): ... - function has "x" and "y" parameters
Look at the call: out.get_pixel(out.width - 1 - x, y) For function call, parameters match up by position / commas
x parameter gets value of out.width - 1 - x y parameter gets value of y
d. shrink
shrink(filename): Create a new "out" image half the width and height
of the original.
Set pixels at x=0 1 2 3 in out, from x=0 2 4 6 in original,
and likewise in the y direction.
In effect this shrinks the image by 2x in both dimensions.
Loop over out vs. original
Up to now, the nested loops hit every pixel in the original image. For this problem, looping over the original doesn't work cleanly, since the out image will only include 25% of the original pixels - looping over the original pixels would need to disregard 75% of the pixels as we go.
Solution: loop over the x,y of the "out" pixels instead. For each out x,y, compute the corresponding "in" x,y to read from in the original image.
Make out image half the width/height of the original image
Loop over x,y of the out image
For out pixel at x= 0 1 2 3 4...
Q: what is the "in_x" source pixel for each out x?
Source at in_x= 0 2 4 6 8 ...
Here is the nearly complete code - complete the code for x_in and y_in as a function of x y
def shrink(filename):
    """
    Create a new "out" image half the width and height
    of the original.
    Set pixels at x=0 1 2 3 in out, from x=0 2 4 6 in original,
    and likewise in the y direction.
    """
    image = SimpleImage(filename)
    out = SimpleImage.blank(image.width // 2, image.height // 2)
    # Here looping x,y over out, not original
    for y in range(out.height):
        for x in range(out.width):
            pixel_out = out.get_pixel(x, y)
            # your code here - compute x_in y_in used below
            x_in = None
            y_in = None

            # Copy from in to out
            pixel_in = image.get_pixel(x_in, y_in)
            pixel_out.red = pixel_in.red
            pixel_out.green = pixel_in.green
            pixel_out.blue = pixel_in.blue
    return out