Today: image co-ordinates, range, nested range, make drawing to figure out co-ords
Previously loaded image into memory like this. Now look at the x/y coordinate scheme of the pixels.
image = SimpleImage(filename)
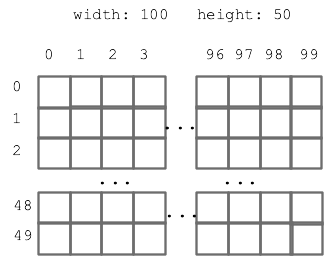
image.get_pixel(x, y)# For the pixel at x=4 y=2 in "image", # set its red value to 0 pixel = image.get_pixel(4, 2) pixel.red = 0
Step 1: range() function
Here is a version of the previous darker algorithm, but written using nested range()
def darker(filename):
    """
    Darker-image algorithm, modifying
    and returning the original image.
    This version uses nested range loops.
    Demo - this code is complete.
    """
    image = SimpleImage(filename)
    for y in range(image.height):
        for x in range(image.width):
            pixel = image.get_pixel(x, y)
            pixel.red *= 0.5
            pixel.green *= 0.5
            pixel.blue *= 0.5
    return image
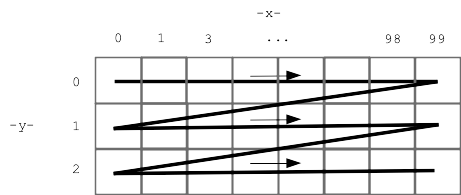
Here is a picture, showing the order the nested y/x loops go through all the pixels - all of the top y=0 row, then the next y=1 row, and so on.
Good news: this is our first nested loop. We'll do more later. It happens that the y/x nested loop for an image is idiomatic - it's the same every time, so you can just kind of use it while you get used to it.
b.red = a.red
b.green = a.green
b.blue = a.blue
![]()
The following approach looks reasonable but does not work - changes the variable b to point to the same pixel as a
b = a
Thus far the coded has changed the original image. Now we'll create a new "out" image and write changes to that.
image = SimpleImage(filename)

# 1. create a 100 x 50 iamge
out = SimpleImage.blank(100, 50)

# 2. More realistic, create out image same size
# as original
out = SimpleImage.blank(image.width, image.height)
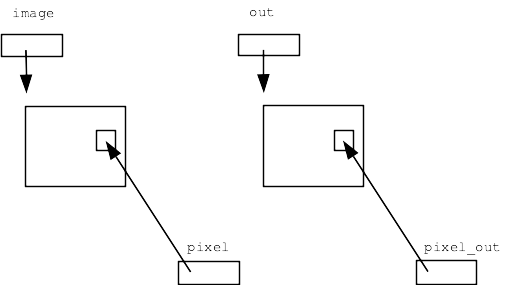
In the code below, we have two images "image" and "out" - can get a pixel in either one
# pixel (10, ) in original image
a = image.get_pixel(10, 0)

# pixel (10, 0) in out image
b = out.get_pixel(10, 0)
Establish the basics on this one, do something interesting on the next one.
Darker algorithm, but creating a separate out image.
def darker(filename):
    """
    Darker-image algorithm, but create a new
    "out" image the same size as the original.
    Copy dark pixels to out and return it.
    Demo - this code is complete.
    """
    image = SimpleImage(filename)
    # Create out image, same size as original
    out =  SimpleImage.blank(image.width, image.height)
    for y in range(image.height):
        for x in range(image.width):
            pixel = image.get_pixel(x, y)
            pixel_out = out.get_pixel(x, y)
            pixel_out.red = pixel.red * 0.5
            pixel_out.green = pixel.green * 0.5
            pixel_out.blue = pixel.blue * 0.5
    return out
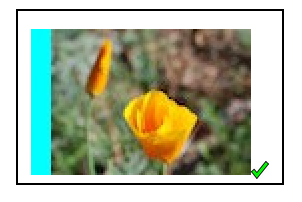
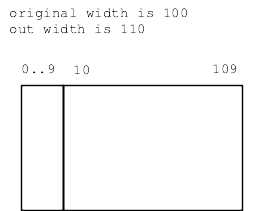
For the Aqua Stripe problem, produce an image with a 10 pixel wide aqua stripe on the left, with a copy of the original image next to it, like this:
Drawing to think about coordinates...
See solution below
How to copy the data from the original to the right side of the output? Need to think about the x,y values, which are not the same in the two images.

For x,y in original, what is the corresponding x,y in out?
Make a little chart (here "x" means in the original image)
pt   x     x_out
A    0     10
B    99    109

What's the pattern?
x_out = x + 10
Now we can write the key get_pixel() line below, to figure pixel_out for each original pixel.
def aqua_stripe(filename):
    """
    Create an out image 10 pixels wider than the original.
    (1) Set an aqua colored vertical stripe 10 pixels wide
    at the left by setting red to 0.
    (2) Copy the original image just to the right
    of the aqua stripe. Return the computed out image.
    """
    image = SimpleImage(filename)
    # Create out image, 10 pixels wider than original
    out = SimpleImage.blank(image.width + 10, image.height)
    # Create the 10-pixel aqua stripe
    for y in range(image.height):
        for x in range(10):
            pixel_out = out.get_pixel(x, y)
            pixel_out.red = 0
    # Copy the original over - make drawing to guide code here
    for y in range(image.height):
        for x in range(image.width):
            pixel = image.get_pixel(x, y)
            pixel_out = out.get_pixel(x + 10, y)  # the key line
            pixel_out.red = pixel.red
            pixel_out.green = pixel.green
            pixel_out.blue = pixel.blue
    return out
Experiments: try +11 instead of +10 - get bad-coord exception, Try +9, and image shifted slightly to left, can try the diff-stripes slider.
It's hard to write that get_pixel() line just doing it in your head. We make a drawing to get the details exactly right.
Notice that our drawing was not general - just picking width = 100 as a concrete example. A single concrete example was good enough to get our thoughts organized, and then the formula worked out actually was general.
A common form of error in these complex indexing algorithms is being "off by one", like using x = 100 when x = 99 is correct. You'll make those errors sometimes, but with a drawing, you can try to do it perfectly the first time.