
Today: advanced 2-d image algorithms (drawing), int/float math, function call exercise, start PyCharm, command line
Recall: last time, 2-d image algorithms - make a drawing to figure out the co-ords
Today: a more difficult 2-d algorithm
> Mirror1
def mirror1(filename):
    """
    Code is provided - this is an example.
    Read the original image at the given filename.
    Create a new 'out' image twice as wide as the original.
    Copy the original image to the left half of out, leaving
    the right half blank (this is a halfway-point to the image2).
    """
    image = SimpleImage(filename)
    # SimpleImage.blank(width, height) - returns a new
    # image with size given in its 2 parameters.
    # Here, create out image with width * 2 or first image:
    out = SimpleImage.blank(image.width * 2, image.height)
    for y in range(image.height):
        for x in range(image.width):
            pixel = image.get_pixel(x, y)
            # left copy
            pixel_left = out.get_pixel(x, y)
            pixel_left.red = pixel.red
            pixel_left.green = pixel.green
            pixel_left.blue = pixel.blue
            # right copy
            # nothing!
    return out
> Mirror2
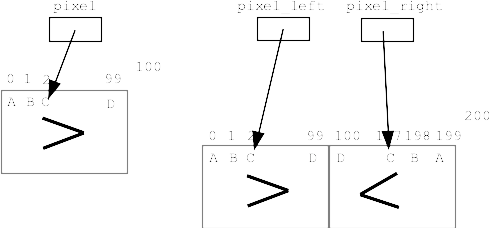
This a favorite example. The algorithm pushes you to nail down tricky details with a drawing, and the output is just neat.
Mirror2: Like mirror1, but also copy the original image to the right half of "out", but as a horizontally reversed mirror image. So the left half is a regular copy, and the right half is a mirror image. (Starter code does the left half).
I think a reasonable reaction to reading that problem statement is: uh, what? How the heck is that going to work? But there are steps for you to do: make a drawing of the image coordinates with concrete numbers, work out what the x,y coordinates are for input and output pixels. We'll go though the whole sequence right now.
Here are 4 points in the original:
A: (0, 0)
B: (1, 0)
C: (2, 0)
D: (99, 0)

Sketch out where these points should land in the output.
What is x value for pixel_right for each of these?
def mirror2(filename):
    """
    Like mirror1, but also copy the original image
    to the right half of "out", but as a horizontally reversed
    mirror image. So the left half is a regular copy,
    and the right half is a mirror image.
    (Starter code does the left half).
    """
    image = SimpleImage(filename)
    out = SimpleImage.blank(image.width * 2, image.height)
    for y in range(image.height):
        for x in range(image.width):
            pixel = image.get_pixel(x, y)
            # left copy
            pixel_left = out.get_pixel(x, y)
            pixel_left.red = pixel.red
            pixel_left.green = pixel.green
            pixel_left.blue = pixel.blue
            # right copy
            # this is the key spot
            # have: pixel at x,y in image
            # want: pixel_right at ??? to write to
            pixel_right = out.get_pixel(out.width - 1 - x, y)
            pixel_right.red = pixel.red
            pixel_right.green = pixel.green
            pixel_right.blue = pixel.blue
    return out
Remove the "- 1" from formula above, so out_x value is one too big. A very common form of Off By One error. What happens when we run it?
An exception is an error cause by a line of code that halts the program at that point. The exception will have a message describing the low-level error, like a bad coordinate, and it will give a line number.
Just with those two facts - look at your code. Why is the code doing that? Sometimes just being pointed at the right line is enough for you to spot the bug.
You would think computer code has a lot to do with numbers, and here we are.
See in Python reference: Python Math
Python has support for two types of number - "int" and "float".
>>> 1.5 + 1.5
3.0
>>>
>>> 1.0 + 2.0
3.0
>>>
>>> 2 + 3
5
>>> 2 + 3 * 4   # Precedence
14
>>> 2 * (1 + 2) # Use parenthesis
6
>>> 10 ** 2     # 10 Squared
100
>>> 2 ** 100    # Grains of sand in universe
1267650600228229401496703205376
>>>
>>>
>>> 1 + 2 + 3
6
>>> 1 + 2.0 + 3  # Makes result float
6.0
>>> 7 / 2
3.5
>>> 8 / 2
4.0
>>> 7 // 2
3
>>> 8 // 2
4
>>> 102 // 4
25
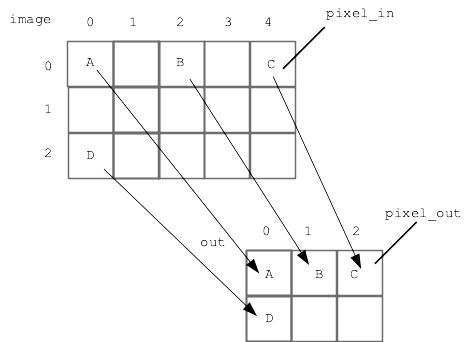
> Shrink
shrink(filename, n): Create a new "out" copy of image with width and height int-divided by n. So for example, if n = 2, out is half sized. For n=2, set pixels at x=0 1 2 3 in out, from x=0 2 4 6 in original, and likewise in the y direction.
To make an image 1/n as wide, compute new width with // int division
out_width = image.width // n
Up to now, the nested loops hit every pixel in the original image. For this problem, looping over the original doesn't work cleanly, since the out image will only include 25% of the original pixels - looping over the original pixels would need to disregard 75% of the pixels as we go.
Solution: loop over the x,y of the "out" pixels instead. For each out x,y, compute the corresponding "in" x,y to read from in the original image. For this example x,y in the loop are for the out image, unlike previous examples.
Here is the nearly complete code - complete the line to compute pixel_in variable (solution below)
def shrink(filename, n):
    """
    Create a new "out" copy of image with width and height
    int-divided by n. N will be 1 or more.
    So for example, if n = 2, out is half sized.
    For n=2, set pixels at x=0 1 2 3 in out, from x=0 2 4 6
    in original, and likewise in the y direction.
    """
    image = SimpleImage(filename)
    out = SimpleImage.blank(image.width // n, image.height // n)
    # Here looping x,y over out, not original
    for y in range(out.height):
        for x in range(out.width):
            pixel_out = out.get_pixel(x, y)

            # your code here - compute pixel_in based on x,y
            # pixel_in = image.get_pixel( ??? )

            pixel_out.red = pixel_in.red
            pixel_out.green = pixel_in.green
            pixel_out.blue = pixel_in.blue
    return out
Solution:
pixel_in = image.get_pixel(x * n, y * n)
We're going to start using parameters more, so we should look them over in a little more detail.
What do you see here?
def foo(a, b):
   ...
   ...
It's a function named "foo" (traditional made-up name in CS). It has two parameters, named "a" and "b".
Each parameter is for extra information the caller "passes in" to the function when calling it. What does that look like? Which value goes with "a" and which with "b"?
A call of the foo() looks like this:
   ....
   foo(13, 100)
   ...
Parameter values match up by position within the parenthesis. The first value goes to "a", the second to "b". It is not required that the value has the same name a the parameter.
I'm going to type this in the interpreter. It won't work in Hack Mode, it will work in the regular Python interpreter, or the "Python Console" within PyCharm. Here I'll put a little two-line def of foo(a, b, c) in, then try calling it with various values. It's very unusual to define a function within the interpreter like this, but here's one time we'll do it. Normally we define functions inside a .py file.
>>> def foo(a, b, c):
      print('params:', a, b, c)
>>>
>>> foo(1, 2, 3)
params: 1 2 3
>>> a = 7
>>> foo(1, a, a + 1)
params: 1 7 8
>>> foo(a, a, a)
params: 7 7 7
>>> foo(10, a * 2, a // 2)
params: 10 14 3
Conclusion: there are three expressions within the parenthesis. They are each evaluated at the time of the function call, the resulting values are passed into foo() matching by position, the first to "a", the second to "b", and so on.
The command line is how your computer works "under the hood", and we'll use it in CS106A. Not pretty, but very powerful.
For details see Python Guide: Command Line
The above guide has instructions to download this example folder: hello.zip
Unzip that folder. Open the folder in PyCharm (not the hello.py, the folder). In PyCharm, select "Terminal" at lower left - that's the command-line area. Then try running the hello.py program ("python3" on the Mac, ""py" on Windows).
$ python3 hello.py Alice
Hello Alice
$ python3 hello.py Bob
Hello Bob
$ python3 hello.py -n 100 Alice
Alice Alice Alice Alice Alice Alice Alice Alice Alice Alice Alice Alice Alice Alice Alice Alice Alice Alice Alice Alice Alice Alice Alice Alice Alice Alice Alice Alice Alice Alice Alice Alice Alice Alice Alice Alice Alice Alice Alice Alice Alice Alice Alice Alice Alice Alice Alice Alice Alice Alice Alice Alice Alice Alice Alice Alice Alice Alice Alice Alice Alice Alice Alice Alice Alice Alice Alice Alice Alice Alice Alice Alice Alice Alice Alice Alice Alice Alice Alice Alice Alice Alice Alice Alice Alice Alice Alice Alice Alice Alice Alice Alice Alice Alice Alice Alice Alice Alice Alice Alice
Then we demo command lines from the image-grid homework. They look like this
$ python3 ./image-grid.py -random yosemite.jpg 3
Those are described in detail in the image-grid homework handout, so you'll see explanations for those when you begin the homework.