
Today: image co-ordinates, range, nested range, make drawing to figure out co-ords
The live image problems today are linked into the notes below, also available on the image-nested section on the server.
Use range() and nested loops to go through all x,y of an image.
The image below is width 6, height 4
The x values range 0 .. 5, and y values range 0 .. 3
range(n) Function
>>> for x in range(10):
          print('in loop:', x)
in loop: 0
in loop: 1
in loop: 2
in loop: 3
in loop: 4
in loop: 5
in loop: 6
in loop: 7
in loop: 8
in loop: 9
>>>
Say we have an image width 5, height 3. Here are the nested loops to over all its x,y:
for y in range(3):
    for x in range(5):
        # use x,y in here
Here is the key rule:
For each iteration of outer, get all the iterations of inner
e.g. y = 0, go through all the x's 0, 1, 2 .. 4. Then for y = 1, go through all the x's again.
Run the nested loops in the interpreter (hack-console). You can see the key rule in action - each iteration of the outer loop selects one y number, and for that one y, the inner loop go through all the x numbers:
>>> for y in range(3):
        for x in range(5):
            print('x:', x, 'y:', y)
x: 0 y: 0
x: 1 y: 0
x: 2 y: 0
x: 3 y: 0
x: 4 y: 0
x: 0 y: 1
x: 1 y: 1
x: 2 y: 1
x: 3 y: 1
x: 4 y: 1
x: 0 y: 2
x: 1 y: 2
x: 2 y: 2
x: 3 y: 2
x: 4 y: 2
Why is y loop first? This way we go top to bottom — y=0, then y=1 and so on. This is the standard, traditional order for code to loop over an image, so we'll always do it this way (and if you encounter image code out in the wild someday, it will tend to do it in this order too).
image.get_pixel(x, y)# get pixel at x=5 y=2 in "image", # can use its .red etc. pixel = image.get_pixel(5, 2) pixel.red = 0

Here is a version of our earlier "darker" algorithm, but written using nested range() loops. The nested loops load every pixel in the image and change the pixel to be darker. On the last line return image outputs the image at the end of the function (more on "return" next week). Run it to see what it outputs. Then we'll look at the code in detail.
def darker(filename):
    image = SimpleImage(filename)
    for y in range(image.height):
        for x in range(image.width):
            pixel = image.get_pixel(x, y)
            pixel.red *= 0.5
            pixel.green *= 0.5
            pixel.blue *= 0.5
    return image

for y in range(image.height):Say the image height is 50. Then range(50) is the series 0, 1, 2 .. 49. Which is all the y values for this image, from top to bottom. The loop runs the y variable through 0, 1, 2 ... 49, one number for each iteration.
for x in range(image.width):Say the image width is 100. The range(100) is the series 0, 1, 2 .. 99 which are the x index numbers from left to right. The loop runs the variable x through 0, 1, .. 99, one number for each iteration.
Here is a picture, showing the order the nested y/x loops go through all the pixels - all of the top y=0 row, then the next y=1 row, and so on. This the same order as reading English text from top to bottom.

The nested y/x loop code has a lot of detail in it. The good news is, writing the loops this way to hit every pixel in an image is idiomatic. It's the same every time, so you can use it as a unit while you get used to its details.
![]()
# Make pixel b look the same as pixel a
b.red = a.red
b.green = a.green
b.blue = a.blue
Thus far the code has changed the original image. Now we'll create a new blank white "out" image and write changes to that. Here are a few examples of creating a new, blank image.
# Say filename is 'poppy.jpg' or whatever
# This loads that image into memory
image = SimpleImage(filename)

# 1. create a blank white 100 x 50 image, store in variable
# named "out"
out = SimpleImage.blank(100, 50)

# 2. Create an out2 image the same size as the original
out2 = SimpleImage.blank(image.width, image.height)

# 3. Create an image twice as wide as the original
image_wide = SimpleImage.blank(image.width * 2, image.height)
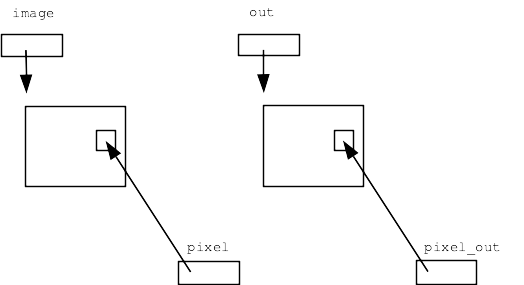
In the code below, we have two images "image" and "out" - can get a pixel in either image how? The key is which image is before the dot when the code calls get_pixel(). This is the essence of noun.verb function call form. Which image do we address the get_pixel() function call to?
# Create 2 image objects
image = SimpleImage(filename)
out = SimpleImage.blank(image.width, image.height)

# pixel points to pixel (10, 0) in original image
pixel = image.get_pixel(10, 0)

# pixel_out points to pixel (10, 0) in out image
pixel_out = out.get_pixel(10, 0)

# Could copy red from one to the other
pixel_out.red = pixel.red
Establish the basics on this one, do something interesting on the next one.
Darker algorithm, but creating a separate out image. This code is complete, just run it.
Demo: try changing last line from return out to return image - what do you see and why?
def darker(filename):
    image = SimpleImage(filename)
    # Create out image, same size as original
    out =  SimpleImage.blank(image.width, image.height)
    for y in range(image.height):
        for x in range(image.width):
            pixel = image.get_pixel(x, y)
            pixel_out = out.get_pixel(x, y)
            pixel_out.red = pixel.red * 0.5
            pixel_out.green = pixel.green * 0.5
            pixel_out.blue = pixel.blue * 0.5
    return out
Now we'll try coding up a real problem.
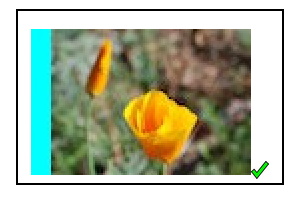
For the Aqua Stripe problem, produce an image with a 10 pixel wide aqua stripe on the left, with a copy of the original image next to it, like this:
out = SimpleImage.blank(image.width + 10, image.height)
    # Create the 10-pixel aqua stripe
    for y in range(image.height):
        for x in range(10):
            pixel_out = out.get_pixel(x, y)
            pixel_out.red = 0
Drawing to think about coordinates...
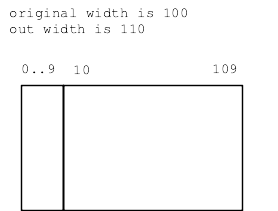
How to copy the data from the original to the right side of the output? Need to think about the x,y values, which are not the same in the two images.
For x,y in original, what is the corresponding x,y in out?
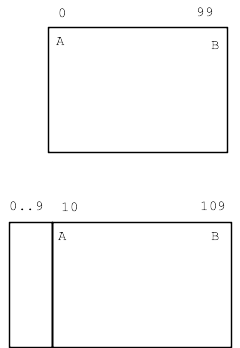
Make a little chart (here "x" means in the original image)
pt   x     x_out
A    0     10
B    99    109

What's the pattern?
x_out = x + 10
Now we can write the key get_pixel() line below, to figure pixel_out for each original pixel.
def aqua_stripe(filename):
    """
    Create an out image 10 pixels wider than the original.
    (1) Set an aqua colored vertical stripe 10 pixels wide
    at the left by setting red to 0.
    (2) Copy the original image just to the right
    of the aqua stripe. Return the computed out image.
    """
    image = SimpleImage(filename)
    # Create out image, 10 pixels wider than original
    out = SimpleImage.blank(image.width + 10, image.height)
    # Create the 10-pixel aqua stripe
    for y in range(image.height):
        for x in range(10):
            pixel_out = out.get_pixel(x, y)
            pixel_out.red = 0
    # Copy the original over - make drawing to guide code here
    for y in range(image.height):
        for x in range(image.width):
            pixel = image.get_pixel(x, y)
            pixel_out = out.get_pixel(x + 10, y)  # key line
            pixel_out.red = pixel.red
            pixel_out.green = pixel.green
            pixel_out.blue = pixel.blue
    return out
Experiments: try +11 instead of +10 - get bad-coord exception, Try +9, and image shifted slightly to left, can try the diff-stripes slider. (Can also try errors in mirror2 below.)
It's hard to write that get_pixel() line just doing it in your head. We make a drawing to get the details exactly right.
Notice that our drawing was not general - just picking width = 100 as a concrete example. A single concrete example was good enough to get our thoughts organized, and then the formula worked out actually was general.
A common form of error in these complex indexing algorithms is being "off by one", like accessing the pixel at x = 100 when x = 99 is correct.
> Mirror1

def mirror1(filename):
    image = SimpleImage(filename)
    # Create out image with width * 2 of first image
    out = SimpleImage.blank(image.width * 2, image.height)
    for y in range(image.height):
        for x in range(image.width):
            pixel = image.get_pixel(x, y)
            # left copy
            pixel_left = out.get_pixel(x, y)
            pixel_left.red = pixel.red
            pixel_left.green = pixel.green
            pixel_left.blue = pixel.blue
            # right copy
            # nothing!
    return out
> Mirror2
This a favorite example, bringing it all together. This algorithm pushes you to work out details carefully with a drawing, and the output is just neat.
Mirror2: Like mirror1, but also copy the original image to the right half of "out", but as a horizontally flipped mirror image. So the left half is a regular copy, and the right half is a mirror image. (Starter code does the left half).
I think a reasonable reaction to reading that problem statement is: uh, what? How the heck is that going to work? But proceeding carefully we can get the details right. Don't do it in your head.
Make a drawing of the image coordinates with concrete numbers, work out what the x,y coordinates are for input and output pixels. We'll go though the whole sequence right here.
Here are 4 points in the original:
A: (0, 0)
B: (1, 0)
C: (2, 0)
D: (99, 0)

Sketch out where these points should land in the output.
What is the x value for pixel_right for each of these?
Try completing drawing with ABCD values. This is a great example of slowing down, working out the details. We start knowing what we want the output to look like, proceed down to the coordinate details.
Lecture - making this drawing large to try to draw on it live.

Here is the drawing with the numbers filled in

def mirror2(filename):
    image = SimpleImage(filename)
    out = SimpleImage.blank(image.width * 2, image.height)
    for y in range(image.height):
        for x in range(image.width):
            pixel = image.get_pixel(x, y)
            # left copy
            pixel_left = out.get_pixel(x, y)
            pixel_left.red = pixel.red
            pixel_left.green = pixel.green
            pixel_left.blue = pixel.blue
            # right copy
            # this is the key spot
            # have: pixel at x,y in image
            # want: pixel_right at ??? to write to
            pixel_right = out.get_pixel(out.width - 1 - x, y)
            pixel_right.red = pixel.red
            pixel_right.green = pixel.green
            pixel_right.blue = pixel.blue
    return out
Remove the "- 1" from formula above, so out_x value is one too big. A very common form of Off By One error. What happens when we run it?
Off By One error - OBO - a very common error in computer code. Surely you will write some of these in CS106A. It has its own acronym and wikipedia page.
An exception is an error cause by a line of code that halts the program at that point. The exception will have a message describing the low-level error, like a bad coordinate, and it will give a line number. Often, although not always, the error message will be a good hint at the underlying problem.
Just with those two facts - look at your code. Why is the code doing that? Sometimes just being pointed at the right line is enough for you to spot the bug.
Here's another variation on the 2-image side by side form, this one with the left image upside down:
> Mirror3
See Python Guide: Keyboard Shortcuts
These work on the experimental server and other places, including the PyCharm tool we'll show you on Fri. Ctrl-k works in GMail .. so satisfying!