
Today: variables, digital images, RGB color, for loop
The HW problems are not that easy. Can take hours. It's not just you!
But we hope, once you have it working, you understand it, then could do it more easily. Like if your homework were deleted, you could do it again pretty readily.
See the Python Guide Variables chapter for more details.
A Python variable has a name and stores a value. We'll start with three rules of variables.
A variable is created in the code by a single equal sign = like this which creates a variable named x:
x = 42
The variable x is set at the moment the line runs.
Suppose there is also a line that sets a variable named color:
color = 'red'
Each variable is stored in the computer's memory. Think of the variable as a little box, labeled with the variable's name and containing a pointer to the value stored:

Suppose code sets a variable color to 'red'. On subsequent lines, appearances of the word color will retrieve the stored color. So for example, these lines paint two squares red:
color = 'red'
bit.paint(color)
bit.move()
bit.paint(color)
The variable, color, is set on the first line, and then two later lines use it by its name. The variable name does not have quote marks around it, just appearing as a bare word in the code.
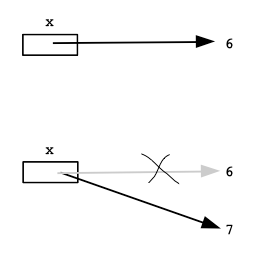
If a variable already exists, using = to change the variable simply changes the variable to refer to the new value. The old value is forgotten. Later references to the variable will use the new value.
In Mathematical proofs, the equal sign sets up a permanent equality. Not so in code! In code, the = sets the variable to something, but it can be changed to something else with the next =.
So in this example, the first paint is red, but the second is blue
color = 'red'
bit.paint(color)

color = 'blue'
bit.paint(color)
Or here is an example with numbers

x = 6
# for lines here,
# x is 6
...
x = 7
# for lines here,
# now x is 7
...
In summary, the = is like the phrase: "Now point to"
We're not doing this one in class, but you can try it on your own to see a variable in action.
> all-blue
Go back to our all-blue Bit loop. Change the code to use a color variable as below. The variable color is set to hold the value 'blue', and the later lines just paint whatever color is in the color variable. This version paints the whole row blue.
def all_blue(filename):
    bit = Bit(filename)
    color = 'blue'
    bit.paint(color)
    while bit.front_clear():
        bit.move()
        bit.paint(color)
    bit.right()
Look at the lines bit.paint(color) lines - they refer to the variable by its name, following the arrow to retrieve 'blue' or whatever was stored there.
Q: How would you change this code to paint the whole row red?
A: Change line 3 to color = 'red' - the later lines just use whatever is in the color variable, so now they will paint red with no other change.
Recall that "expression" is a phrase of code that Python "evaluates" to get a value.
You would think that computer programs have a lot of math at their core. It's true! Python can evaluate mathematical expressions, like a calculator can. Python follows the order of operations, so multiplication and division (* /) are evaluated before addition and subtraction (+ -). Other than that, the math is done from left to right. The math here looks a lot like regular mathematics, so we're not going to spend a lot of time explaining it.
So is the resulting value when Python evaluates this expression?
1 + 2 * 3
The answer is 7, since Python does the multiplication before the addition.
This works with variables too.
x = 6
1 + 2 * x * 3
The expression evaluates to 37, doing the multiplications from left to right, then the addition.
The Python "interpreter" is a program on your laptop which makes Python work on your laptop. More details later on that. However, there is a way you can type code right at the interpreter to see what it does.
Try the >>> interpreter on the experimental server - there's a button for this at the bottom of each problem page on the experimental server. You type a little expression at the ">>>" prompt and hit the enter key. Python evaluates it, prints the resulting value on the next line. We'll use this more as we get into more Python features.
So the ">>>" is the Python interpreter. You type Python code to it directly, see what it does. Not a good way to get work done, but an excellent way to try little phrases of code to see what they do.
We can use the interpreter to try out the claims about variables and math expressions.
>>> x = 11
>>> x
11
>>> 4 + 2 * 5 + 1
15
>>> x = 6
>>> 1 + 2 * x   # evaluates to what?
The answer is 13. The appearance of x in the expression is just an example of a variable - Python retrieves whatever value was set to that variable, in this case 6.
>>> x = 6
>>> x
6
>>> 1 + 2 * x
13
>>> x = 7       # change x
>>> 1 + 2 * x
15
Changing a variable changes it to point to a new value. After that, uses of the variable use the new value.

This line loads an image into Python memory, and sets a variable named image to point to it, ready for Python to work on it.
# Load an image from the filesystem
# into memory in variable named "image".
# Now the image can be manipulated by code.
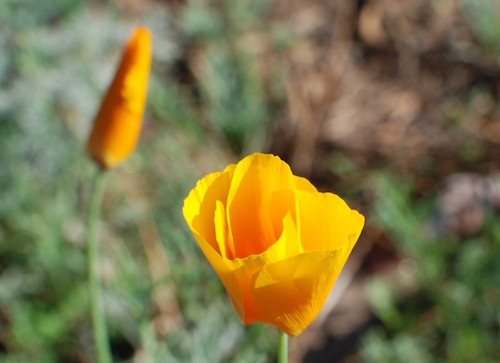
image = SimpleImage('flowers.jpg')

Say we have loaded an image variable as shown above. Now we want to write code to change the image in some way.
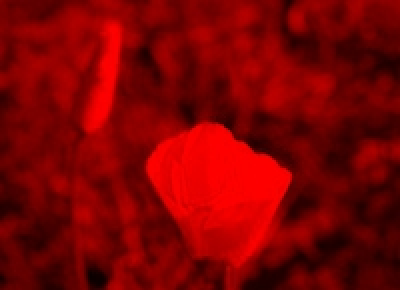
For example, let's say we want to set the blue and green values in each pixel of the image to 0. This will leave just the red values. This is called the "red channel" of the image - an image made of just its red lights.
pixel.red = 255Suppose we have a variable pixel that refers to one pixel inside an image. (We'll show how to obtain such a pixel variable in the next step.)

Then the syntax pixel.red or pixel.blue or pixel.green refers to the red or blue or green value 0..255 inside the pixel.
The example code uses = to set the red and blue values of the pixel to 255 and the green value to 0. This changes the pixel to be magenta.
If we take an image, and turn off all the green and blue light but leave the red lights on. This makes the "red channel" image:
Similarly, we can make the green and blue channels:
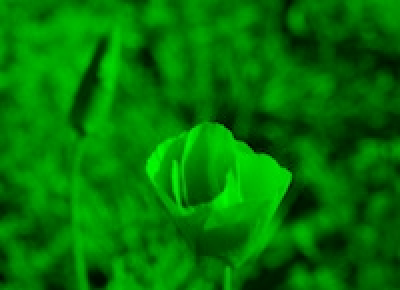
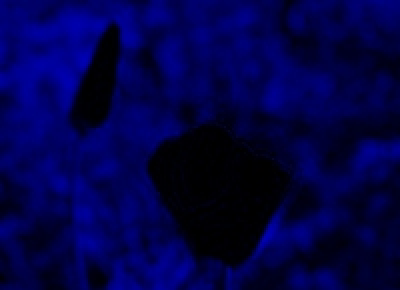
We'll use these in a minute as an example.
The for-loop is probably the single most useful loop we'll see. Say you have a collection of 1000 urls. The for-loop lets you write a few lines of code, and then run those lines once for each url or whatever is in the collection. This is sometimes called a "for each" loop, since it runs the code once for each element. Being able to run some code once for each element in a collection is very handy, and this is exactly what the for loop gives us.
for variable in collection:
    # use variable in here
The "red channel" of an image is just the red lights, with blue and green all turned off. Here is the code to make the red channel of an image using a for loop.
def red_channel(filename):
    image = SimpleImage(filename)
    for pixel in image:
        pixel.green = 0
        pixel.blue = 0
    return image
Here is a link - you can try running it first, then we'll see how it works
The most important element in the for loop is the variable which comes after the for. The for-loop takes control of the variable, setting it to point to the next element for each run of the loop body.
For the red-channel example, the loop sets the pixel to point to the first pixel in the image and runs the loop body. Then it sets pixel to point to the second pixel and runs the loop again. And so on, running the body once for each pixel in the image. If the image has 50,000 pixels, the loop body runs 50,000 times, once for each pixel in the image.
for pixel in image:
    # "pixel" points to the next pixel
    # each iteration of the loop
    pixel.green = 0
    pixel.blue = 0

Side trip about math
x = x + 1What does this do:
x = 6
x = x + 1
x = 6
x = x + 1
    for pixel in image:
        pixel.red = pixel.red * 0.5
        pixel.green = pixel.green * 0.5
        pixel.blue = pixel.blue * 0.5
        # or shorthand form:
        # pixel.red *= 0.5
Say we have this
x = x + 1
That can be written in shorthand like this:
x += 1
If we have this
x = x * 2
Shorthand form:
x *= 2 # double x
For these image problems, that looks like
pixel.red = pixel.red * 0.5  # long form
pixel.red *= 0.5             # shorthand for above
>>> x = 10
>>> x += 3
>>> x
13
>>> x *= 2
>>> x
26
The image1 section is all image problems solved with a for loop to do some operation on every pixel in the image.
Loop over the image, write code to change pixels, recovering the hidden image. Nick solves part, then students try to type code for the rest.
5-10-20 puzzle: The red, green, and blue values are too small by a factor of 5 10 20. But we do not know which factor goes with which color. Figure it out by experimenting with code to modify the image with various factors (i.e. guessing and running it).
> The image1 section has problems like this. The the Iron Puzzle.
Start working on the coordinate numbers .. use this for next lecture examples.
Previously loaded image into memory like this. Look at the x/y coordinate scheme of the pixels.
image = SimpleImage(filename)

Say we have an image 100 pixels wide.
Want to loop over the x coordinates: 0, 1, 2, ....98, 99
First we'll look at the Python range(n) function
Step 1: range() function
range(n) FunctionDemo (or you can try it). The print(xx) function in this context just prints out what is passed to it within the parenthesis. Normally we indent by 4 spaces, but it's ok to just indent by 2 spaces in this temporary, on-the-fly context.
>>> for x in range(10):
      print('in loop:', x)
in loop: 0
in loop: 1
in loop: 2
in loop: 3
in loop: 4
in loop: 5
in loop: 6
in loop: 7
in loop: 8
in loop: 9
1. We see that the for loop works with range(), running the body once for each number.
2. Try different numbers as the parameter passed in to range(). (Use up-arrow in the interpreter to recall previously typed lines - a great time saver.