
Today: int vs float, int division, function call / parameters, start PyCharm, command line, bluescreen algorithm
These are all on HW2, due next Wed.
You would think computer code has a lot to do with numbers, and here we are.
See Python Guide: Python Math chapter.
Surprisingly, computer code generally uses two different types of numbers - "int" and "float".
>>> 2 + 3
5
>>> 2 + 3 * 4   # Precedence
14
>>> 2 * (1 + 2) # Use parenthesis
6
>>> 10 ** 2     # 10 Squared
100
>>> 2 ** 100    # Grains of sand in universe
1267650600228229401496703205376
>>>
>>>
>>> 1 + 2 * 3    # int in, int out (/)
7
>>> 1 + 2.0 + 3  # any float -> float
6.0
>>> 1.5 + 3.0
4.5
>>>
>>> 1.5 * 4.0
6.0
>>>
>>> 6.02e23        # 1 mole
6.02e+23
>>> 6.02e23 * 2    # 2 moles
1.204e+24
int() float()The formal names of the types are "int" and "float". As a handy Python convention, there are functions with those names that try to convert an input to that type. The int() function just discards the fractional part of the number.
>>> int(3.6)
3
>>> float(3)
3.0
>>> 7 / 2
3.5
>>> 8 / 2
4.0
With a series of operators of the same precedence, the operators are evaluated from left to right. Consider the following expression. What to subtract from the 4?
>>> 4 - 2 + 1
??
Python starts with 4, and does the operations one at a time, left to right - so subtracting 2, then adding 1, resulting in 3.
It's the same with multiplication and division. What is the result of this epxression:
>>> 8 / 4 * 2
??
Start with 8, then divide by 4, then multiply by 2, resulting in 4.0.
In this case, the answer is float 4.0 because the division operation / produces a float result, even with int inputs.
Because of int indexing into structures.
get_pixel(x, y) - intWe use functions and parameters constantly - today we'll pull back the curtain on how parameters work.
We'll use the word "parameter" for a value within a function call's parenthesis. The word "argument" is another word you'll see for these.
Each function appears in the code in two different forms - the def form, and the call form. Today we will look at these two in more detail, especially for parameters.
We'll use the darker_left() function as an example of function call and parameters.
Here is what the def form looks like - we see the function name and its parameters within the parenthesis. There is only one copy of the def for a function, but there can be many calls to that function.
def darker_left(filename, left):
        ...
This function has two parameters, filename and left, which are values for it to use when it runs. It loads the image in that filename, and sets a stripe down its left side to be dark, with the width of the stripe specified by the left parameter.
So if the function was called and left had the value 50, the output image would look like this:
Look at the def again. The parameters are listed within the parenthesis.
To write the code in this function, treat each parameter like a variable that holds a value ready to use. The function code simply uses each parameter, relying on the right value being in there. So in this case filename and left have the right values in them, the code here just uses them.
The attitude here is one of trust - the code is given filename and left, and we trust that they are ready to go.

def darker_left(filename, left):
    # your code here
    # use filename and left
    ...
Q: How many pixels on the left to darken?
A: Whatever value is in the left parameter.
Key idea: just use the parameters, filename and left - they are already set up with the values to use. In this case, if left is 50, we want to darken a stripe 50 pixels wide. If left is 2, we darker the a stripe 2 pixels wide. Work out he for/x/range loop to hit that stripe. Note this problem does not create a separate "out" image, so that keeps it simpler.
Solution code
def darker_left(filename, left):
    image = SimpleImage(filename)
    for y in range(image.height):
        for x in range(left):
            pixel = image.get_pixel(x, y)
            pixel.red *= 0.5
            pixel.green *= 0.5
            pixel.blue *= 0.5
    return image
Summary - writing code for a function, look up at the parameters in the parenthesis. Assume those each have a value and just use them.
Where do the parameter values come from? The parameter values come from the function call and its parenthesis. The only way a function runs is when a lines calls that function, and the call will specify the values for the parameters.
A call of a function is one line, calling the function by name to run it. The call specifies the values for the parameters within the parenthesis.
How does a function run? The only way a function runs is if there is a line somewhere that calls the function, and that line will have the parameter values.

When darker_left() function is called, the parameter values to use are written within the parenthesis. In this case the filename parameter gives the name of the file with the image to edit, e.g. 'poppy.jpg'. The left parameter specifies the number of pixels at the left side of the image which should be darkened.
Here are three separate calls to the darker_left() function, and the values for the parameters are in the parenthesis:

For each call to the function, we say the parameters are "passed in" to the function. So above the first calls passes in 50 for the left parameter and the last call passes in 2.
Look at the Run Menu on the experimental server for darker_left() carefully. For each case, you can see the syntax of the function call - the name of the function and a pair of parenthesis. Look inside the parenthesis, and you will see the parameters passed in for each run. Click the Run button with different menu selections to see it in action.
foo(a, b) ExampleWhat do you see here?
def foo(a, b):
   ...
   ...
It's a function named "foo" (traditional made-up name in CS). It has two parameters, named "a" and "b".
Each parameter is for extra information the caller "passes in" to the function when calling it. What does that look like? Which value goes with "a" and which with "b"?
A call of the foo() looks like this:
   ....
   foo(13, 100)
   ...
Parameter values match up by position within the parenthesis. The first value goes to "a", the second to "b". It is not required that the value has the same name a the parameter.
foo() in InterpreterLet's do a little live exercise along these lines.
The hack mode "interpreter", has a ">>>" prompt. You type a line of python code here, hit return. What you typed is sent to python to run, the results are printed after the ">>>".
> Experimental Interpreter >>>
Here we'll enter a little two-line def of foo(a, b) in the interpreter, then try calling it with various values. It's very unusual to define a function within the interpreter like this, but here's one time we'll do it. Normally we define functions inside a .py file.
The most important thing is that at the function call line, the parameter values are pulled from within the parenthesis.
The parameters match by position. So the first value goes to "a", the second value goes to "b". The number of parameters must be exactly 2 or there's an error, since foo() takes 2 parameters. The word "argument" is another word for a parameter, which appears in the Python error messages.
Each parameter value can be an expression - Python computes the value if needed, then sends that value as the parameter.
Each function has its own variables and parameters, separate from the variables and parameters in other functions, even if the variables have the same name. So an "a" inside a function is different from an "a" variable in some other function. This shows up in the last example below.
>>> # Define foo
>>> def foo(a, b):
      print('a:', a, 'b:', b)
>>>
>>> # Call it with 2 param values
>>> foo(1, 2)
a: 1 b: 2
>>> foo(13, 42)
a: 13 b: 42
>>>
>>> # Call with expressions - passes computed value, e.g. 60
>>> foo(10 * 6, 33 + 2)
a: 60 b: 35
>>>
>>> # Show that number of parameters must be 2
>>> foo(12)
Error:foo() missing 1 required positional argument: 'b'
>>> foo(12, 13, 14)
Error:foo() takes 2 positional arguments but 3 were given
>>>
>>>
>>> # Parameters do not match by name
>>> # Parameters match by position - first to "a", second to "b"
>>> b = 10
>>> b
10
>>> foo(b, b + 1)
a: 10 b: 11
>>>
The command line is how your computer works "under the hood", and we'll use it in CS106A. Not pretty, but very powerful. We'll use it with a free program called PyCharm - see the PyCharm instructions on the course page.
For details see Python Guide: Command Line
The above guide has instructions to download this example folder: hello.zip
Unzip that folder. Open the folder in PyCharm (not the hello.py, the folder). In PyCharm, select "Terminal" at lower left - that's the command-line area.
First we'll type the command "date" into the terminal and hit the return key to run it. The computer runs the "date" program, and shows its output in the terminal, and then gives us another prompt to type more commands.
$ date
Fri Jan 14 12:09:24 PST 2022
$
Then try the "ls" command ("dir" on old windows). The command line runs in the context of some folder on the computer - "ls" lists the files in the folder.
hello.pyThe file hello.py contains a Python program.
Then try running the hello.py program ("python3" on the Mac, "py" on Windows) with the command shown below. This program takes in a name on the command line, and prints a greeting to that name. It's a simple program, but it shows how programs are run and how to adjust their inputs.
$ python3 hello.py Alice
Hello Alice
$ python3 hello.py Bob
Hello Bob
$ python3 hello.py -n 100 Alice
Alice Alice Alice Alice Alice Alice Alice Alice Alice Alice Alice Alice Alice Alice Alice Alice Alice Alice Alice Alice Alice Alice Alice Alice Alice Alice Alice Alice Alice Alice Alice Alice Alice Alice Alice Alice Alice Alice Alice Alice Alice Alice Alice Alice Alice Alice Alice Alice Alice Alice Alice Alice Alice Alice Alice Alice Alice Alice Alice Alice Alice Alice Alice Alice Alice Alice Alice Alice Alice Alice Alice Alice Alice Alice Alice Alice Alice Alice Alice Alice Alice Alice Alice Alice Alice Alice Alice Alice Alice Alice Alice Alice Alice Alice Alice Alice Alice Alice Alice Alice
Use the up arrow in the command line to retrieve and then edit a previous line. We never type in the command from scratch - use the up-arrow instead. Huge time saver!
When typing at the command line, you are typing commands to your computer operating system - Mac or Windows or Linux. This is different from the ">>>" prompt where you are typing command to Python, but the two look similar.
Then we demo command lines from the image-grid homework. They look like this
$ python3 image-grid.py -channels poppy.jpg
$
$ python3 image-grid.py -grid poppy.jpg 2
$
$ python3 image-grid.py -random yosemite.jpg 3
Those are described in detail in the image-grid homework handout, so you'll see explanations for those when you begin the homework.
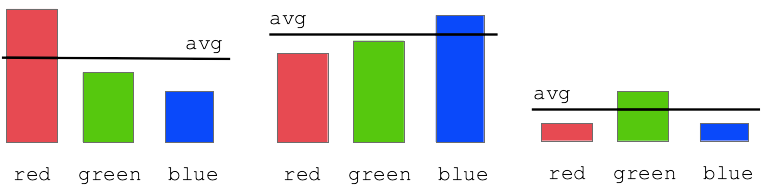
# compute average number for a pixel
average = (pixel.red + pixel.green + pixel.blue) / 3
Diagram:
This code is complete, look at the code then run it to see.
Solution code
def stop_leaves(front_filename, back_filename):
"""Implement stop_leaves as above."""
image = SimpleImage(front_filename)
back = SimpleImage(back_filename)
for y in range(image.height):
for x in range(image.width):
pixel = image.get_pixel(x, y)
average = (pixel.red + pixel.green + pixel.blue) / 3
if pixel.red >= average * 1.4:
# the key line:
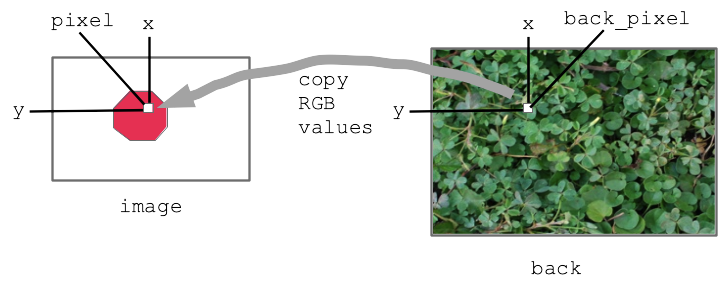
back_pixel = back.get_pixel(x, y)
pixel.red = back_pixel.red
pixel.green = back_pixel.green
pixel.blue = back_pixel.blue
return image
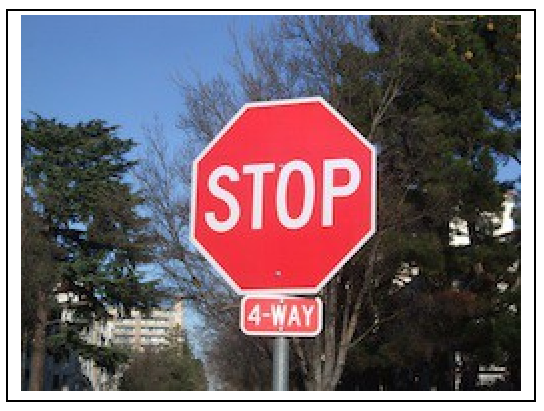
Before - the red stop sign before the bluescreen algorithm:
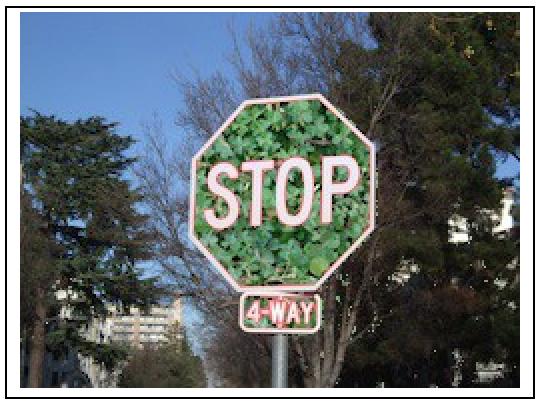
After:
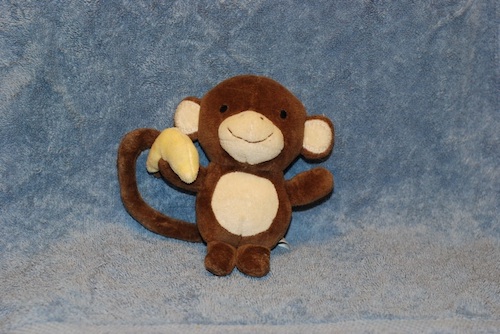
A favorite old example of Nick's.
Have monkey.jpg with blue background
The famous Apollo 8 moon image. At one time the most famous image in the world. Taken as the capsule came around the moon, facing again the earth. Use this as the background.
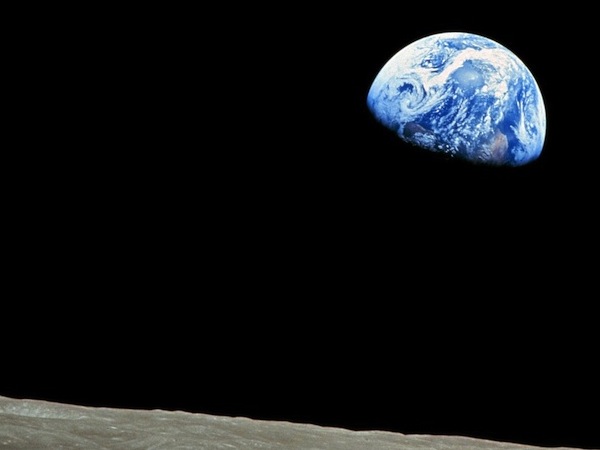
The bluescreen code is the same as before basically. Adjust the hurdle factor to look good. Observe: the bluescreen algorithm depends on the colors in the main image. BUT it does not depend on the colors of the back image - the back image can have any colors it in. Try the stanford.jpg etc. background-cases for the monkey.
The code is complete but has a 1.5 factor to start. Adjust it, so more blue gets replaced, figuring out the right hurdle value.
This is the "front" strategy - replacing blue pixels in the front image, then the front image is the final output. There is also a "back" strategy on the HW2c handout which you have as an option.