
Today: python copying/nesting, better/shorter code, flex-arrow drawing example
Note: we looked at keyboard shortcuts today for fun - see the Keyboard Shortcuts chapter
#Use comments to fill in information that is useful or interesting and not clear from the code itself. These are not needed too often, as frequently the code is readable enough on its own (with good function and variable names).
1. Avoid repeating what the code says. Don't do this:
i = i + 1 # Add 1 to i
2. Could mention what a line accomplishes - not so obvious sometimes - fill in the motivated goal:
    # Increase i to the next multiple of 10
    i = 10 * (i // 10 + 1)
3. Could mention the goal of a few lines, kind of framing what goal the next 8 lines accomplish. Can also use blank lines to separate logical stages from each other.
    # Now figure out where the email address ends
    end = at + 1
    while end < len(s) and ....
        ...
1. Say we have a word variable. The following if-statement will work perfectly for CS106A, and you probably wrote it that way before, and it's fine and we will never mark off for it.
if word == None:       # Works fine, ut bnot PEP8
    print('Nada')
2. However, there is a very old rule in PEP8 that comparisons to the value None should be written with the is operator. This is an awkward rule, but we are stuck with it. You may have noticed PyCharm complaining about the above form, so you can write it as follows and it works correctly and is PEP8:
if word is None:       # Works fine, PEP8 approved
    print('Nada')


if word is not None:   # "is not" variant
    print('Not Nada')
Very important limitation:
3. The is operator is different from == for most non-None values like strings and ints and lists and it is not reliable. Therefore: never use the is operator for values other than None.
Only use is with None as above. If you use it with other values, it will lead to horrible, terrible, weekend-ruining bugs.
There's a longer explanation about this awkward "is" rule in the guide page above.
Not showing any new python, but showing moves and patterns you may not have thought of to shorten and clean up your code.
Many of these techniques involve leveraging variables to clean up the code.
I'm going to show you a v1 form of the code that is suboptimal and then how to write it better. Nobody should feel bad for writing the suboptimal form, as it's en easy enough path to go down by accident.
first_n(s, n): Given a string s and an int n. The n parameter will be one of 1, 2, 3, 4. Return a string of the first n chars of s. If s is not long enough to provide n chars, return None.
'Python', 1 -> 'P'
'Python', 2 -> 'Py'
'Python', 3 -> 'Pyt'
'Python', 4 -> 'Pyth'
'Py', 3 -> None
Here is v1 which works perfectly, but is not the best.
def first_n(s, n):
    if len(s) < n:
        return None
    if n == 1:
        return s[:1]
    if n == 2:
        return s[:2]
    if n == 3:
        return s[:3]
    if n == 4:
        return s[:4]
When n is 1, want an 1 in the slice. When n is 2, want an 2 in the slice. How can we get that effect?
The variable n points to one of the values 1, 2, 3, 4 when this function runs.
Therefore, in your code, if there is a spot where you need a value that appears in a variable or parameter, you can just literally write that variable there.
def first_n(s, n):
    if len(s) < n:
        return None
    return s[:n]
The last line is the key.
If n is 1, uses 1 in the slice. If n is 2, it uses 2, and so on. Use the variable itself, knowing that at run-time, Python will evaluate the variable, pasting in whatever value it points to.
Your algorithm has a few values flowing through it. Pick a value out and put it in a well-named variable. Use the variable on the later lines. We talked about this a bit before, also known as "decomp by var".
1. Helps readability - the named variable helps all the later lines read out what they do.
2. In the style of divide-and-conquer, computing a value that is part of the solution and storing it in a variable - you have picked off and solved a smaller part of the problem, and then put that behind you to work on the next thing.
[0, 7, -2, 12, 3, -3, 5] -> [0, 5, 0, 5, 3, 0, 5]
Given nums, a list of 1 or more numbers. We'll say the first number in the list is the desired low lower bound (aka **low&&), and the last number is the desired upper bound (aka high). Change the list so any number less than low is changed to low, and likewise for any number greater than high. Return the changed list. Use for/i/range to loop over the elements in the list. Use an add-var strategy to introduce variables for the bounds.
Essentially:
nums[0] - low
nums[len(nums) - 1] - high
Adjust numbers outside of low..high
Here is a v1 solution that works, but I would never write it this way.
def low_high(nums):
    for i in range(len(nums)):
        if nums[i] < nums[0]:
            nums[i] = nums[0]
        if nums[i] > nums[len(nums) - 1]:
            nums[i] = nums[len(nums) - 1]
    return nums
Not especially readable: nums[i] > nums[len(nums) - 1]
Introduce variables low and high to store those intermediate values, using the variables on the later lines. This is much more readable.
def low_high(nums):
    low = nums[0]
    high = nums[len(nums) - 1]
    for i in range(len(nums)):
        if nums[i] < low:
            nums[i] = low
        if nums[i] > high:
            nums[i] = high
    return nums
Which is easier to write without bugs, knowing that you might sometimes forget a -1 or get < and > backwards.
v1:
if nums[i] > nums[len(nums) - 1]:
    nums[i] = nums[len(nums) - 1]
v2:
if nums[i] > high:
    nums[i] = high
The version building on the variable is (a) readable and (b) easier to write correctly the first time. Readability is not just about reading, it's about writing it with fewer bugs as you are typing.
On our lecture examples we do this constantly - pulling some intermediate value into a well-named variable to use on later lines.
Your computation has natural partial results. Storing these in variables with good names make better code.
Say your code is not working, and you are trying to fix it. There is some long line of code, and you are not sure if it is right. Try pulling a part of that computation out, looking at just that bit carefully, and storing it in a variable.
What was a long horizontal line, you stretch out vertically into an increased number of shorter lines, better able to concentrate on one part at a time.
Notice that v1 is short but wide. In contrast, v2 is longer because of the 2 added lines to set the variables, but more narrow since the later lines have less on therm.
Say we want to set alarm differently for weekends, something like this:
if not is_weekened:
    alarm = '9:00 am'
else:
    alarm = 'off'
The above code is fine. Here I will propose a slightly shorter way way will use often. (1) Initialize (set) the variable to its common, default value first. (2) Then an if-statement detects the case where the var should e set to a different value.
alarm = '9:00 am'
if is_weekend:
    alarm = 'off'
if case-1:
    lines-a
    ...
    ...

if case-2:
    lines-b
    ...
    ...
What's better than having two sets of lines to solve something? One set of lines that solves both cases!
grounded(minutes, is_birthday): Given you came home minutes late, how many days of grounded are you. If minutes is an hour or less, grounding is 5, otherwise 10. Unless it is your birthday, then 30 extra minutes are allowed. Challenge: change this code to be shorter, not have so much duplicated code.
The code below works correctly. You can see there is one set of lines for the birthday case, and another set of similar lines for the not-birthday case. What exactly is the difference between these two sets of lines?
def grounded(minutes, is_birthday):
    if not is_birthday:
        if minutes <= 60:
            return 5
        return 10

    # is birthday
    if minutes <= 90:
        return 5
    return 10
1. Set limit first. 2. Then unified lines below use limit, work for all cases.
def grounded(minutes, is_birthday):
    limit = 60
    if is_birthday:
        limit = 90

    if minutes <= limit:
        return 5
    return 10
ncopies: word='bleh' n=4 suffix='@@' ->

   'bleh@@bleh@@bleh@@bleh@@'
Change this code to be better / shorter. Look at lines that are similar - make a unified version of those lines.
ncopies(word, n, suffix): Given name string, int n, suffix string, return
n copies of string + suffix.
If suffix is the empty string, use '!' as the suffix.
Challenge: change this code to be shorter,
not have so many distinct paths.
Before:
def ncopies(word, n, suffix):
    result = ''

    if suffix == '':
        for i in range(n):
            result += word + '!'
    else:
        for i in range(n):
            result += word + suffix
    return result
Solution: use logic to set an ending variable to hold what goes on the end for all cases. Later, unified code uses that variable vs. separate if-stmt for each case. Alternately, could use the suffix parameter as the variable, changing it to '!' if it's the empty string.
def ncopies(word, n, suffix):
    result = ''
    ending = suffix
    if ending == '':
        ending = '!'

    for i in range(n):
        result += word + ending
    return result
> match()
match(a, b): Given two strings a and b. Compare the chars of the strings at index 0, index 1 and so on. Return a string of all the chars where the strings have the same char at the same position. So for 'abcd' and 'adddd' return 'ad'. The strings may be of any length. Use a for/i/range loop. The starter code works correctly. Re-write the code to be shorter.
match():
 'abcd'
 'adddd'  -> 'ad'
  01234
Code before unify:
def match(a, b):
    result = ''
    if len(a) < len(b):
        for i in range(len(a)):
            if a[i] == b[i]:
                result += a[i]
    else:
        for i in range(len(b)):
            if a[i] == b[i]:
                result += a[i]
    return result
def match(a, b):
    result = ''
    # Set length to whichever is shorter
    length = len(a)
    if len(b) < len(a):
        length = len(b)

    for i in range(length):
        if a[i] == b[i]:
            result += a[i]

    return result
= And CopiesWhat is the memory drawing for this code, i.e. what does = do?
>>> lst1 = [1, 2, 3, 4]
>>> lst2 = lst1
Answer: In general, a = to point to the same thing as sets ab. It does not make a copy.
So for the above, there is one list, and now both variables point to it.
We can see this is the case by modifying the list through one variable, seeing the change on the other variable.
>>> lst1.append(13)
>>> lst1
[1, 2, 3, 4, 13]
>>> lst2
[1, 2, 3, 4, 13]
Remember: = does not copy the data structure, instead it changes what the variable to the left of the = points to.
Next week we'll pursue examples where structures nested inside of other structures, such as lists inside of lists.
We'll introduce a couple basic techniques today to get started down this path.
Suppose I have a list variable "outer". Inside this list are lists of numbers.
The list .append() function can add anything to the end of a list, including another list.
>>> outer = []
>>> outer.append([1, 2])
>>> outer.append([3, 4])
>>> outer.append([5])
outer -> [[1, 2], [3, 4], [5]]
[5] list?How to obtain a reference to the list [5] in outer?
A: What index is it at within outer? 2
So access that list as outer[2]
>>> outer
[[1, 2], [3, 4], [5]]
>>> outer[2]
[5]
nums = outer[2]?The expression outer[2] is a reference to the [5] list.
>>> outer = [[1, 2], [3, 4], [5]]
>>> nums = outer[2]
>>>
>>> nums
[5]
The expression outer[2] is a reference to the nested list [5]. The line nums = outer[2] sets the nums variable to point to the nested list. We will very often set a variable in this way, pointing to the nested structure, before doing operations on it.
![alt: outer points to list, nums points to nested [5] list](lecture-nest1.svg)
6 on the [5]?The variable nums is pointing to the nested list [5]. Call nums.append(6) to append, changing the nested list. Looking at the original outer list, we see its contents are changed too. This shows that the nums variable really was pointing to the list nested inside of the outer list.
>>> nums.append(6)
>>> nums
[5, 6]
>>> outer
[[1, 2], [3, 4], [5, 6]]
>>>
>>> # Could access list as outer[2] also:
>>> outer[2].append(7)
>>> outer
[[1, 2], [3, 4], [5, 6, 7]]
>>>
The code in this problem builds on the basic outer/nums example above.
> add_99()
add_99(outer): Given a list "outer" which contains lists of numbers. Add 99 to the end of each list of numbers. Return the outer list.
The nest1 section on the server has introductory problems with nested structures.
We may have time for this at the end.
Download the flex-arrow.zip to work this fun little drawing example.
Recall: floating point values passed into draw_line() etc. work fine.
Ultimately we want to produce this output:
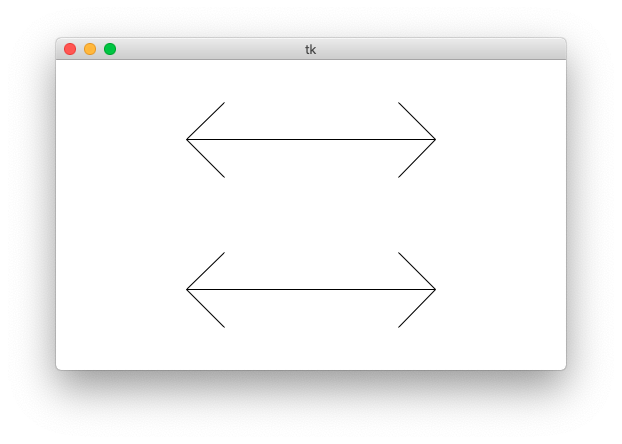
The "flex" parameter is 0..1.0: the fraction of the arrow's length used for the arrow heads. The arms of the arrow will go at a 45-degree angle away from the horizontal.
Specify flex on the command line so you can see how it works. Close the window to exit the program. You can also specify larger canvas sizes.
$ python3 flex-arrow.py -arrows 0.25
$ python3 flex-arrow.py -arrows 0.15
$ python3 flex-arrow.py -arrows 0.1 1200 600
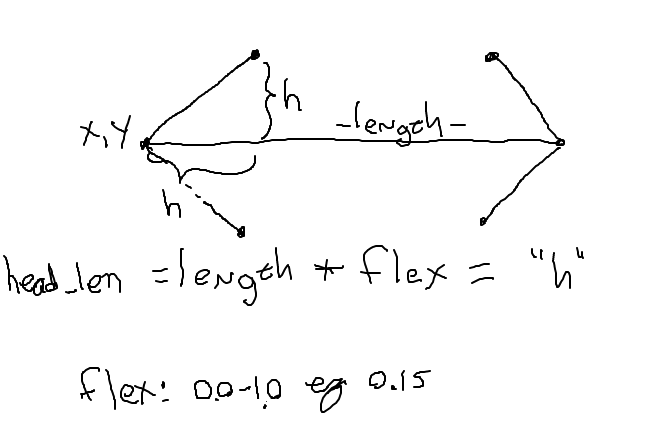
Look at the draw_arrow() function. It is given x,y of the left endpoint of the arrow and the horizontal length of the arrow in pixels. The "flex" number is between 0 .. 1.0, giving the head_len - the horizontal extent of the arrow head - called "h" in the diagram. Main() calls draw_arrow() twice, drawing two arrows in the window.
This starter code the first half of the drawing done.
def draw_arrow(canvas, x, y, length, flex):
    """
    Draw a horizontal line with arrow heads at both ends.
    It's left endpoint at x,y, extending for length pixels.
    "flex" is 0.0 .. 1.0, the fraction of length that the
    arrow heads should extend horizontally.
    """
    # Compute where the line ends, draw it
    x_right = x + length - 1
    canvas.draw_line(x, y, x_right, y)

    # Draw 2 arrowhead lines, up and down from left endpoint
    head_len = flex * length
    # what goes here?
With head_len computed - what the two lines to draw the left arrow head? This is a nice visual algorithmic problem.
Code to draw left arrow head:
    # Draw 2 arrowhead lines, up and down from left endpoint
    head_len = flex * length
    canvas.draw_line(x, y, x + head_len, y - head_len)  # up
    canvas.draw_line(x, y, x + head_len, y + head_len)  # down
Here is the diagram again.
Add the code to draw the head on the right endpoint of the arrow. The head_len variable "h" in the drawing. This is a solid, CS106A applied-math exercise. In the function, the variable x_right is the x coordinate of the right endpoint of the line:x_right = x + length - 1
When that code is working, this should draw both arrows (or use the flex-arrow-solution.py):
$ python3 flex-arrow.py -arrows 0.1 1200 600
def draw_arrow(canvas, x, y, length, flex):
    """
    Draw a horizontal line with arrow heads at both ends.
    It's left endpoint at x,y, extending for length pixels.
    "flex" is 0.0 .. 1.0, the fraction of length that the arrow
    heads should extend horizontally.
    """
    # Compute where the line ends, draw it
    x_right = x + length - 1
    canvas.draw_line(x, y, x_right, y)

    # Draw 2 arrowhead lines, up and down from left endpoint
    head_len = flex * length
    canvas.draw_line(x, y, x + head_len, y - head_len)  # up
    canvas.draw_line(x, y, x + head_len, y + head_len)  # down

    # Draw 2 arrowhead lines from the right endpoint
    # your code here
    pass
    canvas.draw_line(x_right, y, x_right - head_len, y - head_len)
    canvas.draw_line(x_right, y, x_right - head_len, y + head_len)
Now we're going to show you something a little beyond the regular CS106A level, and it's a teeny bit mind warping.
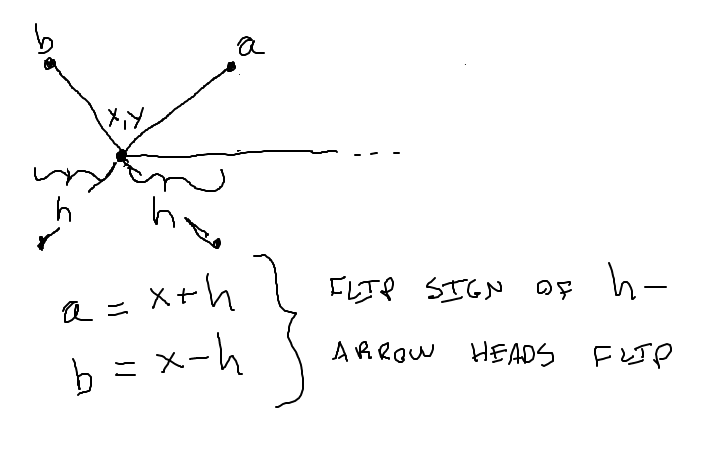
Run the code with -trick like this, see what you get.
$ python3 flex-arrow.py -trick 0.1 1000 600