 Image source: Rob's Puzzle Page
Introduction
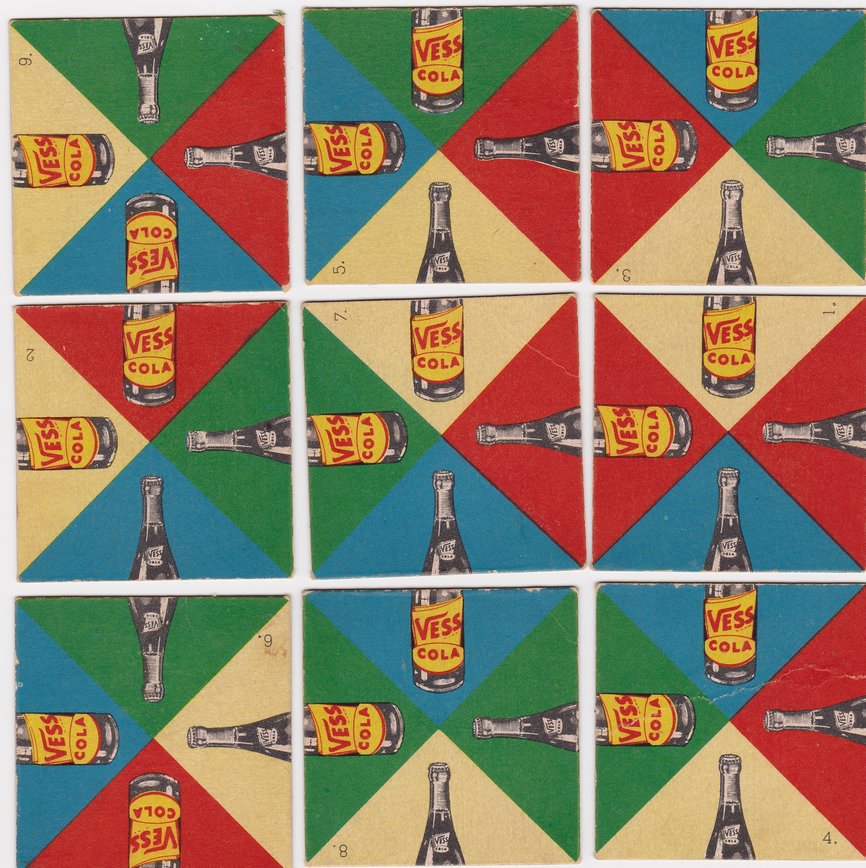
In this part of the assignment, you will be writing code that will solve the edge matching category of puzzles. In particular, your solution will be able to solve a traditional 3x3 grid. Edge matching puzzles have been around since the late 1800s, and they consist of a set of (generally square) tiles that have patterns such that two edges of a tile "match" in a recognizable pattern. For the tiles shown above, matching edges consist of a bottle top in a particular color triangle and a bottle bottom in the same color triangle. The top-right tile in the image above matches its red bottle bottom with the tile to its left's red bottle-top, and it also matches the cream bottle top with the cream bottle bottom of the tile below it. The image above happens to be a vintage puzzle for Vess Cola that was a common advertising giveaway during the 1930s-1950s.
Edge-matching games are suprisingly difficult to solve by hand. Each tile can be oriented four ways, and each tile can be in any of the nine board positions. This gives a total of 9! * 4^9 combinations, or roughly 95 billion different positions. But, with your crack recursive backtracking skills, and thanks to the fast computation abilities of modern computers, your program will be able to completely solve these puzzles in mere milliseconds.
To complete the assignment, you will be using C++ classes, and (as mentioned above), you will be implementing a recursive backtracking algorithm to produce the puzzle solutions. You may also want to take a look at the Demo Program, available for Mac, Windows, and Linux (to run on a Mac, you may have to ctrl-click on the program TileMatchDemo.app and then click Open).
 Mac Demo |
 Windows Demo |
 Linux Demo |
You will turn in the following files:
Tile.cpp, the code for describing a tile.TileMatch.cpp, the code that runs the game and solves the puzzles.
Puzzle Overview
The Edge-Matching puzzles we will look at are 3x3 square tile puzzles where each tile can be in any of four positions on the board, and in any of the nine available positions. The user can play the game manually with the mouse, and they can solve the puzzles in one of two ways: timed and then (if desired) one-at-a-time. If the game is played manually, clicking on a tile will rotate it one position clockwise, and dragging a tile on top of another tile will swap the two tiles and retain their current orientation. When the player solves the game, a message alert appears to congratulate the player. We have provided the graphics and game-play code for you already.
When the user decides to find the solutions, all solutions are found at once, and an overall time to find all the solutions is shown. The user can then choose to see the solutions one at a time. Each solution is then found and displayed, and the user has the choice to save the solution in a form that can be re-loaded later.
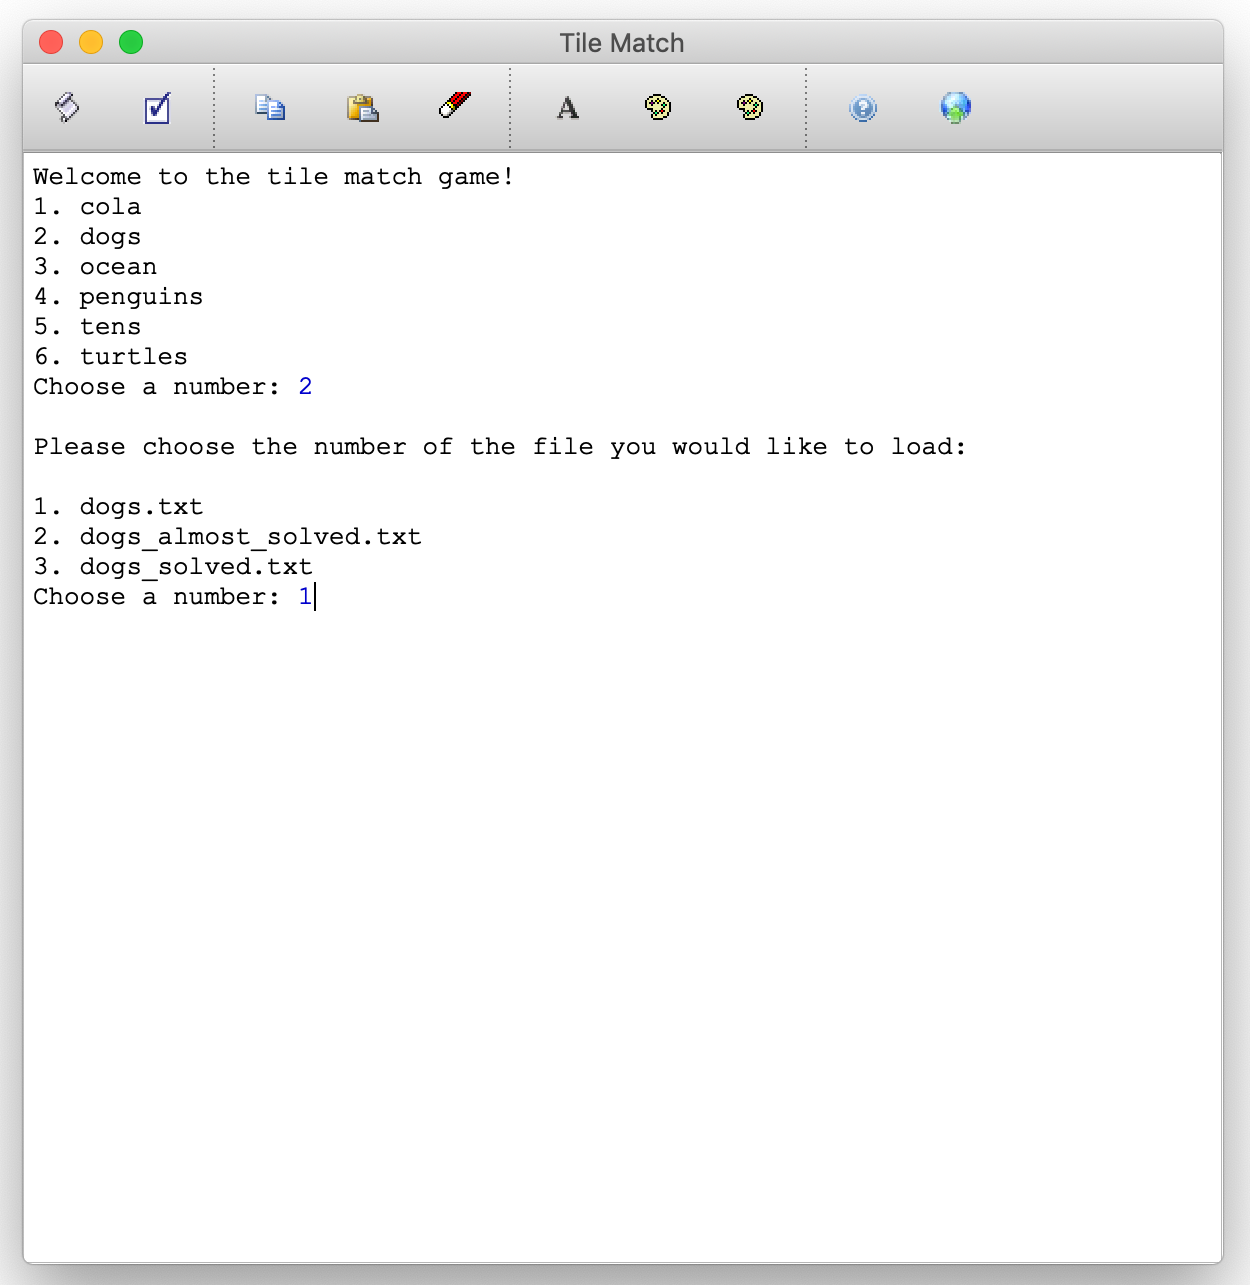
When the program begins, the user is given a choice of which puzzle they want to play. The available puzzles have been curated from a number of sources – some are actual photographs of vintage games, and some are computer-generated. After choosing a puzzle, the player gets to further choose a starting orientation. Some puzzles have solved orientations, and others have almost-solved starting orientations.
Game Start
Once the player has chosen a puzzle, the puzzle appears on the screen and the player has the option to play the game manually. Note that some of the games have been constructed from photographs of real puzzles (the dog puzzle is an example), so the edges don't always line up exactly. Some of the puzzles (e.g., tens and turtles) have been computer-generated, and all edges should line up perfectly.
The console window also shows the beginning layout and orientation of the tiles. We describe this notation in another section, below.
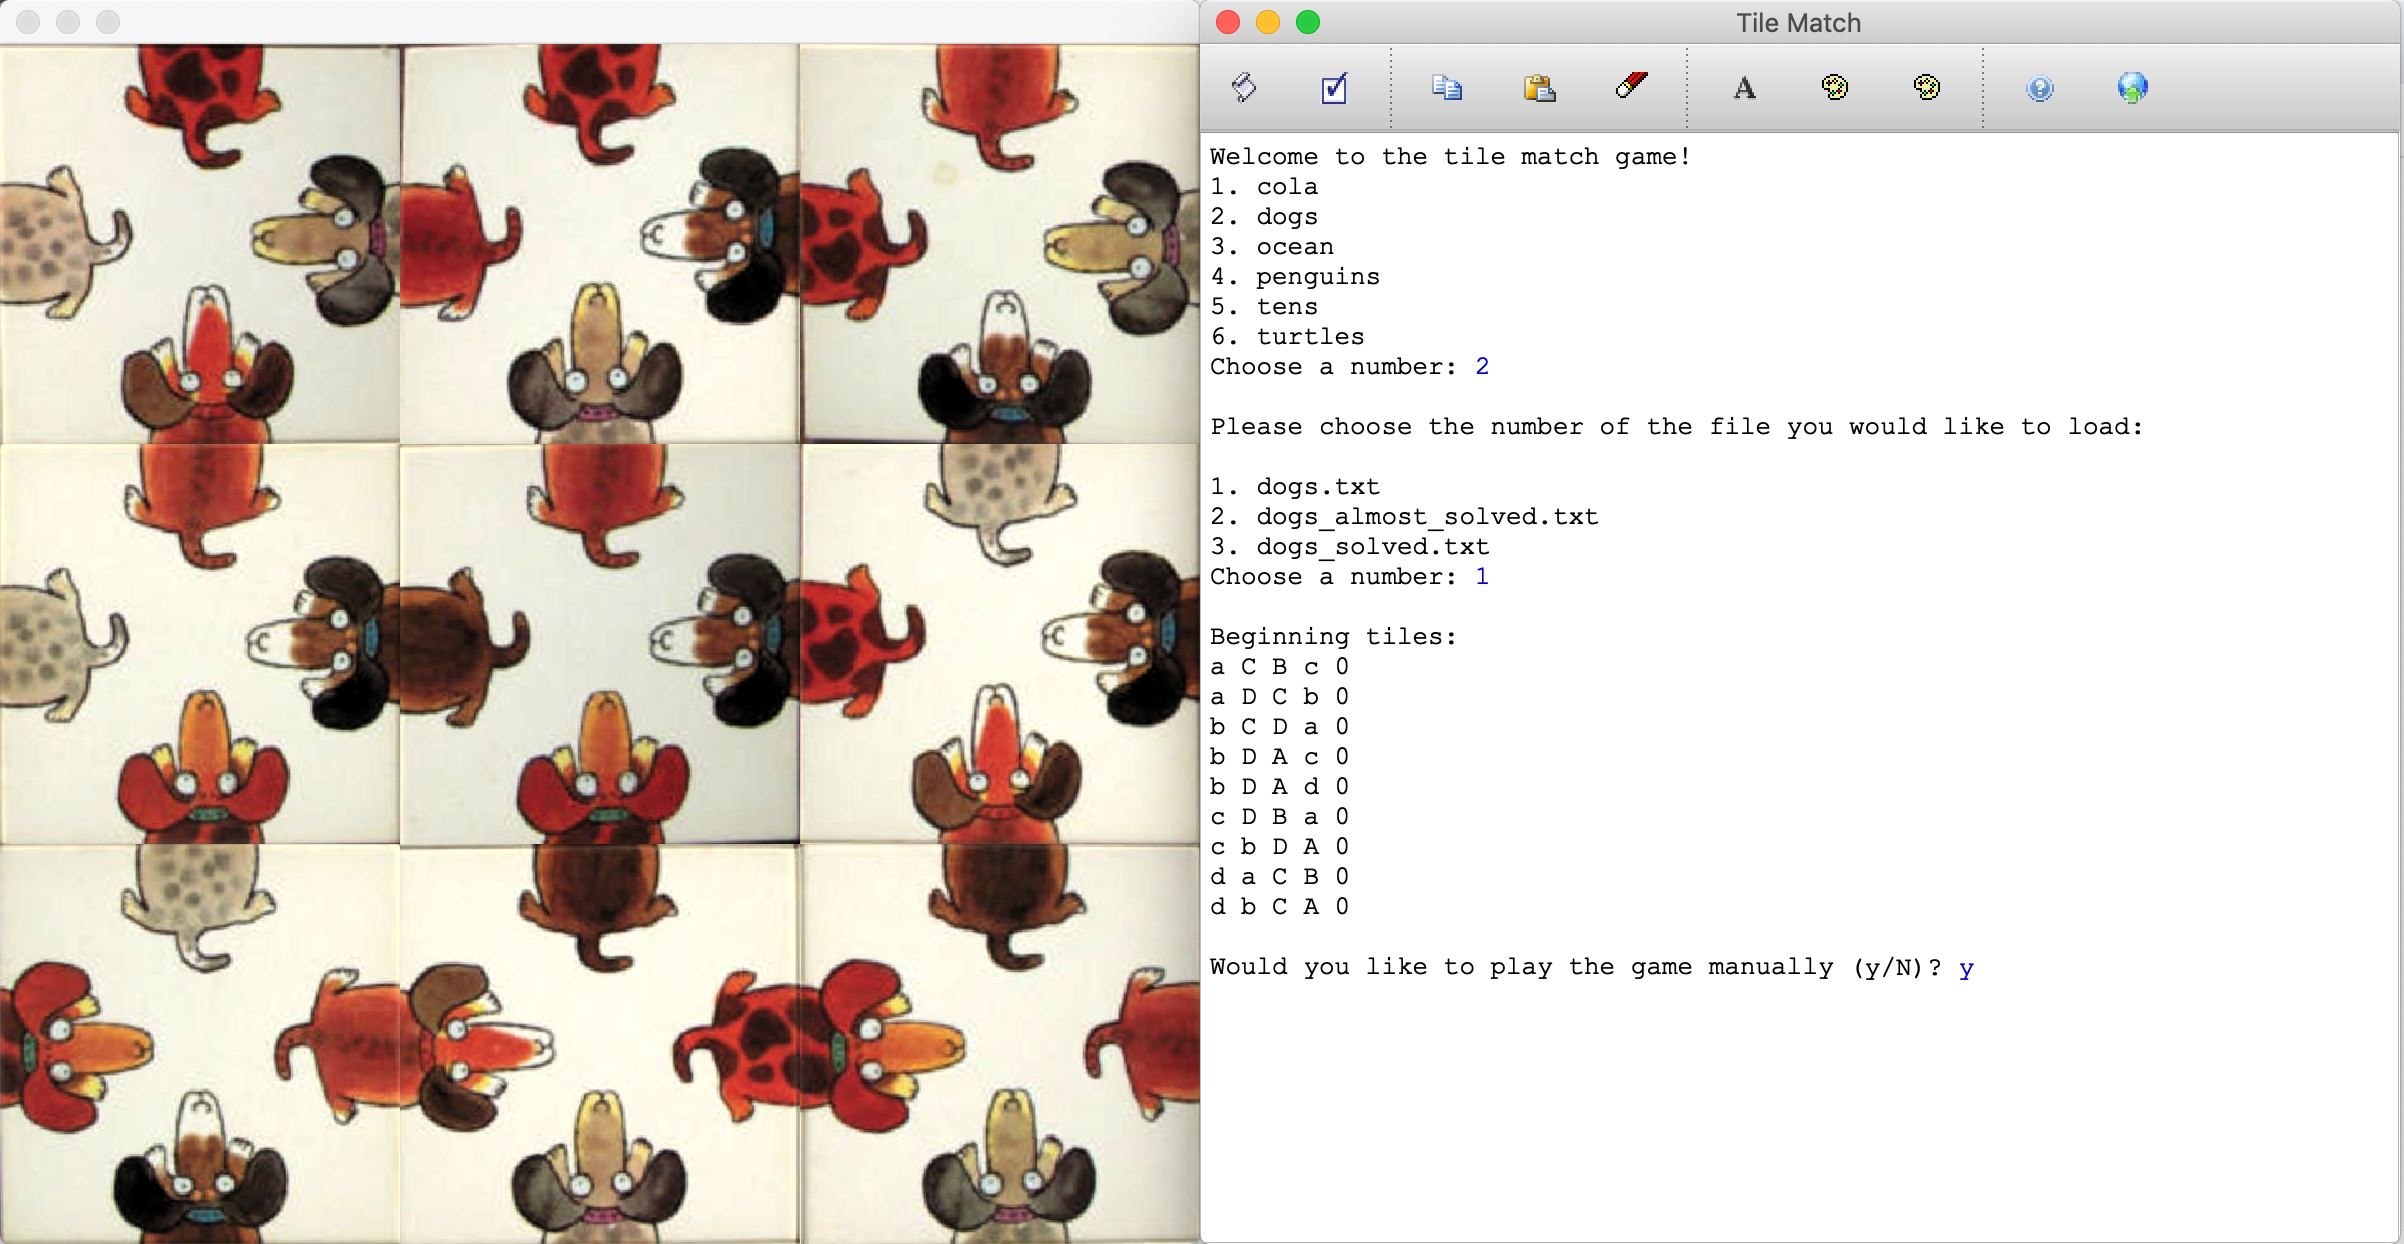
Playing Manually
Once the player is done trying to solve the puzzle manually, typing any key on the keyboard will produce another menu to begin finding solutions:
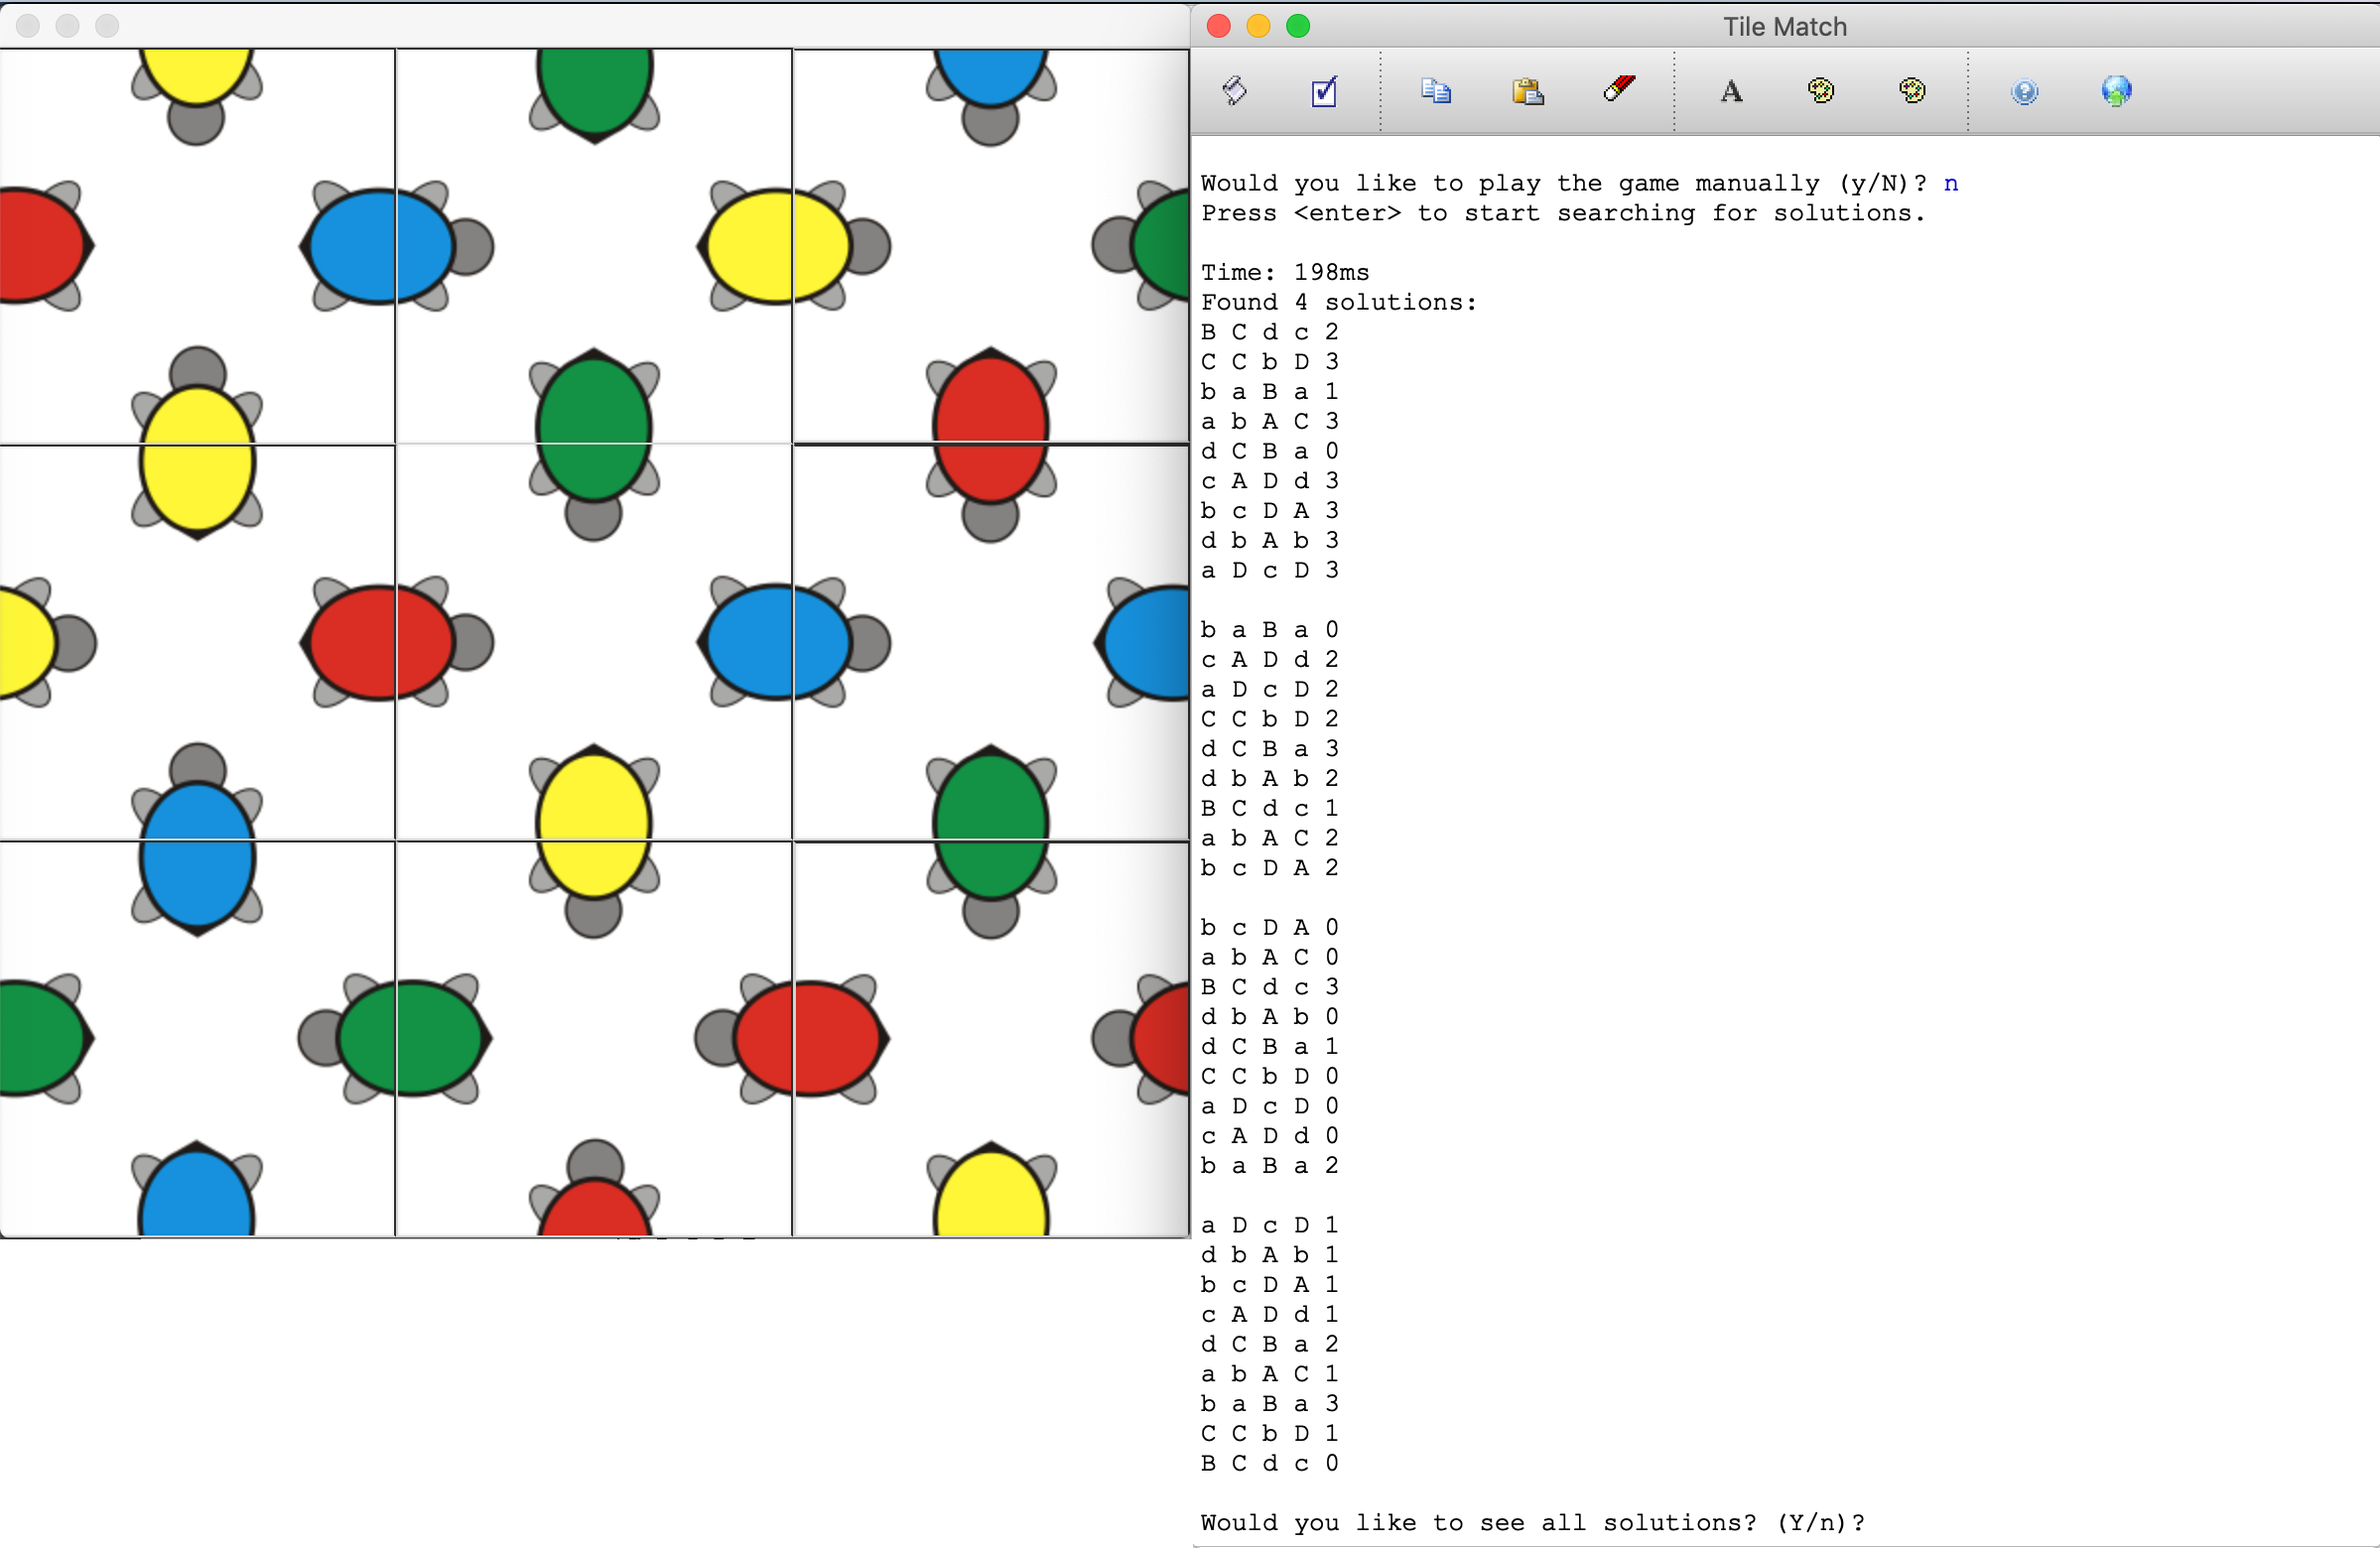
Timing the Solution
Because of symmetry considerations, there will always be at least four solutions for each game, and there could be more. All correct solutions are shown in the console (and each solved image briefly flashes on the screen), and the final orientation found remains on the screen. The timing does not include the animations.
If the player chooses to solve the puzzle one solution at a time, the player can save the solutions after each one, and then can re-load them later. The solutions are saved in text format.

Finding One Solution at a Time
Puzzle Notation
In order to solve a puzzle algorithmically, we need a computer-friendly representation of a tile (that said, an awesome follow-on project would be to simply use computer vision to solve puzzles!). We have chosen the format described below.
When you start a puzzle, you will see the Beginning tiles shown. For example:
Beginning tiles:
c a C D 0
D a c B 0
A c d B 0
d C A b 0
d b C A 0
c d B A 0
b a C D 0
A b d B 0
a B C d 0
Each line represents a single tile, with letters representing the sides, and the number represnting the rotational orientation.
To create a "match" in a puzzle, two tiles are needed, with each tile producing one half of the match (e.g., the top and bottom of a red-triangle cola bottle, or the head and tail of an orange-spotted dog). To represent a match, a letter is used, with the upper case varient (e.g., "A") representing one of the halves ("red-triangle cola bottle top") and the lower case variant ("a") representing the corresponding match ("red-triangle cola bottle bottom").
The orientation of a tile is based on the original image of each tile, with all tiles starting with an orientation of "0". The orientation increases as the tile is rotated clockwise, "1" would be a tile rotated clockwise once, "2" would be a tile rotated twice, and "3" would be a tile rotated three times. A tile rotated four times would be in its original position, and therefore have an orientation of "0" again.
Here is the original tile for one of the turtle puzzle pieces:

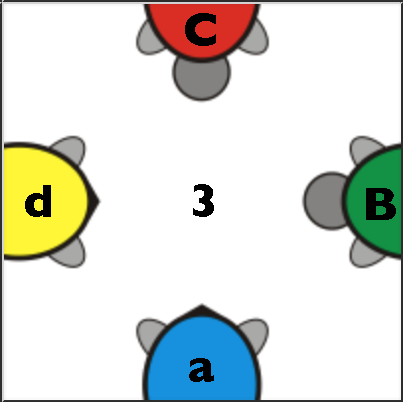
For a turtle, we have arbitrarily chosen A for blue, B for green, C for red, and D for yellow. We have also arbitrarily chosen the turtle head to be uppercase, and the turtle's tail to be lowercase. The following four images show the same piece rotated through its four positions. The letters are annotated on each part of a turtle on each tile, and the orientation is shown in the middle.
 ->
->
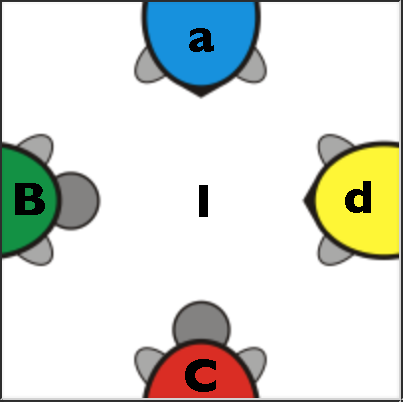 ->
->
 ->
->
The following is a solved and annotated turtle puzzle. It also has the row and column annotated in the text (in purple).
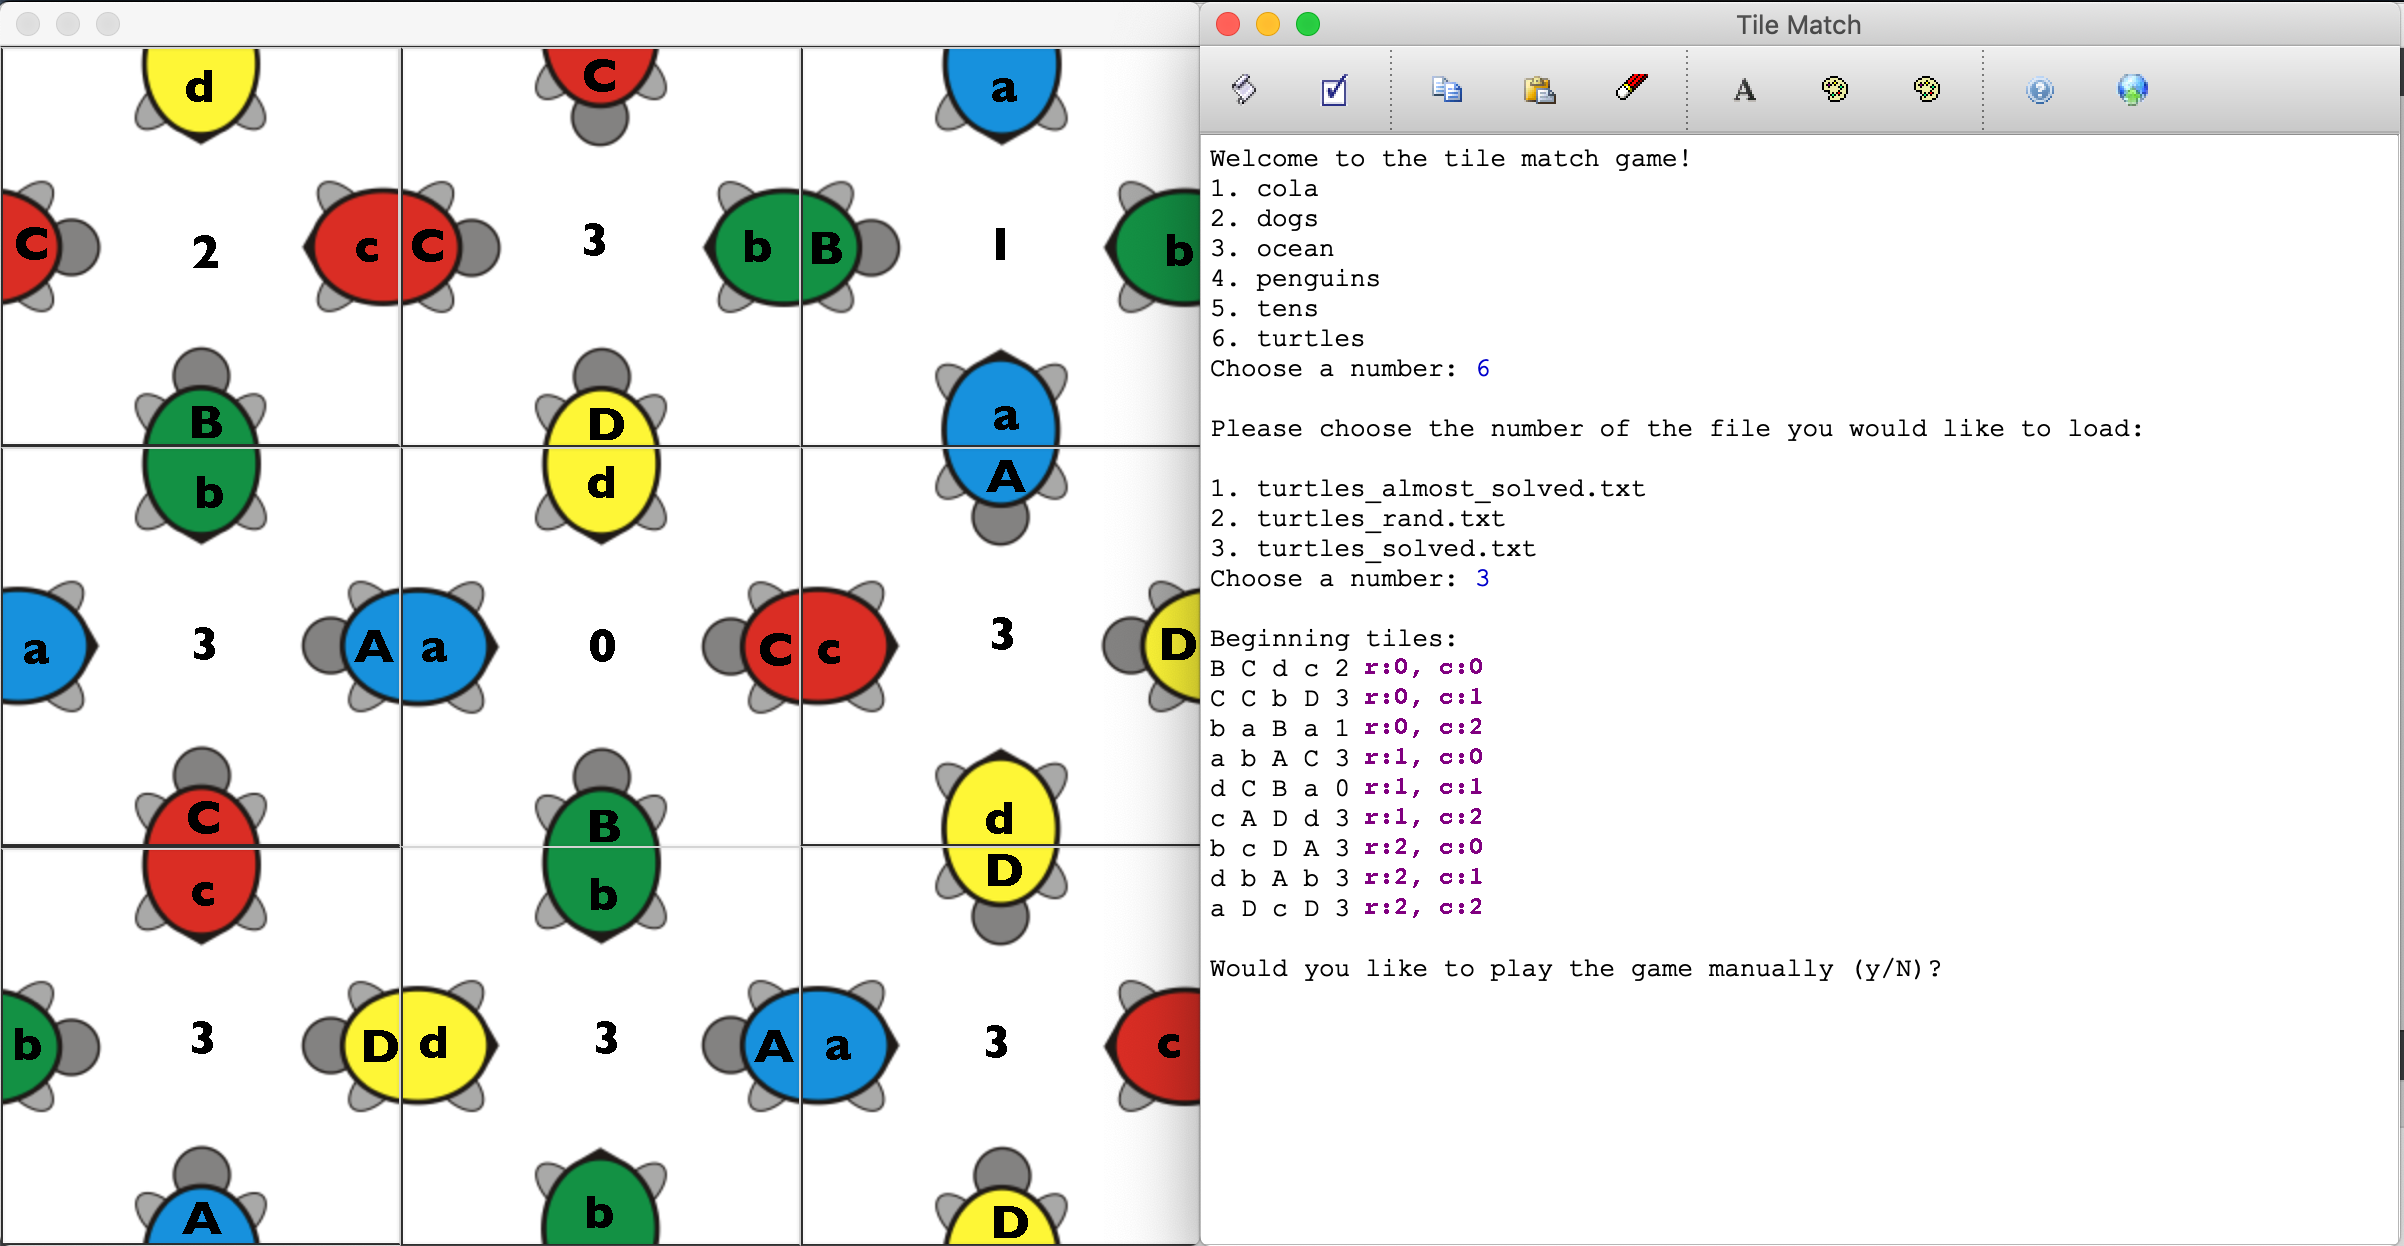
Annotated Turtles - the center turtle is the only one orientated in its original image form
Note that all lined-up turtles have the same uppercase and lowercase combination (A/a, B/b, C/c, or D/d). The only turtle in its original image rotation happens to be the center turtle. All others are rotated.
Implementation Details
You will write code in the following two files. We will describe them in detail in this section.
Tile.cpp, the code for describing a tile.TileMatch.cpp, the code that runs the game and solves the puzzles.
We have provided two other classes for you:
PlayGame, a class that allows the user to play the game by clicking and dragging tiles. You will not have to interface with thePlayGameclass, though you are welcome to investigate its methods.Puzzle, a class that holds images and aGridof tiles. You will have to interface with this in one function inTileMatch.cpp.
Note that we have decomposed the program such that the the Tile class does not have information about images related to a puzzle, and simply defines a tile as described in Puzzle Notation. The Puzzle class has the (somewhat messy) image manipulation functions that are not necessary for the Tile class.
Tile.h and Tile.cpp
As we described in Puzzle Notation, we have devised a way to describe a tile such that it can be used to solve puzzles. Tile.h and Tile.cpp are the files that define and implement a tile description in a C++ class, respectively. Tile.h has been commented heavily so that you know what each function is supposed to do, and we expand on that documentation here. We have written the default constructor for the class for you, but you are responsible for writing the constructor that takes a std::string as a parameter, and you are also responsible for the five remaining functions (some are only one-liners). Although you are not required to do so, you may add private functions and class variables to the class, but you may not change the public functions. Do not change any of the method signatures, either (i.e., don't change the parameters). In other words: someone else using the Tile class should be able to drop your Tile.h and Tile.cpp files into their own code and use it without any changes to their other code.
Tile method | Description |
|---|---|
Tile() |
The default constructor. We have written this for you. This creates a Tile instance with default values. You should not need to use the default constructor, but it is necessary so we can create a Grid of tiles. |
Tile(string s) |
A constructor that parses a string such as A B a b 0 and produces a Tile. The orientation is optional, and if it is not present in the string (e.g., the string is simply something like A B a b, then you should set the orientation to 0. |
bool isMatched(Tile &other, Connection otherLocation) |
This method sees if the current Tile is properly matched with another Tile. This means that tiles are arranged such that the edge that is touching is a correct match. The location of the other tile is given relative to the current tile, using an enum, as defined in Tile.h. If you have never used an enum before, it is straightforward: otherLocation will have a value of any one of Tile::ABOVE, Tile::RIGHT, Tile::BELOW, or Tile::LEFT. You can use the values in an expression such as if (otherLocation==Tile::ABOVE) {. For more information about enums in C++, see here. |
int getOrientation() |
Returns the orientation of the tile. |
void setOrientation(int orientation) |
Sets the orientation of the tile. |
string sidesStr() const |
Returns a string representation of the sides. If the original tile had a representation of A B a b 0, then this function simply returns ABab. This is used by the Puzzle class to enter the tiles into a map with a string key. |
displayTileStr() |
(Written for you) Returns a string that is a display representation of a tile, with the correct orientation. For example, A b a B 3 would return a string in the following form, with a newline after the "B":
b A a B |
friend ostream &operator<<(ostream &out, Tile const &tile) |
(Written for you) Overloads the << operator to print out a representation of a tile, in the original form, but with the current orientation. E.g., A B a b 2 |
Tile class variable | Description |
int orientation |
The orientation of a tile. 0 is the original image orientation, 1 is rotated clockwise 90 degrees, 2 is rotated clockwise 180 degrees, and 3 is rotated clockwise 270 degrees. |
Vector<string> sides |
A Vector that holds the string values (e.g., A). The Vector should hold the values in the order they appear the text representation, e.g., for A B a b 0, the Vector should have the values in the order A then B then a then b. |
TileMatch.cpp
You only have to write one functions in the TileMatch.cpp file. There are other functions in the file that you can investigate, but you should not change any of them. We have provided a function (described below) called allMatch() which you may find helpful, but do not need to use if your solution does not require it.
| Function | Description |
|---|---|
void findAllSolutions(Vector<Tile>& tileVec, Grid<Tile>& tiles, int row,
int col, Vector<Grid<Tile>>& solutions) |
This is the recursive puzzle solver function. The tileVec parameter is a Vector of tiles that you can use for backtracking. The tiles param is an initially blank Grid of tiles that you can populate with the tiles from tileVec to check whether your backtracking is headed towards a correct solution. The row and col parameters provide the current location, and the first time the function is called they will both be 0. Finally, the solutions parameter is a Vector of Grid of tiles correct solutions that you should populate as you find correct solutions. |
bool allMatch(Grid<Tile>& tiles) |
(Written for you) Determines if the tiles form a matching solution to the puzzle. true if the puzzle is solved, false otherwise. |
Development Strategy
Before you begin writing any code, check out the demo program, and make sure you understand how the program works.
The puzzle notation is important to understanding the functions in the Tile class, so spend some time understanding the notation. Think about what two matching tiles would look like next to each other (either vertically or horizontally).
You should complete the Tile class before writing any other code. To test the code, use the runSimpleTests(SELECTED_TESTS) from TileMatch.cpp.
Extension Ideas
Give "hints" to the player playing live. Modify the game-playing code so that when the user presses the h key (for example), the user gets a hint on how to play next. Perhaps the program could point out the correct rotation or position of a particular tile.
Print a "list of moves" from start to a solution. Come up with a way to walk a player through the moves that would have to happen to go from the original tile locations to the solution. The easiest way would be to detail the locations of the tiles, and then the rotations, but there are other options.