Introduction
This is intended to be a basic guide to using Eclipse. This guide is by no means comprehensive, but is sufficient to give you enough knowledge to work on your 108 projects. Running and using Eclipse should be the same regardless of operating system. If there are any OS-specific tips, we'll save them for the end of the document.Obtaining Eclipse
Eclipse 3.2 is installed in our class directory. To use this installation, add /usr/class/cs108/bin to your path and type runeclipse. (Check out the Java on Unix page to see how to set your path). Note that you have to ssh into a Linux machine (such as myth.stanford.edu) in order to use this installation. For those who are used to the Solaris machines (i.e. elaine.stanford.edu), this will NOT work because as of version 3.2, Eclipse is no longer built for Solaris 8/Motif. For those who don't know what an elaine is, feel free to ignore this and go ahead to run Eclipse from myth.stanford.edu. Look here for a guide on how to establish a remote SSH session with X forwarding.
If that somehow doesn't work for you, you can try running Stanford's Eclipse 3.1 on any of the myth, bramble, and hedge machine. X-forward an SSH session and execute /usr/bin/eclipse.
Mac X11 users: try ssh -Y if ssh -X doesn't work for you.
Report any errors to cs108@cs.stanford.edu. Remember to describe precisely what happened when you encountered the error. This includes the name of the machine, the command you ran, the error message you got, and if possible the environment variables of your shell (run setenv to get them).
If you prefer to work from your room, you can get Eclipse here. Eclipse is available for Windows, Mac OSX, Linux, and a variety of Unix platforms. You will also need the Java Development Kit (JDK) available here. We'll be using version 1.5 this quarter. Mac OS X machines have Java 1.4 built-in. For Java 1.5, Mac users need to be running Mac OS X 10.4 and then download the latest Java 1.5 from the apple site.
Using Eclipse
You will want to create a new project for each assignment in CS108. This will let you separate the files for each HW into different folders. Before you start, make sure you're using the Java 1.5 environment. Go to Window->Preferences. On the left pane, click Java->Editor->Installed JREs. Make sure that the 1.5 JRE is added and checked.
- Create a new project from starter
files
Bring up the New Project Dialog by selecting File->New->Project.... Click Java and over on the right you should see Java Project appear. Click on Java Project.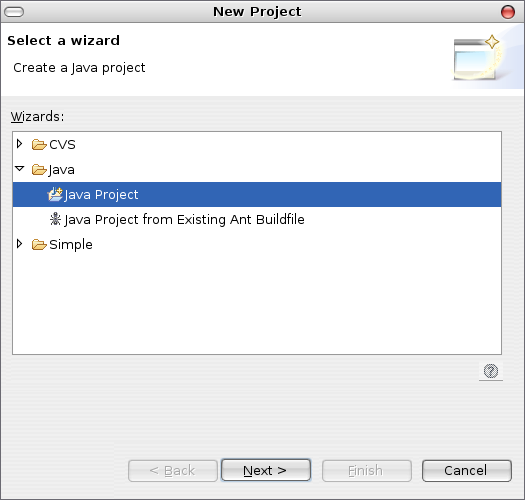
Then click Next. Now, give your project a name. Click "Create project from existing source" and add then add the directory in which your project lives. We want to use Java 5 (also known as Java 1.5), so you can either specifically select it, or set 5.0 to as the default. Also, click on "Use project folder as root for sources and class files."
Now, just click Finish and you're done creating the project! If it asks you to switch to the Java Perspective, say yes.
Another thing you want to do is make sure the project is using the correct JRE. Right click on your project in the Package Explorer on the left and click on Properties. Select Java Build Path and Choose the Libraries Tab. If the JRE is 1.5, you're fine.
If this isn't the case, you need to set a different JRE for the project. Click on "JRE System Library", and then click Edit. Select Alternative JRE and select the JRE you want from the drop down box.
- Adding existing files to the project
If you had a HelloWorld directory with all your source files, an easy way to addthese files to your HelloWorld is probably to just Import the HelloWorld directory. After adding the HelloWorld project,you should now see it in the main window. Expand the 'HelloWorld' node and you should see a folder for your sources, 'src'. You will also see a node for the Java libraries, but you can ignore that. Right click on the 'src' directory and click Import.... Select File System as the input source and then click Next. Enter the CS108 HelloWorld directory as the directory of files to import. You should see the directory and its contents in the tree view. Click on the files you wish to import, or click Select All... to import all the files from that directory. Make sure that you also select Create Selected Folders Only. This way it will put all the files in the 'src' directory. Otherwise it would make a '/usr/class/cs108/HelloWorld/' directory in your 'src' directory, and everything would be in there, and it wouldn't be pretty. And finally, click Finish and you're done! Alternatively, you can just create a project from existing source, as mentioned above.
- Adding new classes/files to the project
To add a new class to the project click File->New->Class. This will bring up the New Class Dialog. In this dialog, you can set a bunch of properties for the class. In my example, I've created a HelloWorld class in the default package, and I clicked on the option to create a main() stub, so I wouldn't have to type it out myself. Once you are done filling in the info for your class, hit Finish and you're done! The Java Perspective should look something like this: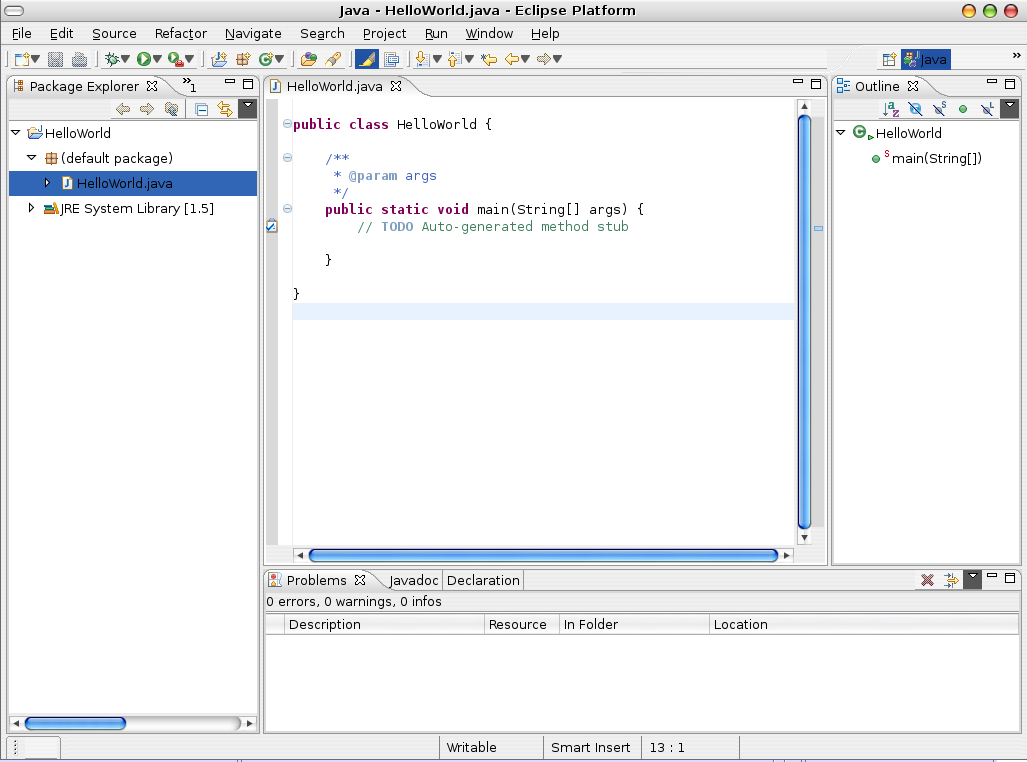
- Building the project
To compile the .java files into .class files select Project->Build All. (from then on you can do Build Project which will only compile those .java files that haven't been compiled yet).
- Running your program
To run your program once it has compiled without errors, either click Run->Run... or click the button that looks like 'Play'. Select Java Application and then click New.
Then you will have a chance to select which class's main() you want to use as a starting point. Eclipse will automatically filter out classes that don't have a main(). You also get to specify any arguments you want to pass to main().
Once you're ready, hit the Run button, and you're off and running!
- Debugging your program
To debug your program click Run->Debug.... This will pop up a dialog similar to the one used to Run the program. Click Debug (or the icon of the bug) and two things will happen. First, this will change your perspective to the Debug perspective. Secondly it will start running your program.Now if you want to stop debugging at any time, click Run->Terminate. (If you see a blue "all done" in the Console at the bottom, then you have finished running the program, and you won't be able to Terminate.
-
The Console window
The Console window in the Debug Perspective will be your friend! This is where all the console output will go. So this is where you will see all your System.out.println() calls. Printing out debugging information to the console window can be a huge tool for debugging. -
Adding Breakpoints
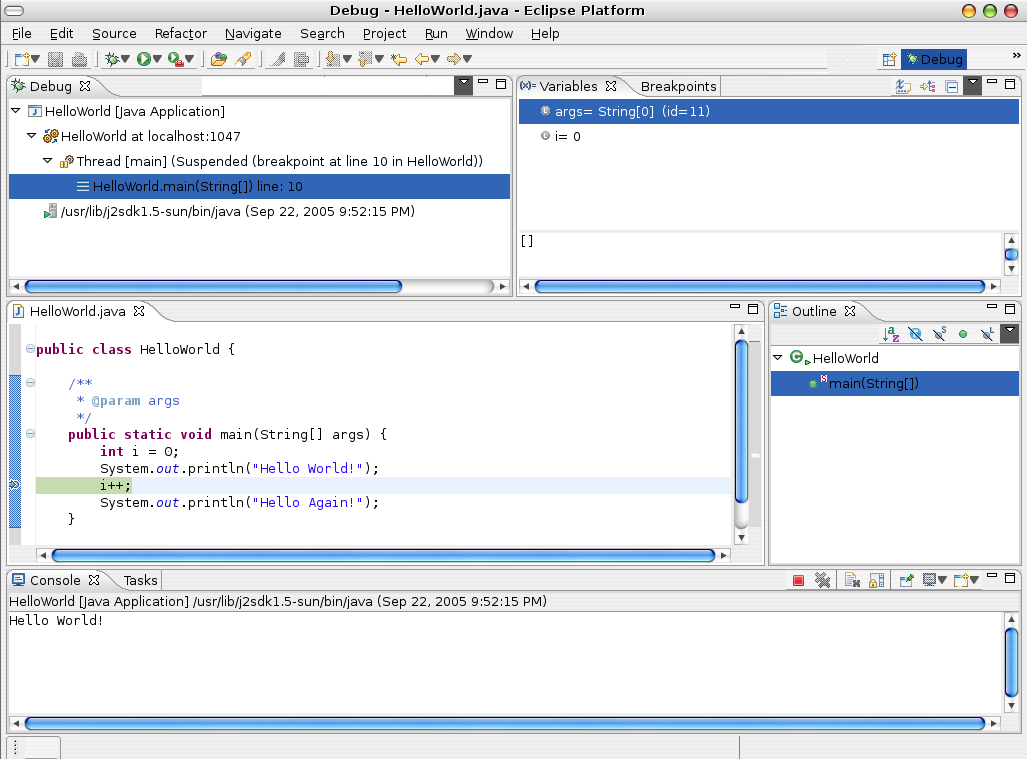
You can add breakpoints in both the Java Perspective and the Debug Perspective. To add a breakpoint at a certain line, right-click in the left margin on the line that you want a breakpoint. A little menu should pop-up. Click Toggle Breakpoint. A little blue dot should appear in the margin on that line. Similarly, this is the same way you remove a breakpoint.When you run the debugger, the program will now stop before executing the lines with breakpoints.
In the picture above, I placed a breakpoint on the line that says i++.
You can step through your program one instruction at a time. You can choose to step into methods or over them. This can be done from the Run menu, or by using the buttons on the Debug toolbar:
To set a breakpoint that triggers only when certain conditions are true, i.e. a conditional breakpoint, or set them to trigger only after being hit a certain number of times, right-click the blue dot/breakpoint and select Breakpoint Properties....
-
Looking at the contents of variables
One of the very powerful tools that the debugger provides is the ability to see the contents of variables at any point in the execution. When in debug perspective in eclipse, you can see the 'Variables' pane in the upper-right. This will show you the contents of various local and member variables.
One neat thing you can do with debugging is change the value of a variable at any point in the execution. Right-click a variable and select Change Value...
-
The Console window