HW 1 is made of many Bit problems, some small and some large.
Part-a is the first set of problems on this page. Part-b depends on lecture-3, and we'll release it at that time. The whole thing is due Wed Jan 14th at 11:55pm. The mechanics of submitting your work will be explained in the part-b text.
Lair helper hours (linked off course page) begin for the quarter on Sun night, and Nick and Ngoc are available right after class plus thie hours M-F are listed on the course page. The experimental server saves your code each time you click the Run button. There is also a (seldom used) "save" command in a menu, if you want to save your code without running it.
Three ground rules for doing these problems...
1. Solve these problems just using the basic Python features shown in the examples this week: def, while, if, ==, !=, None, plus the Bit functions like bit.move(). The problems here can all be solved nicely with just those basic features. Do not use Python features like range() which we have not covered yet. Using such a feature is a sign that your solution is on the wrong track.
2. Work on your code just running with a single case, like Case-1, as this shows you the best feedback as the code runs. Then as a last step, select the "Run All" option in the menu and Run to check your code against all the cases. If successful, the output is "All Correct" at the top with the big checkmark, which means your code produces the correct output. You should also check your code over for clean style (also covered Fri). See Python Style Guide
3. Famous CS Planning proverb: "We don't have time to stop for gas, we're already late." You should always read the handout for each problem as you work on that problem. I know it's a lot of text, but sometimes it can save you a ton of time. If we see students getting stuck on some spot that is not a good use of their time, we'll add clarifying sentences in the handout for that spot. Don't be the student who gets stuck on some issue for hours, only to discover that the solution is mentinoed in the handout.
The part-a problems are 1 function each - no extra decomposition.
These first 2 problems correspond to the first lecture - no loops.
1. bit-alpha
2. bit-beta
Then we have loops and logic problems from lecture-2.
3. top-rgb
4. top-bot
5. top-logic1
6. top-logic2
7. change-green
Note for problems 8 and later: When bit moves across a series of squares in a straight line, we'll call that a "linear move". Many of the problems below involve a series a linear moves, e.g. Bit follows a horizontal line, then turns and follows a vertical line, and then turns and follows another horizontal line. In your code, each linear move should be solved by its own while loop. Where bit stops for each linear move should be encoded in the while-test, so the loop ends on the last square. This is a good way to code a series of linear moves, and it's the way we want you to do these. When the problem statement says "use three loops", that is a reminder of this rule; it does not limit your use of if-statements, just spelling out how many loops there should be. (See linear move example in lecture 2.)
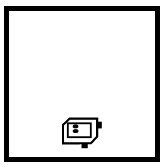
8. hidey-hole
Suggestion, as above: One loop to move right, with its test stopping at the right spot. Then a second loop to go down.
9. cave-blue
10. downward-red
11. upward-blue
12. up-green
Suggestion: write one while loop that gets to the top first and test that. Then add if-logic inside the loop to detect and handle the niches on the way. See the lecture-2
blue-dip example.
Before
After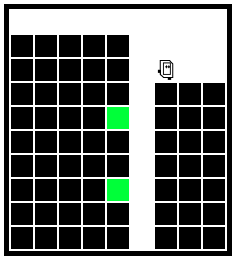
13. tunnel
Before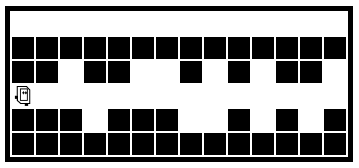
After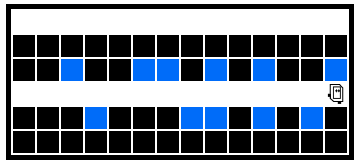
The code for tunnel is a little repetitious. For part-b, we'll see a technique to tighten that up.
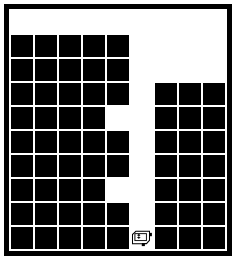
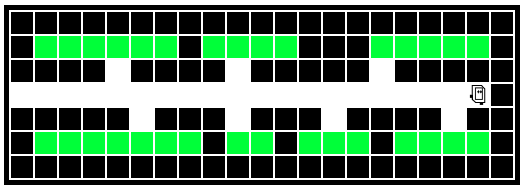
14. spiral escape
Bit is stuck in a terrible maze. Use 5 loops to get bit to the exit square on the left edge like this: 1. Move bit forward until a solid black square appears to bit's left. 2. Turn right and then move forward until the first green square. 3. Turn right and move one square forward, into the 1-wide vertical hole. Move down the hole until an empty square appears to bit's right. 4. Turn right and then move until blocked. 5. Turn right and then move until on a non-blue square. 6. Turn left and move exactly one square - this is the exit. Paint it green. Bit praises your coding genius from the exit square!
Suggestion - this problem has, if we're being honest, every linear move situation we could think of. As explained above, each line move should get its own while-loop. You want to use a drawing to work out the geometry and logic for the loops, getting bit to stop on the right square using each while-test. Here is a drawing based on the Case-1 maze, showing how you might focus on the 5 stopping squares to work out the while-tests. This is good example of using a drawing to work through a complex sequence. Don't hesitate to click Run on your partially entered code — a handy way to see what's working and what the setup is for the next step.

Stop Here - ok congrats, that's a ton of Python problem solving, and you are done with part-a of the homework. We will release part-b on Friday, and also instructions for turning in your code (which the experimental server saves on each click of the Run button). Part-b will have a few problems, using techniques from Friday's lecture.
These problems use the ideas from Friday lecture.
This problem deals with the double-move issue of how to do 2 moves within a loop. This is a single-function problem.
Starting with this problem, there will be one or two helper functions per problem. Recall the key theme of lecture-3 — call the helper function. There are radio-buttons at the top of the page on the experimental server that scroll to each function and adjust which case is tested, or you can do it manually. All the function defs should be at the leftmost indent in the text; not one function indented inside another. The line "bit = Bit(filename)" should only appear once in the whole program (the Fri lecture examples demonstrate this). The Python "pass" construct is a placeholder showing where you code goes, and it should be deleted.
For these problems, we are specifying the function pre/post conditions here in the handout instead of in the triple-quote """Docstring""" in the code.
a. do_tree(): The helper function do_tree() draws a small tree made of 4 painted squares. The bottom of the tree is made of a green square, a red square, and a green square in a row. Then above the red square is one more green square. Before the function runs, bit is one square away and facing what will be the red square. The function draws the tree with a series of moves, turns, and paints, but no loops. It's ok if bit moves a little inefficiently, so long as the tree is drawn. At the end, leave bit on the original square, but facing the opposite direction from the beginning. Assume there is enough clear space to draw the tree.
Before do_tree()
After do_tree()

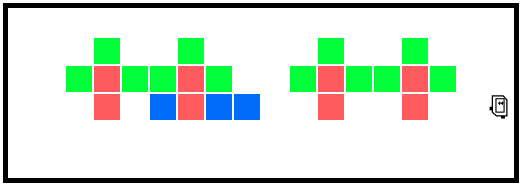
b. do_forest(): bit starts facing the right side of the world. Move bit straight forward until blocked. For each moved-to square, if the square is red, draw a tree just above the red square.
Before do_forest()
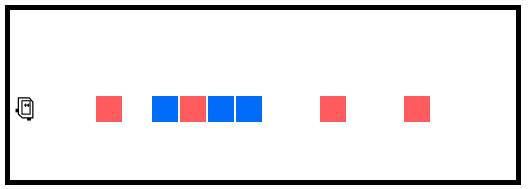
After do_forest()
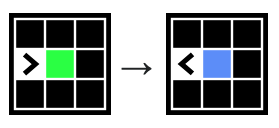
a. one_dot(): For this problem, a "dot" is a single square available for painting. Bit starts off facing an adjacent dot square. Move bit to the dot square, and then fix the color there as follows: if the color is green, paint it blue. If the square is blank, paint it red. In other cases, leave the square unchanged. Finally move bit to the original square, facing away from the dot. The first four test cases test this helper. Do not use any loops.
one_dot():
b. all_dots(): Bit is on a flat road facing the right side of the world. Move bit forward until blocked. For each moved-to square, if there is an empty square below, call one_dot() on it to fix that square's color. When bit reaches the end road, there is guaranteed to be one last dot immediately above the block that ends the road. Add code after the loop to fix this last dot. Leave bit facing away from the last dot. Use one loop. Suggestion: get the road dots working perfectly first. Then work on the last dot.
all_dots():

a. For this problem, the do_room() helper function paints one room green. Each room is 1 square high and 1 or more squares wide. There is one empty square - a door - that is the opening into the room. The door can be anywhere along the room's width. Bit begins in the door square, facing into the room. Go into the room and paint all its squares green. Then return to occupy the door square, facing out of the room. It's ok if bit goes some extra distance, so long as all the painting is done and bit gets back to the door. Try to only paint each square green a single time. Our solution uses 3 while loops which is a good approach — get to one side, paint all the squares green, find the door.

b. Bit starts at the beginning of a 1-wide hall. Move bit forward to the end of the hall. For each moved to square, a door to a room may appear at the left or right, or both. Fill all the rooms with green. End with bit at end of the hall, facing the original direction. Use one while loop to all the way to the end of the hall. Add logic within the loop to detect and handle the rooms.
This problem is an algorithmic classic.
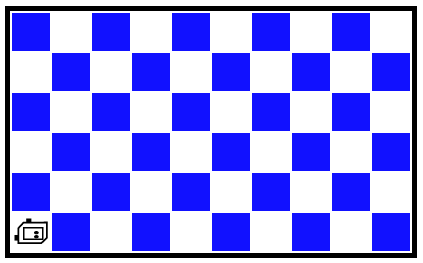
Solving this problem is similar to solving the Fill example from lecture-3 — helper functions which solve a single row, and a main function that goes down the left side, calling the helper(s). Looking over that lecture example will save you time on this problem. For the Checkerboard problem, Bit starts in the upper left corner, facing down. Move bit to the lower left corner, filling in all the rows with a checkerboard patternl, like this:
Before:

After:
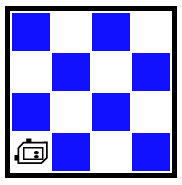
It's handy to have terms for the two row types — we'll say the topmost row is "type 0", since the blue squares begin right away, and the second row is "type 1".
Your code should be able to solve any size world that is 2x2 or larger, and the world may not be square. The double-move issue appears a couple times in the checkerboard, so keep your solution to the blue-green problem above in mind.
We will decompose out two helpers, solving each type of row — do_type0() and do_type1().
There is a cute coding trick that helps with the code for the type-0 and type-1 rows. It's a non-obvious coding trick, so we're going to nudge you in the right direction here: get the do_type0() function working first. Then, inside your do_type1() function, you should call the do_type0() function to do almost all the work. As a result, the do_type1() function will be short and will not itself contain any loops.
Get the helpers working first, before solving the whole checkerboard. Cases 1-6 in the menu test the helpers, testing them with both even and odd width rows.
The pre/post specifications for the helpers are provided in the """Docstring""" text on each function.
def do_row0(bit):
    """
    Begin facing down in the row to fill.
    Move towards the right side of the world,
    making a type-0 row.
    End at the left side of the row, facing down.
    """
    pass


def do_row1(bit):
    """
    Begin facing down in the row to fill.
    Move towards the right side of the world,
    making a type-1 row.
    End at the left side of the row, facing down.
    """
    pass
Type-0 before/after:


Type-1 before/after:

Now the main challenge — write code in do_checkerboard() to solve the whole thing. Bit begins in the upper left corner facing down, and ends in the lower left corner facing down. Use the same structure as the fill() example: in the loop, move into a row and then solve it. First get the function to solve all the rows except leaving the very first row blank. Once that's working, think about adding a little code to solve the first row.
You have earned a moment of satisfaction when it finally works.
Below is the link to turn in your code to "Paperless", the system where the section leaders review and grade your code. The Experimental server is storing your code each time you click the Run button, as you can tell if you close a tab and then re-open it. Use the page linked below to review and send your from the experimental server to paperless. Your code needs to have passed the Run All case, getting the big checkmark, and the code should be cleaned to follow proper PEP8 Python coding style as explained here: Python Style Basics
And you're done - welcome to Python coding!