For this project, you'll combine decomposition with code that draws lines, ovals etc. to make some neat patterns. All parts of HW5 are due Wed Feb 18th at 11:55 pm.
This week's warmups are on string while-loop patterns: parsehw. Infinite loops can be an issue with these while loops, so look at your while-test to see that it will become false at some point, and that the index is being changed on each iteration.
Turn In Turn In Warmups to Paperless
To get started, download quilt.zip. Open that .zip file to get a "quilt" folder containing the quilt.py file for this program. Open the quilt folder with the PyCharm open... menu command to get started.
For the quilt program, we provide working main() function. Depending on the command line arguments, main() calls one or another of your functions as shown below.
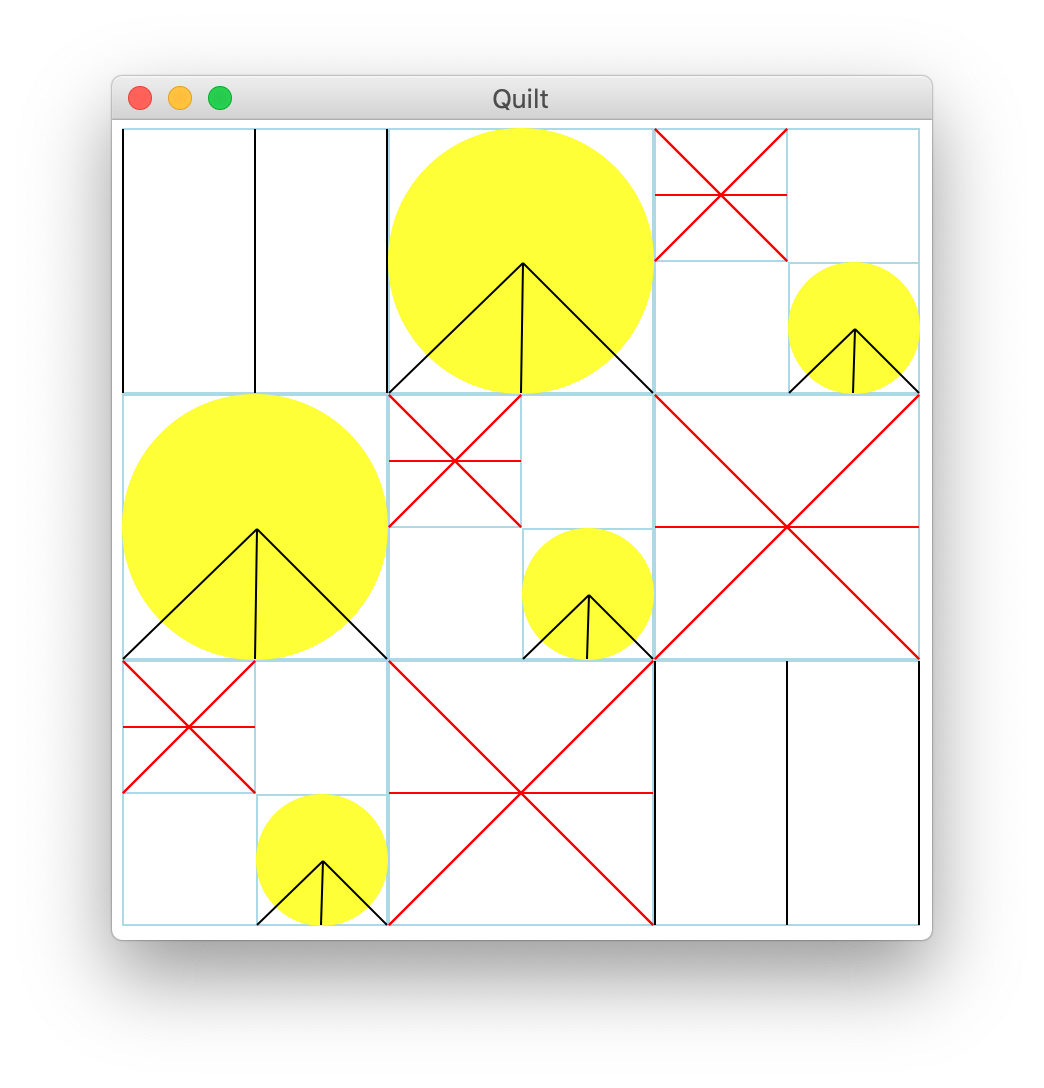
The quilt drawing is made of three different "patch" drawings: bars, eye and bowtie. Each patch type is drawn by its own function, and these functions are the first three parts of the project.
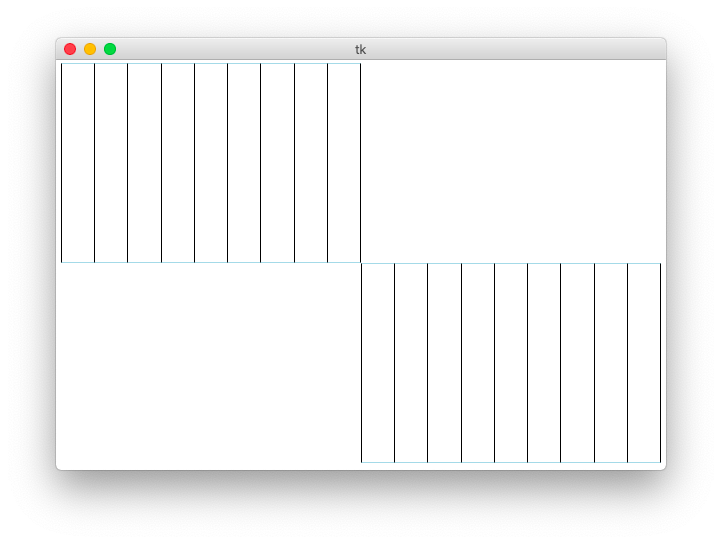
def draw_bars(canvas, left, top, width, height, n):
This function draws a rectangle and then a series vertical bars (see examples below).
1. Draw a rectangle frame on the passed in canvas with the rectangle's upper left corner at the given left,top and extending the given width and height. Draw the rectangle with color='lightblue'.
2. Draw n black vertical lines on the canvas. The first line should be on the left edge of the patch, covering the left side line of the border rectangle. The last line should be at the right edge, covering the right side line of the border rectangle. All the other lines should be evenly spaced between the 2 sides. The n parameter is guaranteed to be at least 2.
To test that your functions are using parameters properly, main() divides the window into 4 quadrants, and calls your draw_bars() function once to draw in the upper left quadrant, and a second time to draw in the lower right quadrant.
Here is a command line run of the program to create a 600 by 400 window, drawing two 300 by 200 patches with n of 10 — one patch in the upper left quadrant, and one in the lower right.
$ python3 quilt.py -bars 600 400 10
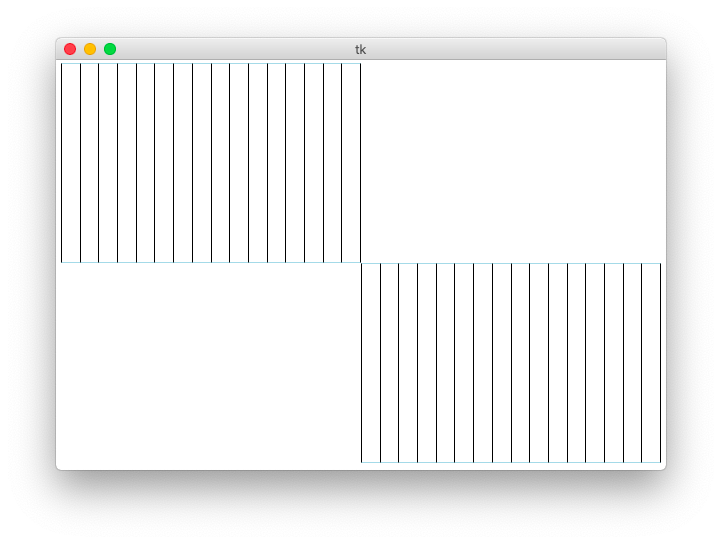
Here is a run of the same size, but asking for 17 bars
$ python3 quilt.py -bars 600 400 17
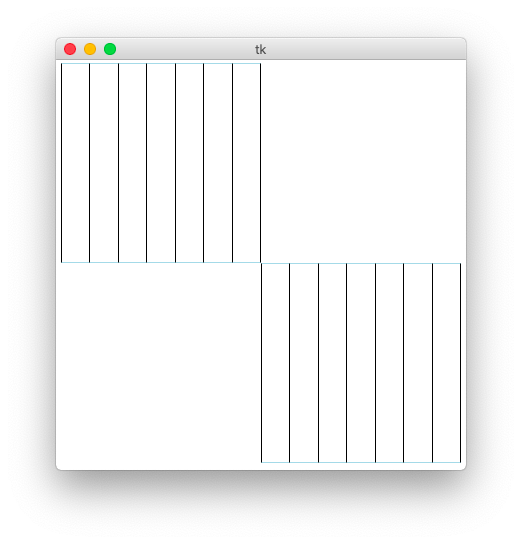
And here is a run asking for 8 bars with patch size 200 by 200
$ python3 quilt.py -bars 400 400 8
Note that if your Python code hits an error, the exception printout will be in the terminal where you launched the program, so be sure to look there if your output is going wrong. Close the graphics window to exit the python program when done.
Divide And Conquer aside: you don't want to type in a big program (or any large project) and then test the whole thing at the end. The best practice is to proceed in smaller pieces — build a part of it, and test that part right away. Then build and test the next part, and so on. CS106A project writeups naturally follow this best practice, talking about project sub-parts, and "milestone" tests of each part as you gradually build up the whole program. These graphics functions do not lend themselves to Doctests, so we are testing them by running them individually and looking at the output.
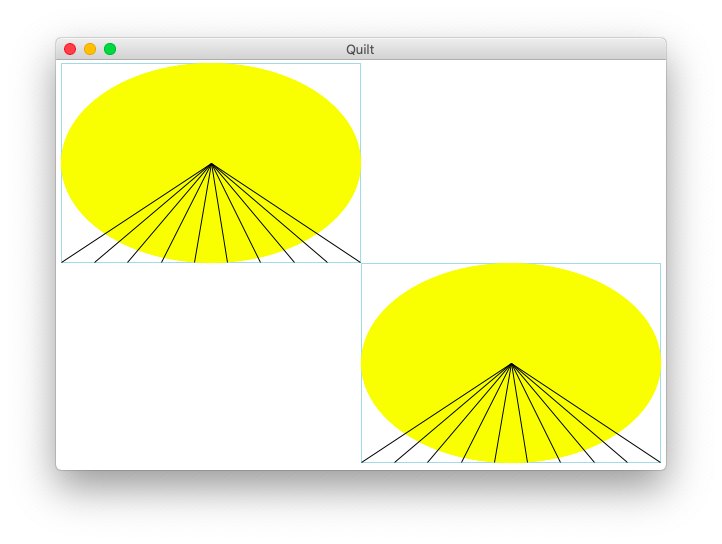
def draw_eye(canvas, left, top, width, height, n):
1. Draw the lightblue border rectangle, the same as for the bars.
2. Draw a yellow oval, with the upper left of its bounding box at left,top and extending for width,height. The oval should just barely cover up the border rectangle on the four sides.
3. Draw n black lines starting from the center of the oval. We'll say the center is the pixel 50% of the way across the patch horizontally and vertically. Extend each black line to n points on the bottom edge of the border rectangle, distributed along the edge evenly in the same way as the bars patch.
The following command line calls your draw_eye() twice in a 600 by 400 window, 10 lines:
$ python3 quilt.py -eye 600 400 10
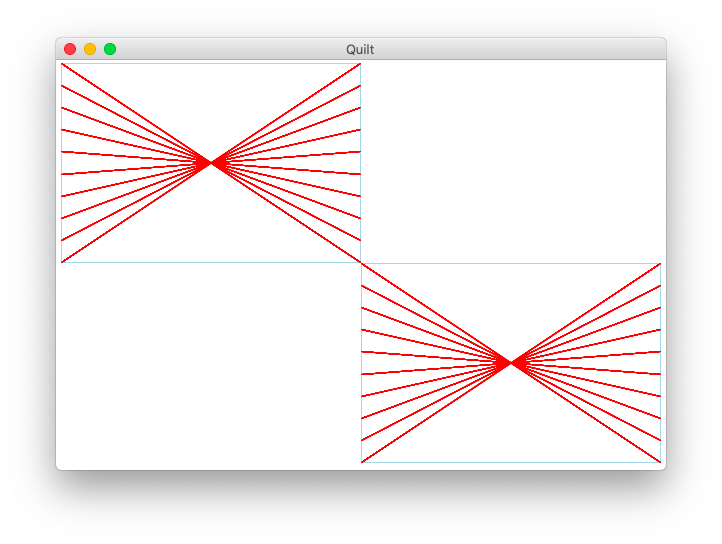
def draw_bowtie(canvas, left, top, width, height, n):
1. Draw the lightblue border rectangle as before.
2. Draw n red lines as follows. N will be 2 or more. The first line is from the upper left corner to the lower right corner of the patch. The next line moves down on the left, and up on the right. Continuing this pattern with the lines evenly spaced until the last line starts from the lower-left corner and goes to the upper right corner. Draw each line in 1 step, from its point on the left edge to its point on the right edge (do not draw 2 line segments, each to the middle, which is more work and does not look quite right).
One approach: for each line 0, 1, 2, ... n-1, compute a "y_delta" amount which is the vertical distance from the start point. For the left side, the deltas move down from the upper left corner. For the right side, the deltas move up from the lower right corner.
To draw a line of a specific color, add the optional named parameter color like this: canvas.draw_line(0, 0, 10, 10, color='red')
Minor PEP8 detail: optional parameters like that are written without a space around the =
The following command line runs draw_bowtie() twice in a 600 by 400 window, 10 lines:
$ python3 quilt.py -bowtie 600 400 10
Build and debug your code until it can draw all 3 patch types correctly for various sizes and values of n.
Now it's time to add the fourth Power Patch type. The power patch looks like this:
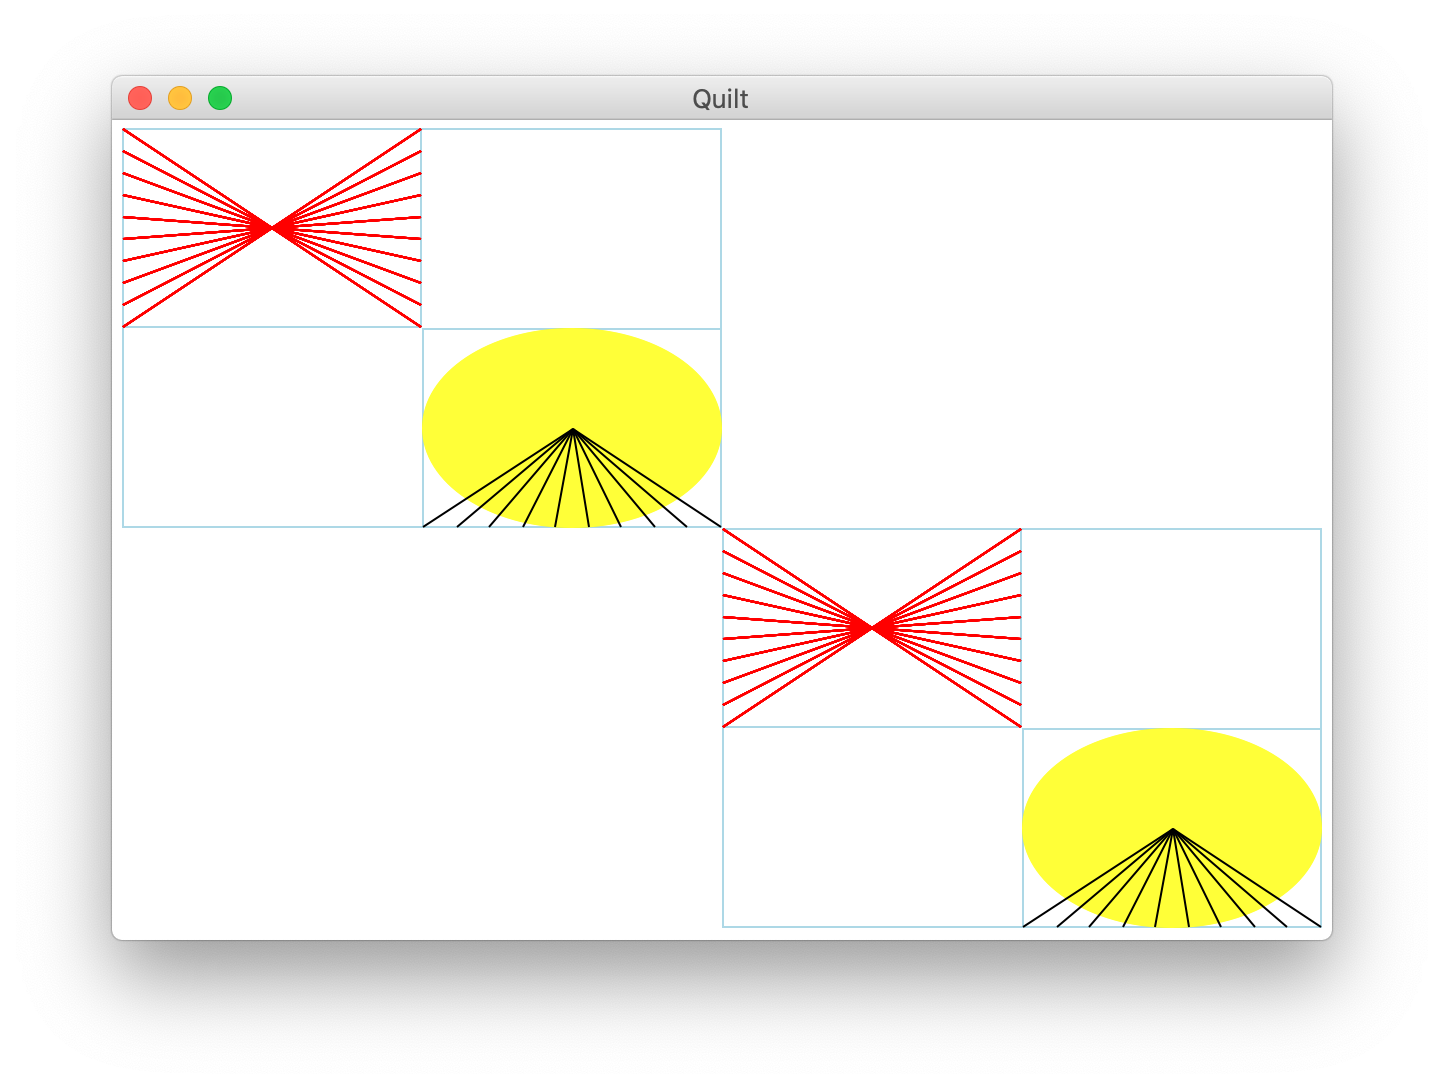
The patch is itself divided into four quadrants with a bowtie in the upper-left and an eye in the lower right. That's going to require a pile of loops and math to draw. Just kidding! This function can be done with three lines of code. One line to draw the outer lightblue rectangle, then two lines to draw the nested patches. Use floating point math for the position and size of everything which works out fine.
The -power option draws the power patch:
$ python3 quilt.py -power 600 400 10
The last part uses decomposition to build the whole quilt. See the similar example in lecture.
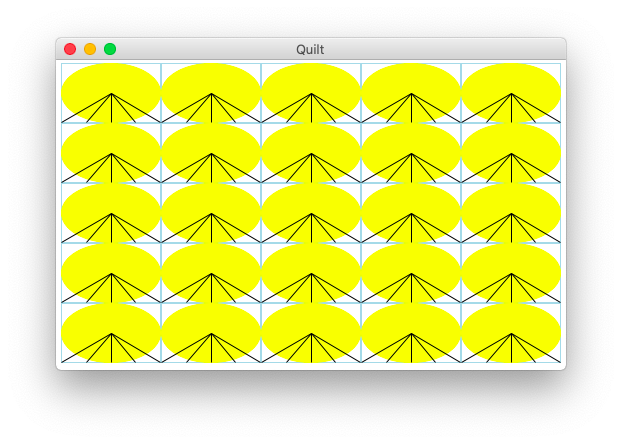
The draw_quilt() function creates a canvas of the passed in width and height. The quilt will be made of an n-by-n grid of sub-rectangles, each the same size. We'll call the width and height of each sub-rectangle the patch_width and patch_height.
Many times we have written a nested y/x loop to go over all the pixels in an image. In this case we want a nested loop over the row/col numbers of the patches, e.g. row=0 is the top row of patches, row=1 is the next row of patches and so on.
    # loop over rows and columns of patches
    for row in range(n):
        for col in range(n):
            # Draw one patch of the grid of patches
What is the x,y pixel coordinate of upper left corner of the patch at row,col? What is its width and height? What do you do to draw a patch there?
Inside the row/col loop, call draw_eye() to draw an eye for every patch in the quilt to test that the row/col logic is working. Below is the command line to call your draw_quilt() function, here creating a 500 x 300 canvas with n of 5. That creates 5 x 5 grid of patches, and each patch also uses n of 5 (we're using n for two things here - the number of patches, and the internal n of each patch).
$ python3 quilt.py -quilt 500 300 5
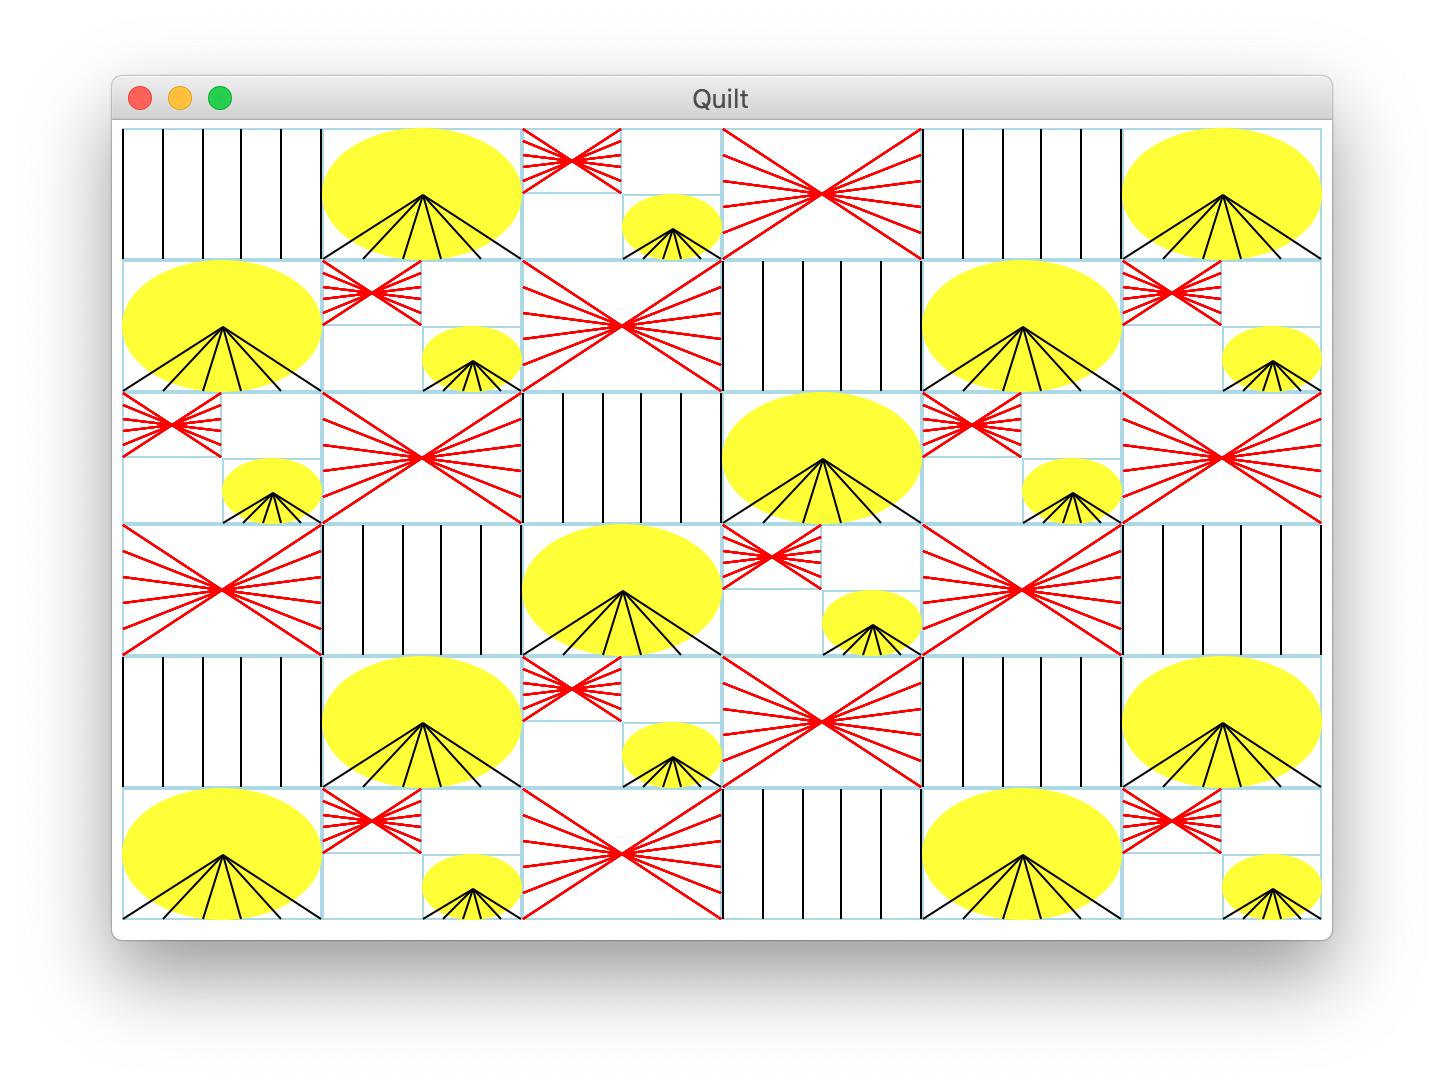
We want a scheme to draw a different patch type in every spot in the grid, using the order: bars, eye, power, bowtie. There is a standard programming trick for this situation, where we want to cycle through patches like this.
Inside the loops, compute a choice int from the row and col numbers using the modulo operator % this:
choice = (row + col) % 4
This modulo % operator computes the remainder dividing by 4. The result of % n is always in the range 0, 1, .. n-1. In this case choice will cycle through a pattern for each row 0, 1, 2, 3, 0, 1, 2, 3, 0.
Use choice to rotate between the different patch types: 0=bars, 1=eye, 2=power, 3=bowtie. Change the inside of the row/col loop to draw the right patch type depending on the choice. That is the deliverable state for your quilt program.
Here is the command line to run draw_quilt():
$ python3 quilt.py -quilt 600 400 6
Here's a quilt with a relatively low value of n=3 giving it a more abstract look. One is reminded of our earlier research in the area of art suitable for hotels.
$ python3 quilt.py -quilt 400 400 3
As a final test, try a nice big quilt like this
$ python3 quilt.py -quilt 1200 800 10
When all of the code is working, you should be able to draw a quilt with various sizes and various values of N. This program puts together loops, applied math, and drawing, and leverages decomposition for sub-problems. Save your quilt.py file to turn in with on paperless once you have the part-b done.
Stanford senior lecturer Julie Zelenski (teaches CS107E) created the original "quilt" assignment, with different quilt-squares each drawn its own function, as a graphical way to play with decomposition. (see the Nifty Assignments archive) Nick Parlante created this version for CS106A-python, creating the new patches and adapting the ideas to Python, proportionate drawing, and using the command-line to test milestones. CS106A TA Juliette Woodrow made the good suggestion to make the power patch out of existing patches.