
Today: variables, digital images, RGB color, for loop
See the Python Guide Variables chapter for more details and examples about variables.
A Python variable has a name and stores a value. We'll start with four rules of variables.
Set a variable like this:
x = 42
The = (equal sign) sets a variable, here setting the variable x to point to the value 42 (known as a variable "assignment" in CS terminology).
Suppose there is also a line that sets a variable named color
color = 'green'
The variables and values are stored in the computer's memory, with each variable like a little box, labeled with the variable's name and containing a pointer to the variable's value:
Each function has its own set of variables, separate from variables in other functions. This is part of our modularity strategy — keeping functions independent and separate from each other.

This code sets a variable color to 'green', and on later lines, wherever the expression color appears, Python uses the variable's value at that spot. In effect, the code paints green twice:
color = 'green'
bit.paint(color)
bit.move()
bit.paint(color)
Note that the variable name color does not have quote marks around it, just appearing as a bare word in the code.
Suppose I try to write code using a color variable, but I type the name wrong as cobor. When the code tries to read the incorrect cobor, the it halts with an error. Reasonably, Python tries to find look up each variable that is mentioend, e.g. cobor, and halts with an error if that variable has not been previously assigned a value.
color = 'green'
bit.paint(cobor)
  NameError: name 'cobor' is not defined
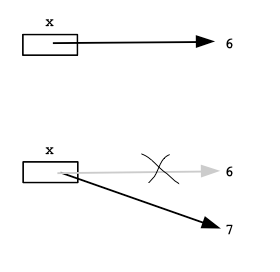
The = sets a variable, and this works the same if the variable already exists. Assigning a variable that already exists with = simply change the variable to refer to the new value, forgetting about the previous value. Subsequent uses of the variable will get the new value. The = is like the phrase: "Now point to"
So in this example, the first paint is green, but the second is red
color = 'green'
bit.paint(color)
bit.move()
color = 'red'
bit.paint(color)
In memory, the variable points to 'green' and then, midway through the code, is changed to point to 'red'.

Mathematics: In mathematics, the equal sign sets up a permanent equality. Not so in code! In code, the = sets the variable to a value, but it can be a temporary arrangement. The code can set the variable to point to something else in a moment.
x = y do?Assigning one variable to another sets both variables to point to the same value. So x = y sets x to point to the same value as y.
>>> y = 13
>>> x = y   # x same as y

Variables work naturally within expressions. In this example, the variable x is 5 within the expression.
x = 5
1 + 2 * x * 3
The expression evaluates to 31.

>>> on Experimental Server> Python interpreter >>> (on the experimental server)
The Python interpreter prints >>> where you can type an expression. Here you are typing bits of code directly to the Python language. Python evaluates the expression and prints out the result — a REPL Read Eval Print Loop. This is a very handy way to explore Python's features. Code in the interpreter is not saved, so it's best for trying little experiments.
Later on you can install Python on your laptop and use that interpreter, but for now we have the interpreter >>> on the experimental server.
We can use the interpreter to try out the claims about variables and math expressions.
>>> x = 11
>>> x
11
>>> 4 + 2 * 5 + 1
15
>>> x = 6
>>> 1 + 2 * x   # evaluates to what?
The answer is 13. The appearance of x in the expression is just an example of a variable - Python retrieves whatever value was set to that variable, in this case 6.
>>> x = 6
>>> x
6
>>> 1 + 2 * x
13
>>> x = 7       # change x
>>> 1 + 2 * x
15
Changing a variable changes it to point to a new value. After that, uses of the variable use the new value.
Or here is an example with numbers

x = 6
# x is 6
...
x = 7
# now x is 7
...
We're not doing this one in class, but you can try it on your own to see a variable in action.
> all-blue
Go back to our all-blue Bit loop. Change the code to use a color variable as below. The variable color is set to hold the value 'blue', and the later lines just paint whatever color is in the color variable. This version paints the whole row blue.
def all_blue(filename):
    bit = Bit(filename)
    color = 'blue'
    bit.paint(color)
    while bit.front_clear():
        bit.move()
        bit.paint(color)
    bit.right()
Look at the lines bit.paint(color) lines - they refer to the variable by its name, following the arrow to retrieve 'blue' or whatever was stored there.
Q: How would you change this code to paint the whole row red?
A: Change line 3 to color = 'red' - the later lines just use whatever is in the color variable, so now they will paint red with no other change.
Live RGB explorer: rgb-explorer
Roses are 255 0 0
Violets are 0 0 255
...

Q: If you have an image of 2 million pixels - how many numbers is that?
A: 6 million numbers, each 0..255. Three numbers, R G B, for each pixel. That's an image on your phone.
This line loads an image into Python memory, and sets a variable named image to point to it, ready for Python to work on it.
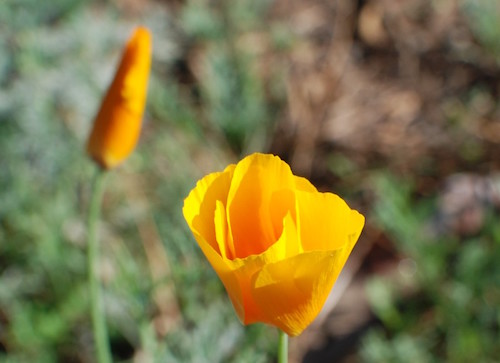
# Load an image from the filesystem
# into memory in variable named "image".
# Now the image can be manipulated by code.

image = SimpleImage('flowers.jpg')

Say we have loaded an image variable as shown above. Now we want to write code to change the image in some way.
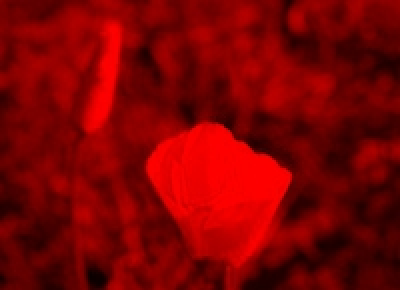
For example, let's say we want to set the blue and green values in each pixel of the image to 0. This will leave just the red values. This is called the "red channel" of the image - an image made of just its red lights.
pixel.red = 255Suppose we have a variable pixel that refers to one pixel inside an image. (We'll show how to obtain such a pixel variable in the next step.)

Suppose the variable pixel points to a pixel in an image. Then using pixel.red accesses the red of the RGB numbers in that pixel, and it can be used with = like this:
pixel.red = 255
pixel.green = 0
pixel.blue = 255
The above lines change the RGB numbers of the pixel, changing its color to purple.
If we take an image, and turn off all the green and blue light but leave the red lights on. This makes the "red channel" image:
Similarly, we can make the green and blue channels:
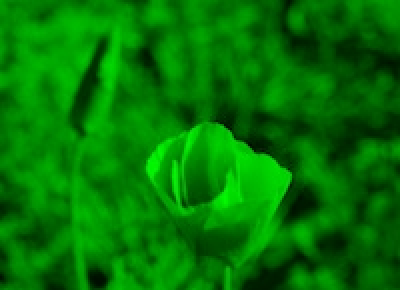
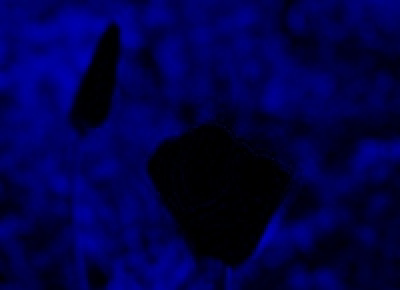
We'll use these in a minute as an example.
The for-loop is probably the single most useful loop we'll see. Say you have a collection of 1000 pixels. The for-loop lets you write a few lines of code, and then run those lines once for each pixel or whatever is in the collection. This is sometimes called a "for each" loop, since it runs the code once for each element. Being able to run some code once for each element in a collection is very handy, and this is exactly what the for loop gives us.
for variable in collection:
    # use variable in here
The "red channel" of an image is just the red lights, with blue and green all turned off. Here is the code to make the red channel of an image using a for loop.
def red_channel(filename):
    image = SimpleImage(filename)
    for pixel in image:
        pixel.green = 0
        pixel.blue = 0
    return image
Here is a link - you can try running it first, then we'll see how it works
The most important element in the for loop is the variable which comes after the for. The for-loop takes control of the variable, setting it to point to the next element for each run of the loop body.
For the red-channel example, the loop sets the pixel to point to the first pixel in the image and runs the loop body. Then it sets pixel to point to the second pixel and runs the loop again. And so on, running the body once for each pixel in the image. If the image has 50,000 pixels, the loop body runs 50,000 times, once for each pixel in the image.


The programer just uses the variable in the loop for their desired computation, knowing that the for loop will set the variable to point to every element, one per run of the loop body.
Side trip about math
x = x + 1What does this do:
x = 6
x = x + 1
 # LHS = RHS
     x = 6
     x = x + 1
Much of CS has to do with cutting down the number of steps we need to do. e.g typing a command accelerator key instead of moving the mouse around. This next shorthand is certainly in this tradition.
Having quick ways to do common cases is a great idea.
Say we have this
x = x + 1
That can be written in shorthand like this:
x += 1
Increasing a variable like this is so common, we have a shorthand for it in the code.
If we have this
x = x * 2
Shorthand form:
x *= 2
For these image problems, that looks like
pixel.red = pixel.red * 0.5  # long form
pixel.red *= 0.5             # shorthand for above
>>> x = 10
>>> x += 3
>>> x
13
>>> x *= 2
>>> x
26
    for pixel in image:
        pixel.red = pixel.red * 0.5
        pixel.green = pixel.green * 0.5
        pixel.blue = pixel.blue * 0.5
        # or shorthand form:
        # pixel.red *= 0.5
The image1 section is all image problems solved with a for loop to do some operation on every pixel in the image.
Loop over the image, write code to change pixels, recovering the hidden image. Nick solves part, then students try to type code for the rest.
5-10-20 puzzle: The red, green, and blue values are too small by a factor of 5 10 20. But we do not know which factor goes with which color. Figure it out by experimenting with code to modify the image with various factors (i.e. guessing and running it).
> The image1 section has problems like this. The the Iron Puzzle.
Start range() function, needed for next steps.
The pixels in an image are numbered starting with 0 - "zero based indexing". This is an incredibly common scheme within computers, so you'll get used to it. Zero based indexing makes the math come out cleaner for some cases, which is why it is used in code.
Below is an image which is 6 pixels wide, i.e. its width is 6. Look at the topmost row of pixels.
The leftmost pixel is at x=0, the next pixel to its right is x=1, and so on up to x=5 for the last, rightmost pixel.
It's easy to think that since the width 6, the rightmost pixel is at x = 6. Nope! In zero based indexing, the last index is 1 less than the number of things — if there are 6 pixels, the last pixel is at index 5. In other words, the rightmost pixel in an image is at x = (width - 1)

6 pixels -> index numbers 0..5
10 pixels -> index numbers 0..9
More generally, if you have n things with zero-based indexing, the first is at 0 and the last is at n - 1.
for x in range(10):
    print('in loop', x)
range(n) FunctionSee the Python Guide range
range(10) -> [0, 1, 2, 3, 4, 5, 6, 7, 8, 9]
range(6)  -> [0, 1, 2, 3, 4, 5]
range(3)  -> [0, 1, 2]

range(n)  -> [0, 1, 2 .... n-1]  # UBNI

Start at 0, go up to but not including N
What does this loop do:
for x in range(10):
    print('in loop', x)
First, the range(10) expression produces the sequence of numbers [0, 1, 2, .. 9]. The for-loop takes over the variable x, pointing it to the number 0 on the first run of the loop body (aka first "iteration"). The function print('in loop', x) prints 'in loop 0'. For next iteration, the for=loop sets x to point to the number 1, and runs the body again. This continues through all the numbers, until the last iteration with x pointing to 9.

Demo (or you can try it). The print(xx) function in this context just prints out what is passed to it within the parenthesis. Normally we indent by 4 spaces, but it's ok to just indent by 2 spaces in this temporary, on-the-fly context.
>>> for x in range(10):
      print('in loop:', x)
in loop: 0
in loop: 1
in loop: 2
in loop: 3
in loop: 4
in loop: 5
in loop: 6
in loop: 7
in loop: 8
in loop: 9
1. We see that the for loop works with range(), running the body once for each number.
2. Try different numbers as the parameter passed in to range(). Use up-arrow in the interpreter to recall previously typed lines, then hit the return key to run the edited versin - a great time saver. (laziness feature FTW!).