Description
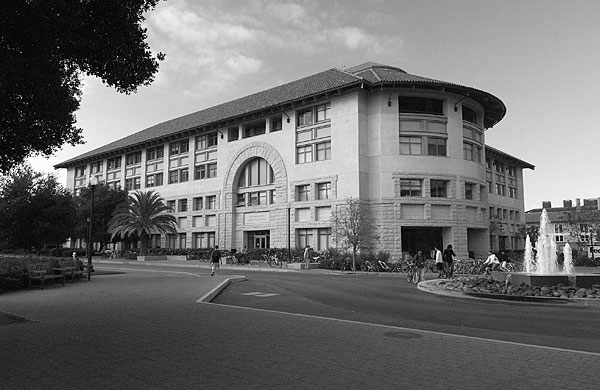
In this assignment, you are going to implement an edge detector for grayscale PNG images. Edge detection is an image processing technique to find boundaries of objects in images. Here are an example image and the detected edges:

|

|
There are lots of edge detection algorithms but in this assignment, you will implement an algorithm with the following three steps:
- Smoothing
- Gradient calculation
- Non-maximum suppression
(if you are familiar with edge detection algorithms, you will that notice these are the first three steps of the Canny algorithm.)
The following sections will give you more details about each of the steps.
Smoothing
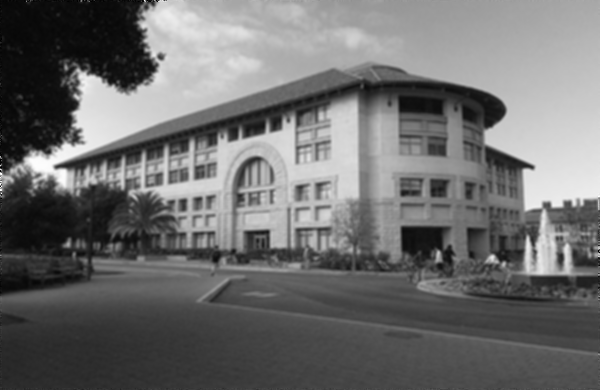
Before starting the actual edge detection, we first smooth the image to reduce the amount of edges detected from the noise. Smoothing is typically done by applying a low-pass filter to the image (as the noise is often high frequency term in the image). In this assignment, we will use a Gaussian blur. The following example shows the effect of the Gaussian smoothing:

|

|
Gaussian blur is defined as a convolution between the image and the following 5x5 filter, a discrete Gaussian function in 2D space truncated after two tabs:
$$
\mathbf{Img}_{\mathit{smooth}} =
\frac{1}{159} \ \left( \begin{array}{ccccc}
2 & 4 & 5 & 4 & 2
\\
4 & 9 & 12 & 9 & 4
\\
5 & 12 & 15 & 12 & 5
\\
4 & 9 & 12 & 9 & 4
\\
2 & 4 & 5 & 4 & 2
\end{array}
\right) * \mathbf{Img}
$$
As a starting point, this Gaussian blur is already implemented in the code (task smooth). Understanding how the task implements convolution in Regent will be helpful to do this assignment.
Gradient calculation
Simply put, the edges in an image are from the sudden changes of brightness, assuming that each object consists of pixels that do not greatly vary in their brightness. One way to measure how big the change is to calculate the gradient magnitude at each pixel. The gradient operator we are going to use in this assignment is Sobel operator. Sobel operator is based on the following two 3x3 filters, which calculate x and y component of the gradient, respectively:|
$$ G_x = \left( \begin{array}{ccc} -1 & 0 & 1 \\ -2 & 0 & 2 \\ -1 & 0 & 1 \end{array} \right) * \mathbf{Img}_{\mathit{smooth}} $$ |
$$ G_y = \left( \begin{array}{ccc} -1 & -2 & -1 \\ 0 & 0 & 0 \\ 1 & 2 & 1 \end{array} \right) * \mathbf{Img}_{\mathit{smooth}} $$ |
Once x and y components of the gradient is computed, the magnitude can be computed by:
$$\big|\nabla \mathbf{Img}_{\mathit{smooth}}\big| = \sqrt{G_x^2 + G_y^2}$$
In the code, tasks sobelX and sobelY are already declared, but have some parts missing. Your first task in this assignment is to complete tasks sobelX and sobelY.
If you implement them correctly, you should be able to get this image after running the code:

|
You might notice that the edges in this image look thicker than those in the edge image above. In the next step, we are going to make them thinner.
Non-maximum suppression
One of the artifacts from smoothing is that it also makes the object boundaries blurry. As a result, the gradients calculated from the previous step might make the final edges span multiple pixels. In order to get sharper edges, we find local maxima in the gradient image and remove the others. Local maxima can be found in various ways, but in this assignment we will implement a simple one: a gradient is considered locally maximal if it is either greater than or equal to its neighbors in the positive and negative gradient direction. The gradient direction, which is calculated from arctangent of the gradient vector
$$
\theta_G = \mathbf{arctan}(\frac{G_y}{G_x}),
$$
is rounded to the nearest 45° in order to conform to one of 8 discrete directions. This diagram shows with which neighbors a pixel needs to be compared, based on its gradient direction:
| j - 1 | j | j + 1 | x-axis | |
|---|---|---|---|---|
| i - 1 |
45° or 225° |
90° or 270° |
135° or 315° |
|
| i |
0° or 180° |
Center |
0° or 180° |
|
| i + 1 |
135° or 315° |
90° or 270° |
45° or 225° |
|
| y-axis |
|
51 $$\nwarrow$$ |
143 $$\nwarrow$$ |
276 $$\nwarrow$$ |
383 $$\nwarrow$$ |
363 $$\nwarrow$$ |
|
176 $$\nwarrow$$ |
309 $$\nwarrow$$ |
398 $$\nwarrow$$ |
408 $$\nwarrow$$ |
388 $$\nwarrow$$ |
|
343 $$\nwarrow$$ |
408 $$\nwarrow$$ |
401 $$\nwarrow$$ |
388 $$\nwarrow$$ |
404 $$\nwarrow$$ |
|
307 $$\nwarrow$$ |
394 $$\nwarrow$$ |
391 $$\nwarrow$$ |
353 $$\nwarrow$$ |
319 $$\nwarrow$$ |
Each cell shows its gradient magnitude and direction. For this image, non-maximum suppression will find the following local maxima (boxed in bold lines):
|
51 $$\nwarrow$$ |
143 $$\nwarrow$$ |
276 $$\nwarrow$$ |
383 $$\nwarrow$$ |
363 $$\nwarrow$$ |
|
176 $$\nwarrow$$ |
309 $$\nwarrow$$ |
398 $$\nwarrow$$ |
408 $$\nwarrow$$ |
388 $$\nwarrow$$ |
|
343 $$\nwarrow$$ |
408 $$\nwarrow$$ |
401 $$\nwarrow$$ |
388 $$\nwarrow$$ |
404 $$\nwarrow$$ |
|
307 $$\nwarrow$$ |
394 $$\nwarrow$$ |
391 $$\nwarrow$$ |
353 $$\nwarrow$$ |
319 $$\nwarrow$$ |
Your second task is to implement this non-maximum suppression step. Each pixel has boolean field local_maximum, which tells whether the pixel is a local maximum or not. The field is initialized to true in the task initialize and you should implement the suppressNonmax task so that it sets false to the pixels that are not local maxima.
Boundary Pixels and Interior Subregion
You will notice that the pixels near the image boundary do not have enough neighbors to run some of the three steps above. The Gaussian smoothing requires two neighbor pixels in each direction and the gradient calculation and non-maximum suppression require one. Therefore, none of the three steps can be applied to the pixels right on the image boundary and the smoothing cannot be applied to those that are one-pixel inside. We made two simplifications in this assignment to handle these pixels:
- All three steps are applied to only the interior part of image. The interior image consist of the pixels that are at least two-pixels away from the boundary. We call the pixels not in the interior image boundary pixels.
- Boundary pixels have their original pixel values for the
smoothfield and {0, 0} for thegradientfield.
In the code, tasks use the region r_interior to update only the interior image, while they also read the region r_image, which contains the whole image, in order to access the neighbor pixels.
Bonus points
Implement the complete Canny algorithm
The code we gave you takes the gradients from non-maximum suppression and filters them by a threshold (80 by default) to determine the final edge image. However, the original Canny algorithm does two more steps from here: double thresholding and edge tracking by hysteresis. Double thresholding categorizes edges into two groups using two threshold values: strong edges, whose gradient values are greater than high threshold, and weak edges, whose gradient values are in between two thresholds. Then, the edge tracking step finds all connected components and select the pixels as final edges that are included in a component with at least one strong edge pixel. These two steps can effectively distinguish between the true edges that accidentally have small gradients and spurious ones from the noise.
Implement these two steps to get the complete Canny algorithm.
How to run the code
File assignment1.tar.gz has several source files and some images (under directory images) that you can test. All you have to change will be file edge.rg unless you try the bonus problem. The parts that you need to modify are marked with TODOs. Here is the complete list of options you can pass (the same list will appear with option -h):
Usage: regent edge.rg [OPTIONS]
OPTIONS
  -h            : Print the usage and exit.
  -i {file}     : Use {file} as input.
  -o {file}     : Save the final edge to {file}. Will use 'edge.png' by default.
  -s {file}     : Save the image after Gaussian smoothing to {file}.
  -t {value}    : Set {value} to the threshold.
  --no-smooth   : Skip Gaussian smoothing.
  --no-suppress : Skip non-maximum suppression.
You need libpng to run this code. Most of your systems (including GCP) have already installed this package, but here are some commands to install the package:
- OSX:
brew install libpng(if you use Homebrew) orport install libpng(if you use MacPorts) - Ubuntu:
apt-get install libpng
You can find more information about the package at the libpng webpage.
Finally, you do not need to use the GCP cluster for this assignment, although getting used to running jobs on the cluster is highly recommended.
What to submit
Send your edge.rg file to . If you made any changes in the other files, send an archive of the whole directory.