1) Download and run the Qt installer
If you have previously installed Qt Creator, you must first uninstall that one before re-installing the latest. To uninstall, find the Qt Maintenance Tool application and run it. On the first panel, select Uninstall only to proceed with uninstall. Now continue below to download and install the latest Qt version.
Download the Qt installer from its official download site at https://www.qt.io/download-qt-installer.
The site should detect that your computer is running Windows and automatically download the correct installer to your Downloads folder.
The downloaded installer is named something like qt-online-installer-windows-x64. Double-click to run it.
The Qt installer will walk you through a set of steps. For most steps, you can use the default settings and simply click "Next" or "Agree" to move on, with the following exceptions:
- At the
Loginstep, sign up (or sign in) for your own Qt Account.- Enter your @stanford.edu email and verify your account via email.
- At the
Open Source Obligationsstep:- Agree to the license terms as an individual user, not as part of a company/organization and not for commercial use.
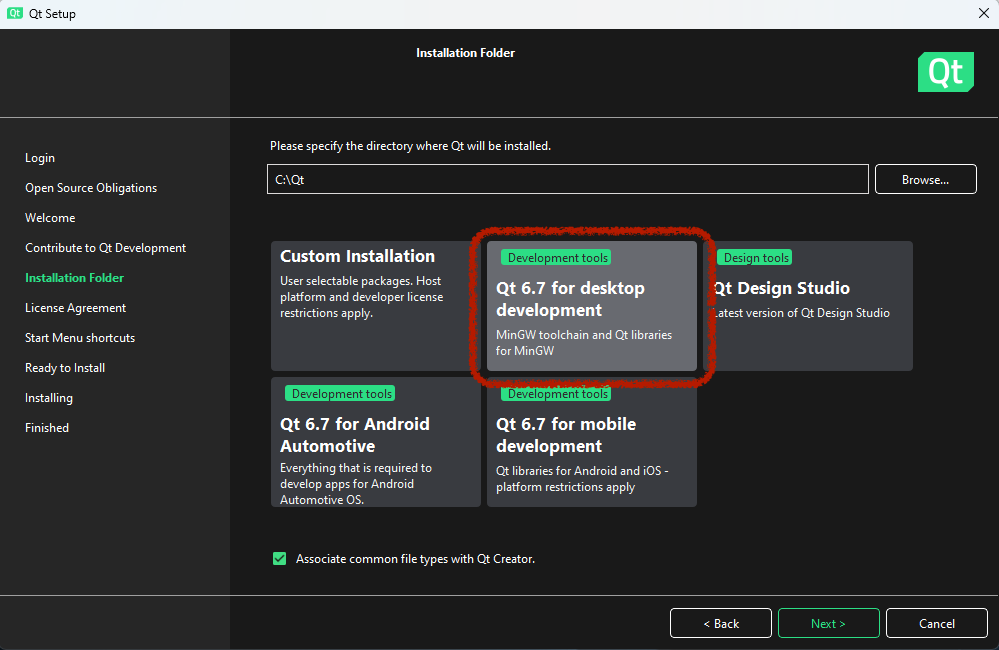
- At the
Installation Folderstep:- Do not change the default name and location of the directory where Qt will be installed.
- Select the option for "Qt 6.10 for desktop development" MinGW toolchain and Qt libraries for MinGW. (in the screenshot below, we put a red ring around the option to select)
Wait until the installation process is finished (it can take a while), exit the installer when done.
2) Install Git and Zip
There are two utility programs necessary to submit work, git and zip.
- Open a Powershell terminal in Adminstrative mode:
- Win -> type: Powershell -> click "Run as Administrator"
- Once the powershell opens, type the following three lines:
winget install --id Git.Git -e --source wingetwinget install 7zip.7zipsetx /M PATH "$($env:PATH);C:\Program Files\7-Zip;C:\Program Files\Git\cmd"
- You will need to allow access for both during the install process.
3) Install CS106-specific package
After installing Qt, you must install the CS106-specific package and do a complete build and run cycle to confirm all is working properly.
Download CS106 package and extract
- Download this archive file: 📦 CS106.zip
- Un-zip the download contents (on a Windows computer, click "Extract all") to a location of your choice. You should have a folder named
CS106with several files and folders inside.
Open and configure CS106 project
A Qt Creator project includes a file named with a .pro extension. Double-clicking the .pro file opens the project in Qt Creator.
-
Find the
CS106.profile and open it now.- If your Windows File Explorer options are set to hide filename extensions, the file
CS106.prowill display the nameCS106. You can change whether extensions are displayed in File Explorer by choosing menu item File->Options, select the "View" tab and under “Advanced settings”, uncheck "Hide extensions for known file types". Click "Apply" button.
- If your Windows File Explorer options are set to hide filename extensions, the file
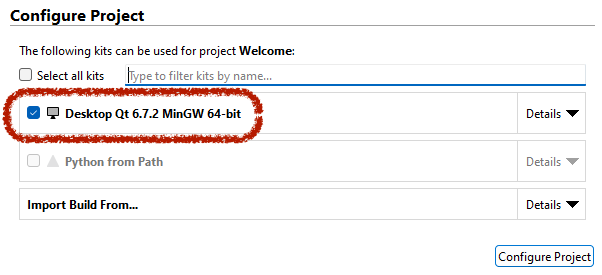
- When opening a project for the first time, you must configure the build kit. The correct kit to choose will be the Qt desktop kit you installed
- If your Qt Creator shows no kits are available, review the Qt install instructions. You can repeat the steps to re-install Qt if you missed selecting the correct option.
-
Check the box for the Qt desktop kit you installed (Qt 6.10.x for your desktop) and click the "Configure Project" button.
Build the program
C++ code must be compiled or built before it is run; this means converting the source code into executable binary code.
- Click the Build icon
 in the lower-left of the Qt Creator window.
 - Watch the build progress meter
 in the lower-right. The first time you build a project, it can take a minute or more to compile the library code. When the bar turns green, it indicates the program successfully built.
Run the program
Now that the program is built, you are ready to run it.
- Click the Play/Run icon
 in lower-left of window.
 -
The welcome program will prompt you to enter your name and then will show a graphics window with the Stanford logo and confirmation of your library install (should be version 2025.2). Click the "Play sound clip" button for a greeting from LSJUMB.

✔️ Congratulations, your installation is good to go! You may now discard the CS106 project, you will not need it again.
4) Configure settings
For a better experience, we encourage changing some of the default settings, see our recommended configuration settings.