

MacAFS 2.4
On this page:
IMPORTANT: In order to use MacAFS 2.4 you need to have MacLeland 2.4.1 installed. You can download MacLeland from the ESS Previous Software Versions page.
Overview
If you have file space in AFS, you can use MacAFS to access your AFS files, as well as AFS files belonging to others. (Access controls set by the owner may limit or prevent your access to their files.) This can be done by mounting the appropriate AFS volume on your desktop, to use similarly to the way you would work with other Mac folders, or by connecting to the directory through the Terminal program.
The easiest way to share AFS files with others is to mount the AFS volume, save the file on the volume, and then use the Access Control List (ACL) command (found in the volume's or folder's contextual menu) to set the appropriate permissions. Others can then mount the same volume and access the file. If a lot of people need access to your directory you could have a problem: directories can only contain 20 ACLs. MacAFS let you create a single "group ACL" that applies to all these people at once. These group ACLs are called pts groups. A pts group counts as one ACL but can hold as many SUNet IDs as you need. With a pts group you can grant a lot of people access to your directory without bumping into the 20 ACL limit. It also saves you the time and hassle of assigning ACLs to people one at a time.
For more information about AFS, see the AFS at Stanford web site.
Installing MacAFS
Note: To install MacAFS, you need an Administrator account and password for the Mac. You will be prompted to restart your Mac to complete the installation.
- Download the MacAFS installer file and double-click the MacAFS icon..
- Click Continue.

- Click Continue.

- Select your System drive for the destination if it is not already selected and then click Continue.

- Click Install to start the installation.

- When prompted, enter your Administrator account for the Mac and click OK.

- You will need to restart your Mac to complete the installation. Click Continue Installation to proceed.

- Click Restart to finish the installation.

Mounting AFS Volumes
Once a volume is mounted, you can see the volume's contents by double-clicking it to open a Finder window for it, or by using an open Finder window to navigate to it. The Finder will show all files and directories in the volume, except for dot files (files whose names begin with a period, e.g., .login), which are not accessible from the desktop. For other files, you can drag/drop them to your other volumes (your startup drive, for instance), and drag/drop files from them to your mounted AFS volume. You'll also have access to them in Open and Save dialog boxes.
Authenticate to Kerberos
- In MacLeland menu, click AFS Controller.

- If you are not already logged into MacLeland, enter your SUNet ID and password when prompted and click OK.
Note: If the entry fields are not displayed, click anywhere in the dialog box to expand it.

- The Mount AFS Volume window will be displayed.
Mount Your Home Directory
- Select My Home from the Mount Volume belonging to drop-down list box.
- Click Mount.
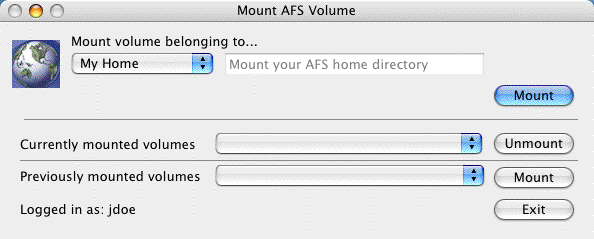
- An alias to your AFS home folder will mount on your desktop.
Mount a User, Class, Department, or Group Directory
- Select User, Class, Department, or Group from the Mount Volume belonging to
- In the adjacent box, type in the name of the directory you want to mount.
- For User - enter the SUNet ID of a user's home directory (example: enter jdoe to mount John Doe's directory)
- For Class - enter the class name (example: econ1)
- For Department - enter the name of a department (example: biology)
- For Group - enter the name of name of a group (example: dance)
- Click Mount.

- An alias to the AFS folder will mount on your desktop.
Mount AFS Root
Note: The AFS root volume is mounted by default when you install MacAFS. There is no way to permanently not have the AFS root mounted on the desktop.
- To view the entire AFS file system, double-click the AFS icon that is installed on your desktop as part of the MacAFS installation.

- The AFS root , which contains aliases to folders for the AFS file system and Stanford's AFS file system, is displayed.

Mount AFS Path
- To mount a volume using a specific AFS path, select AFS Path from the Mount Volume belonging to
drop-down list box and then enter the full path in the adjacent box (examples: enter /afs/ir.stanford.edu/dept/chemistry to mount the volume for the chemistry department; enter /afs/ir.stanford.edu/users/j/d/jdoe to mount John Doe's home directory).
- Click Mount.
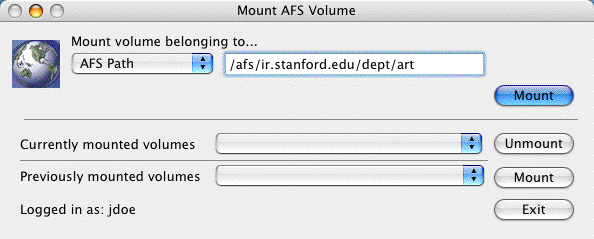
- An alias to the AFS folder will mount on your desktop.
Disconnect a Mounted Volume
- Click the Currently mounted volumes drop-down list box.
- Select the volume that you want to disconnect and then click the Unmount button.

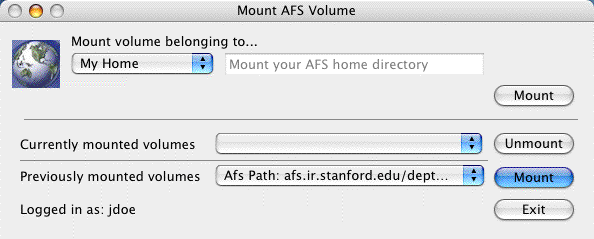
Remount a Previously Mounted Volume
- Click the Previous mounted volumes drop-down list box. Up to 10 of the most recently mounted drives are displayed.
- Select the drive that you want to remount and then click the Mount button.
Managing PTS Groups
Note: This utility can be used to create and manage personally defined pts groups. Groups created by the system administrators to manage group and department AFS folders cannot be managed through this utility.
A pts group is a list of specific users that you can place on access control lists (ACLs). It provides a way to give permissions to a set of folders to many people.
You own all the files and folders in your account, and you can determine who gets access to your files. You can create your own groups of people, and then give them permissions to your files. When you create a pts group, you automatically become its owner. Only the owner of a group can add members, remove members, or delete the group entirely.
In AFS, permissions are set by folder, not by file. Every file in a folder has the same permission. New sub-folders inherit the permissions of their parent folders. An ACL can have up to twenty entries, but a pts group, regardless of the number of people in it, only counts as one entry. There is no restriction on the number of members in a pts group.
See AFS at Stanford: Setting Permissions with a Macintosh for more information.
Open the Manage PTS Groups Utility
- In MacLeland menu, click AFS Controller.
- On the File menu, click Manage PTS Groups.
Create a PTS Group
- In the PTS Group box, enter a name for your group and then click the Create Group button.

Add a Member to a PTS Group
- To add a member to a group, select the group by clicking it in the My Groups column.
- In the SUNet ID box, enter the Sunet ID of the person you want to add to the group. (This must be their true SUNet ID, not an alias)
- Click the Add to Group button. The SUNet ID of the person added will appear in the Group Members column.

Remove a Member from a PTS Group
- To remove a member from a group, select the group by clicking it in the My Groups column.
- In the Group Members column, click the member you wish to remove.
- Click the Remove Member button.

- Click Yes to remove the member from the group.

Delete a PTS Group
- Select the group you want to delete by clicking it in the My Groups column.
- Click the Delete Group button.

- Click Yes to delete the pts group.

Add a PTS Group to an AFS Access Control List (ACL)
- In MacAFS, mount the volume that contains the folder for which you want to add a pts group to the access control list. If the volume is already mounted, use an open Finder window to navigate to it
- Right-click the folder and select AFS > Access Control List.

- When the access control list for the folder is displayed, click Add.

- Enter the following information for the pts group:
- Name: enter the name of the pts group you want to add to the access control list. The name must start with your SUNet ID and a colon.
- Entry Type: choose Normal to add permissions; choose Negative to remove permissions for someone who would otherwise have rights due to an entry in the Normal list, e.g., to deny privileges to an individual who is in a group that appears in the Normal list.
- Permissions: check the boxes for the permissions you want to grant to the members of the pts group.

- Click Save to save your permissions and close the dialog box.
- The name of the pts group will now appear in the access control list. Close the window.

Troubleshooting
Please see the Frequently Asked Questions for more information.
If you encounter problems or need assistance, please submit a HelpSU request.