Stanford Email - Palm OS
Configuring SnapperMail for IMAP
McClish Tools > Palm Software > Configuring Snapper Mail for IMAP using SSL
On this page:
Learning About or Getting SnapperMail
Installing Software on your Palm Device
Configure Snapper for IMAP Mail
Configure IMAP Folders (only necessary if you want to use more than your inbox)
Check Mail / Sync Folders
Additional Information and Links
Learning About or Getting SnapperMail
You can get information, download a 30 day trial or purchase SnapperMail from the SnapperMail website. SnapperMail Premier is the minimum version required to use SSL to receive your Stanford mail.
You can learn more about SnapperMail by reading the manual that unzips with the program.
Installing SnapperMail
If you need assistance installing software on your Palm OS device, you can find it here on the PalmOne website.
Configure Snapper IMAP |
Launch SnapperMail
Tap Snapper on your Palm screen |
|
From within Snapper Mail
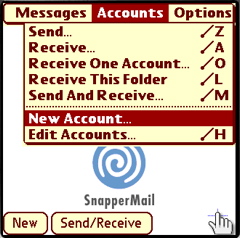
- Press Menu
(or tap upper left corner of screen)
- Select Accounts/New Account
|
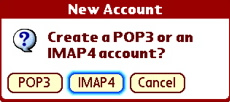 |
Tap IMAP4 for IMAP account
|
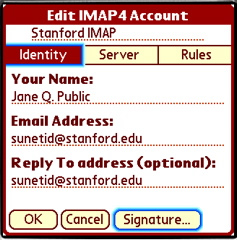 |
Change Account 1 to Stanford IMAP
(re-highlight, delete, then type)
- If you're not comfortable with your keys yet, tap Menu, then select Keyboard to use the on-screen keyboard. You can do this at any prompt.
Tap Identity (if it's not already selected), then enter the following
- Your Name: Your Real Name
- Email address: sunetid@stanford.edu (note: you can highlight then copy this (menu c) and paste (menu p) as needed)
- Reply to address: sunetid@stanford.edu
Tap Signature (bottom of screen) |
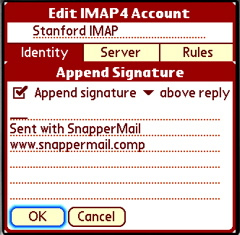 |
- Select Append Signature, choose above reply or below reply
- Tap the first line then enter a short signature like Brief message from YourName's Treo (so people don't get concerned when they get a very short response from you).
Tap OK
|
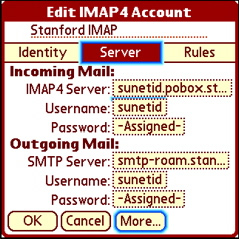 |
Tap Server (top, center of page)
- Incoming Mail - Tap "Unassigned" then enter
- POP3 Server: sunetid.pobox.stanford.edu
- Username: sunetid
- Password: sunetid password
- Outgoing Mail - Tap "Unassigned" then enter
- SMTP Server : smtp-roam.stanford.edu
- Username: sunetid
- Password: sunetid password
Tap More... (bottom of screen) |
 |
- IMAP4 Settings:
- Use Port 993(will switch to this as you make selections)
- Change "No SSL Security" to Always secure (wrapped port)
- Check Always trust server
- SMTP Settings:
- Use Port: 465 (will switch to this as you make selections)
- Change "No SSL Security" to Always secure (wrapped port)
- Check Always trust server
Tap OK |
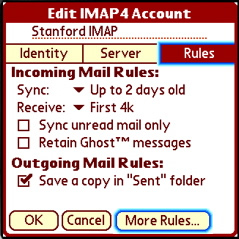 |
Tap Rules (top, right)
- Incoming Mail Rules:
- Sync: Change to Up to 4 days old or your preference
- Receive: Change to Headers only or your preference
- Check Sync unread mail only or your preference
- Outgoing Mail Rules:
- Select Save a copy in "Sent" folder if you'd like to save a copy on your Palm
Tap More Rules... (bottom of screen) |
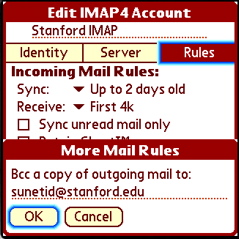 |
- Tap blank field then enter sunetid@stanford.edu
Tap OK
Tap OK
Tap Done |
Configure IMAP Folders |
SnapperMail will only sync your IMAP 'Inbox' by default as this is all that most users require. If you wish to sync additional folders from your IMAP mail server you need to do the following for each folder
|
|
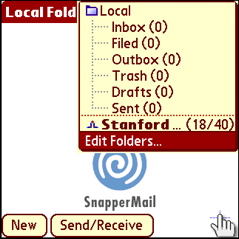
In the SnapperMail main message list
- Tap the folder list - probably says Inbox (top, right side of screen)
- Tap Edit Folders...
|
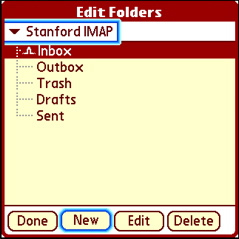 |
- Make sure the Stanford IMAP account is selected at the top of the 'Edit Folders' screen
- Tap New (bottom of screen) to create a new folder for the IMAP account
|
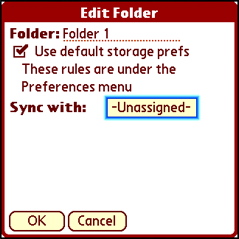 |
- Select Use default storage prefs unless you'd prefer specific settings for this folder
- Sync with:
|
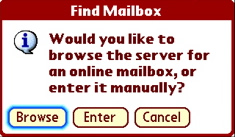 |
Tap Browse
- SnapperMail will connect to Stanford's IMAP server
|
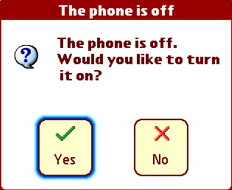 |
Tap Yes
- Then wait for a connection to display a list of folders available on the server.
|
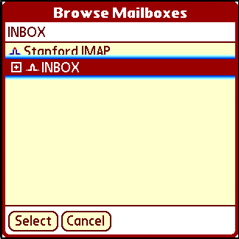 |
Tap INBOX twice |
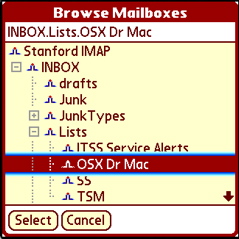 |
- Select/Highlight the desired IMAP folder to sync (The folder list can be expanded and collapsed by tapping the '+' and '-' boxes)
- Tap Select (or Press your Navigator Button)
|
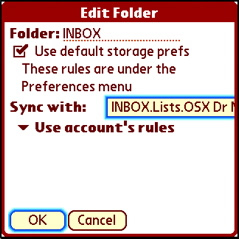 |
- Change the Folder Name from INBOX to match the name of the folder you've chosen to sync
- Select Use account's rules (or change for this specific folder)
Tap OK |
|
Add new folders as necessary
Tap Done
The SnapperMail folder(s) will be synced to the selected IMAP folder(s) next time you do a Send/Receive |
Check Mail / Sync Folders |
Tap Send/Receive (bottom of screen) to get your mail
|
Useful Links
Snapper Mail Users Manual (from current released version, beta version not yet available) ftp:www.stanford.edu/~mcclish/tools/SnapperMail_manual.pdf
Download the Treo Handbook http://www.palmone.com/us/support/handbooks/treo/treo600gsm_UG.pdf
Download the Treo Datasheet http://www.palmone.com/us/support/handbooks/treo/treo600gsm_DS.pdf
Treo 600 Interactive Tutorial & Product Tour - half way down the page, on the right hand side
Stanford Palm Tech Briefing http://www.stanford.edu/group/itss-customer/ip/techbriefings/palm/index.html