Demarcation Guidelines
- Go to HFM -> Demarcation
- Set the view to inplane.
- First identify on which slice the hippocampal head begins.
This slice is where the anterior structures (anterior depth of CoS,
ERC, PRC) will be start.
- I do the demarcations as follows:
- Choose the boundary you are demarcating by selecting the appropriate
demarcation (left column) and hemisphere (middle column) on the Demarcation
Window (eg. Fusiform Vertex, Left Hemisphere)
- Select pixels using ROI Select -> Line.
- Hit the left mouse button to start a line, and the right to end a
line.
- Check each by hitting L or R to make sure that the demarcations are
concise. If they spread too far on the flat map, I use less pixels.
- Unselect pixels using ROI Select -> Unselect Rect.
- Hit the left mouse button at the upper-left and lower-right corners
of a box to be unselected.
- Store the demarcation by hitting the Store button.
- NOTE: If you switch boundaries before hitting store, you will lose
the boundary. Whenever you click on a boundary, that boundary will be loaded
into the variable selpts, even if it is empty, and the old selpts will be
lost unless it has already been stored.
- I go in the following order, doing each bilaterally:
- Fusiform Vertex (note anteriorly this is the lateral border of the
PRC)
- Depth of the Collateral Sulcus - Posterior and anterior separately
- PHC/Sub - Only for posterior slices
- Sub-CA1 - Post + Ant
- CA1-CA23DG - Post + Ant
- ERC-Sub - Anterior only
- PRC-ERC - Anterior only
- The Anterior Calcarine, which if present, will be so probably only
on the last slice (shown on 11 here)
- Post CADG - on the slice w/ the Ant. Calcarine
- Mark from the CA1/CA23DG boundary all the way to the middle of the
HC head as shown on slice 11.
- Ant. CADG - on the slice where you start to see the pez (feet), or
undulations on the superior surface
- Mark from the CA1/CA23DG boundary all the way to the middle of the
HC head as shown on slice 2.
- ERC-PRC/PHC Boundary
- On the slice where the HC head begins (here it is slice 3), mark continuously
along the cortical manifold from the ERC-Sub boundary, through, the PRC-ERC
boundary, all the way until the Fus Vertex.
- Save early, save often, by hitting the Save button, and calling
it "roi1" or "roi2" etc.
- While editing, I find it useful to hit the Show All button
occasionally to see how it is going. Note again that this will flush the currently
viewed buffer, so hit Store before hitting Show All.
- After you've finished all the boundaries bilaterally, hit the Make
Flat box. This will project the separate demarcations onto the flat maps.
Save it.
- While on the flat map, you can display the different boundaries by
selecting them.
- Hit Fit ROIs. This will fit green demarcation lines to the
blue selected boundaries.
- Then hit Fill Regions. This will auto-fill all the 7 demarcated
regions for time-series analysis.
- Peruse through the regions by selecting them on the right column in
the demarcation window
- Hit the Show All button. If there is a big hole of pixels
(greater than 1 row), find out where it belongs by hitting the Fit ROIs
button, and add it to that region by selecting the region, selecting additional
pixels, hitting Remove Overlap to make sure there is no overlap between
regions, and finally hitting the Store button.
- Save it.
- Hit the RegionTS button to create a timeseries for each region
in each condition. It will be saved to the files RegionTS.txt and
RegionTS.mat.
- Publish a plethora of papers.
This is an example of one subjects demarcation. The A/P slice is slice
3.
11 
10 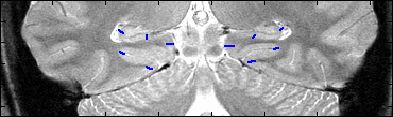
9 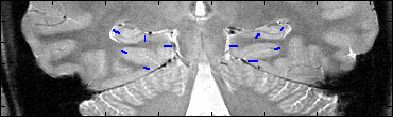
8 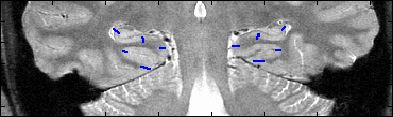
7 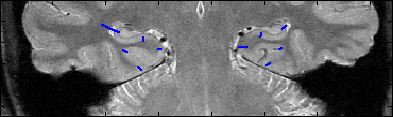
6 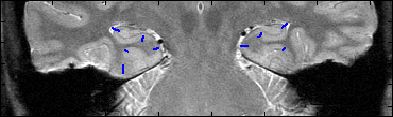
5 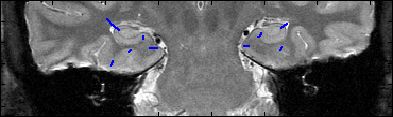
4 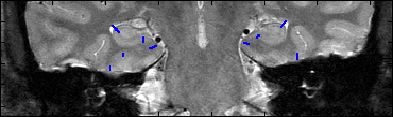
3 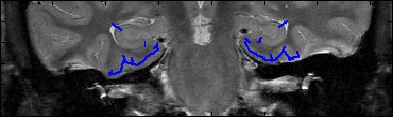
2 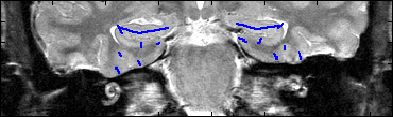
1 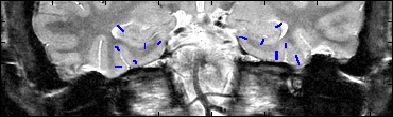
View
Insausti Guidelines
Back to main