
Sentaurus Workbench
5. Miscellaneous Features
5.1 Archiving Projects
5.2 UNIX Window in Project Directory
5.3 Options from Command Line
5.4 Exporting and Importing Scenarios
5.5 Running Inspect and Tecplot SV
5.6 Running Optimizer
5.7 Calibration
Objectives
- To become familiar with miscellaneous features of Sentaurus Workbench.
5.1 Archiving Projects
Sentaurus Workbench projects can be archived, that is, they can be copied and compressed for later use.
To archive a project: Project > Export.
All files in the project directory are copied and compressed.
To archive several projects, select the projects to be archived, and select Project > Export.
All files in the selected projects are copied and compressed.
To import archived projects: Project > Import.
If the archive contains more than one project, you have the option to import selected projects or all projects.
In addition, projects can be saved using Project > Save Clean As, which cleans up the project before it is saved in an uncompressed format.
5.2 UNIX Window in Project Directory
Often, it is convenient to access the contents of the current project directory from the command line. In Sentaurus Workbench, you can open an Xterm in the project directory, which can be used as any other UNIX window.
To open a UNIX window: Edit > Command Prompt Here.
5.3 Options from Command Line
All interactive operations associated with running a project can be accomplished at a UNIX prompt. The commands for submitting jobs, preprocessing, and cleaning up project directories are gsub (and gjob), spp, and gcleanup, respectively.
For more information about the commands executed (at the prompt), refer to the Sentaurus Workbench User Guide or use the UNIX command:
> <command> -h[elp]
for example:
> gsub -h
5.4 Exporting and Importing Scenarios
Scenarios, that is, sets of parameters and variables visible in the Sentaurus Workbench main window, can be exported to a file for use with either spreadsheet applications or external editors. In addition, scenarios defined in a text editor can be imported into Sentaurus Workbench.
To export a scenario:
- Experiments > Export.
- In the Export View dialog box, select Tab for the Column Delimiter (see Figure 1).
- Click OK.
- In the Save As dialog box, select Tab delimited (*.tdf) for Files of type and provide a file name (for example) test.tdf. This exports the scenario to a file.
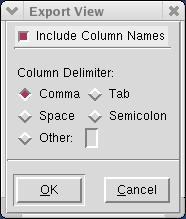
Figure 1. Export View dialog box.
To read from this file:
- Experiments > Import from a File, and select
the file test.tdf.
The Import Experiments dialog box is displayed (see Figure 2). - Since the column count starts from 0, lgate and HaloDose form columns 2
and 3, respectively.
Make the changes as shown in Figure 2, and set the Skip First Lines to 3 to omit the text and header information.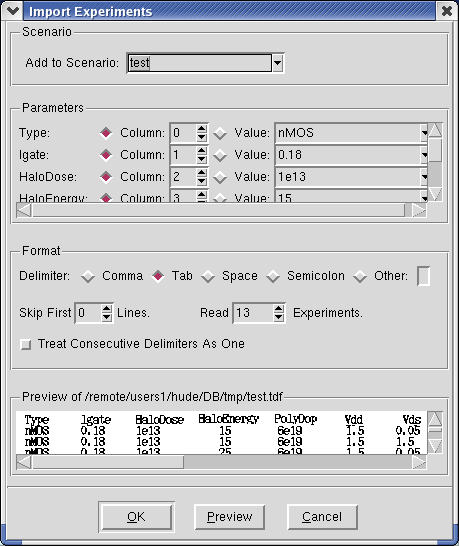
Figure 2. Import Experiments dialog box.
- Click Preview to access all of the information about the experiments (see Figure 3).
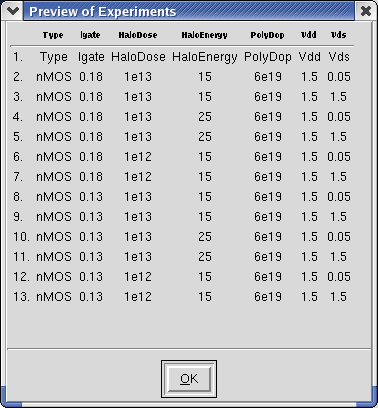
Figure 3. Preview of Experiments dialog box.
Now, you will read the first eight experiments:
- Set Read Experiments to 8 in a new scenario called test.
- Click OK.
The eight experiments are read into the new scenario test, which appears in the main window.
To create a scenario in an external text editor and import it into Sentaurus Workbench, create a table as shown in Figure 4, and save it in comma-delimited or tab-delimited format. Then, import the file.

Figure 4. Table of experiments.
5.5 Running Inspect and Tecplot SV
To run Inspect and Tecplot SV from Sentaurus Workbench, outside of any project:
- Extensions > Run Inspect.
- Extensions > Run Tecplot SV.
5.6 Running Optimizer
To run an Optimizer project from Sentaurus Workbench:
- Optimization > Run.
For more details about Optimizer and optimization procedures, refer to the Optimizer User Guide.
5.7 Calibration
To create a Calibration Kit project or scenario: Calibration > Project Wizard.
The Project Wizard is displayed (see Figure 5). Follow the instructions.
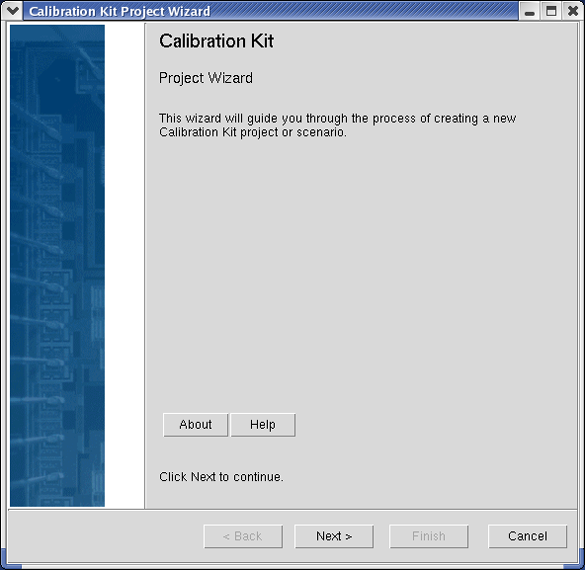
Figure 5. Calibration Kit Project Wizard. (Click image for full-size view.)
To create a short-loop experiment for Calibration Kit projects: Calibration > Process Wizard. Follow the instructions.
To create a Calibration Kit project for optimizing calibration parameters: Calibration > Optimization Wizard. Follow the instructions.
For more details, refer to the Calibration Kit User Guide.
Section 5 of 6 | back to top | << previous section | next section >>
Copyright © 2011 Synopsys, Inc. All rights reserved.