MACLELAND
2.3
USER
GUIDE
Local
Links
(in MacLeland Help folder)
... & Stanford Web Authentication
Network Links
|
Using MacLeland with the AFS File System If you have file space in AFS, you can use MacLeland to access your AFS files, as well as AFS files belonging to others. (Access controls set by the owner may limit or prevent your access to their files, of course.) This can be done by mounting the appropriate AFS volume on your desktop, to use similarly to the way you would work with other Mac folders, or by connecting to the directory through the Terminal program. Both of these methods are discussed below. Remember, you must have the MacLeland OpenAFS program installed - it is a separate installation from MacLeland in versions 2.0 and higher. See the Installing MacLeland section for more information. Note well: the AFS features in MacLeland 2.0 and above are very different from their counterparts in earlier versions. Generally speaking, AFS previously worked poorly with pre-2.0 MacLeland; it works very well with MacLeland now, and most MacLeland users should learn about it and consider using it for a variety of reasons. A comparison highlighting the improvements appears later in this section. This section also includes cautionary information about using AFS on Macintoshes that are not always connected to the Internet. AFS on the DesktopTo mount an AFS volume on your desktop, use either the Mount Home Folder or the Mount Other... command, found in the MacLeland menu. If the commands are grayed out but the command below them, Start AFS Service, is not, click on that command - that can establish AFS service if it did not get started properly at Mac bootup, or if a loss of network connection (or some other cause) caused MacLeland to think AFS was not available. (The Start AFS Service command does require you to enter an administrator password, however.) Once it is mounted, you can see the volume's contents by double-clicking on it to open a Finder window for it, or by using an open Finder window to navigate to it. The Finder will show all files and directories in the volume, except for dotfiles (files whose names begin with a period, e.g., .login), which are thus not accessible from the desktop. (You can work with them through the Terminal application - see below.) For other files, you can drag/drop them to your other volumes (your startup drive, for instance), and drag/drop files from them to your mounted AFS volume. You'll also have access to them in Open and Save dialog boxes. This means, for instance, that you can use your AFS file space as another volume where you can save your Macintosh files, e.g., to back them up, or to make them available for sharing with others. If you create web pages, for instance, you will find it simple to create them on your Macintosh and then drag the HTML files into your WWW folder in your AFS home folder - and voila, the web pages are available on the web. (For directions on setting up your WWW folder in AFS, choose the appropriate link on the Stanford Web Service page.) Important: For several different reasons, we generally recommend that when you want to work with a file stored in AFS space, you first copy it to your Mac's hard drive, and then open it, work with it, save it back to your Mac, and then copy it back into AFS. In most cases, this is not a requirement, and you may find you can work directly with the AFS version of the file without problem. However, with some applications in OS X.3 - SubEthaEdit always, and in some (fortunately) rare cases, Microsoft Word - working with an AFS file directly can cause a kernel panic in OS X, meaning that the machine must be rebooted, a quite dire failure. The problem is being investigated by programmers in the OpenAFS community. In the meantime, consider yourself warned. Sharing Files in AFS Using MacLelandUsing MacLeland and AFS to share files with others is simple, though not quite as intuitive as a Mac user might expect. The easiest way is to mount the AFS volume, save the file on the volume, and then use the Access Control List... command (found in the volume's or folder's contextual menu) to set the appropriate permissions. The other person or people can then mount the same volume and access the file. (See the example below.) Other differences you might encounter (they're mostly minor and obscure) are also described below. Example: You are creating a Microsoft Excel spreadsheet you want to share with Alma, who will work on it too. Another person on the team, Bryant, will want to see it occasionally as well. You might consider emailing it back and forth, but in this case, you choose to save it in your AFS space, and allow Alma and Bryant to use it from there on their Macs. (You could consider making it available on the web, but that probably means Alma won't be able to work on it.) After mounting your home folder (with MacLeland's Mount Home Folder command), you create a new folder called, say, classproject. Move your spreadsheet file into that folder. The next step is to set the appropriate permissions (or, as they're called in AFS, the ACLs, pronounced "ackles"). You set the permissions for the enclosing folder or volume, not the individual file - that's why you created the classproject folder to hold your spreadsheet file. To set the ACLs appropriately, hold down the Control key, and click-hold on the classproject folder. You'll see the contextual menu for the folder, which includes the AFS submenu. Open the submenu to see your AFS options:
Select the Access Control List command (the other commands are discussed later, below):
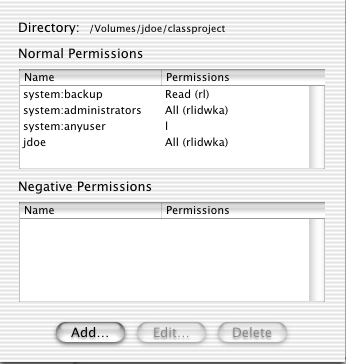
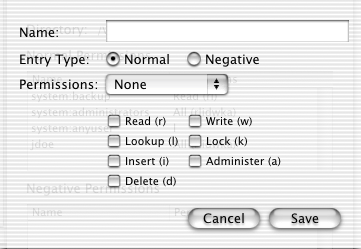
The current list of permissions is shown; the permissions may be given for an individual user (such as jdoe, the owner in the example) or for AFS groups, signalled by the colon in the name, which separates the owner ("system" in the examples) from the group's name. The permissions for each person or group are shown in the Permissions column, as a string of letters, abbreviations for the 7 different types of permission (rlidwka, shown above, represents all 7; l, for list, only one). Additionally, some commonly used combinations have their own names, such as Read, shown above with its combination, rl (for read and list). For the example, you would want to add permissions for Alma and Bryant. To add to the list, click the Add... button, and this dialog box will appear:
First, you enter the SUNet ID of the person, or the group name of the group, to whom you want to grant (or deny) the permission. You can specify only one person or one group. Choose Normal (to add permissions) or Negative (to remove permissions for someone who would otherwise have rights due to an entry in the Normal list, e.g., to deny privileges to an individual who is in a group that appears in the Normal list). For permissions, you can either set the 7 individual permission types by clicking the check boxes, or choose one of the combinations from the dropdown menu (which will reset the 7 check boxes as appropriate). In general, unless you are well-versed in ACLs, you will probably find the combinations (None, Read, Write, and All) to be adequate for your needs. See Setting Permissions for more information about AFS permissions. For Alma, who gets to update the file, you would probably choose Write permission from the drop-down menu (which sets rlidwk). For Bryant, who needs only to see the file, you would probably choose Read from the menu (which sets rl). Click Save to save the permissions you set for each person, and return to the updated Access Control List window. To change the permissions for a person or group already in the Normal or Negative permissions list, select the person or group and then click the Edit... button (or simply double-click on the person or group). Change the settings as appropriate, Save, and then see your changes reflected in the Access Control List window. Some important details about ACLs:
Volume Information, Flush Directory, Flush VolumeThe other three commands in the AFS submenu of the contextual menu are:
Differences and Improvements from Earlier Versions of MacLelandMacLeland has always supported AFS access, but generally not well. Few people used it because of its problems, despite its significant benefits, particularly for web work. Here are some notes about its improved functionality for MacLeland 2.0 and above.
Using AFS in the Terminal ProgramMounted AFS volumes are also available to the Terminal program, which thus supports the full range of AFS commands and features. Terminal, a Mac OS X application that Apple provides in the Utilities folder of the Applications folder, its primary use is to provide a command-line interface to the UNIX underbelly of OS X. But once an AFS volume is mounted through either of MacLeland's two Mount commands, you can begin working with it (and its files and directories) through Terminal as well as issue other AFS commands The best way to reference AFS files is through the path established through the desktop, in particular, through the /Network top-level directory. So, for instance, if you are jdoe and have your AFS home directory mounted on your desktop, you could change to its directory (cd) with this command from Terminal: [macdoe:~] jdoe% cd
/Volumes/jdoe An excellent shortcut is available: you can enter an entire pathname by dragging the volume, folder or file from the desktop or Finder window into the Terminal window. For example, jdoe could first type the cd command, and then, on the desktop, drag the jdoe AFS volume icon into the Terminal window. The path "/Volumes/jdoe" would get added to the command line, just as it was typed in the example above. (This shortcut works for any file on the Mac, whether it's in AFS or stored on one of the Mac's hard drives, making it a handy way to find the path for any given item appearing in the Finder.) Once you have issued a command such as the above example shows, you are working with AFS. You can issue all the various fs and pts commands, but only to the extent that they work with directories and files within the mounted AFS volumes; you cannot work with AFS directories and files outside the mounted volumes. Mounting the AFS root volume (you can find it as one of the menu items in the Mount Other... dialog box) will give you the ability to reach any AFS file. (But see the important caveat below before mounting that volume.) Because AFS-on-the-desktop supports access to most of the files in the directory and the ability to grant and revoke privileges to users and groups, it will suffice for most basic AFS needs of the average Mac/AFS user. But the Terminal method also provides at least two important capabilities unavailable directly from the desktop:
Cautions and Tips for Using AFS Without a Full-time Connection to the InternetIf you have a portable Macintosh or if you use a modem to connect your Mac to the Internet - in other words, if you don't have a full-time connection to the Internet - you can use AFS, but you must be especially cautious, since disconnecting from the network with AFS volumes mounted can create problems, as described below. Here are some warnings and tips for you: 1. Don't turn on the "Globally mount AFS root filesystem" or "Automatically mount home folder after MacLeland login" settings in the AFS panel of the MacLeland settings. These settings are designed for desktops that have a persistent network connection. Using these features on a portable may cause problems if and when the system is put in Sleep mode and/or moved across subnets (via AirPort connections). The manifestation of the problem is that you may see the spinning beach ball for an extended period of time. You can try and restart Finder, but this is not always successful. You generally can resolve the problem by logging out from your Mac (not just from MacLeland) and logging back in again. If you let the spinning beach ball go on long enough it MAY actually resolve the location problems but not reliably. 2. As mentioned earlier, if you find the Mount commands grayed out, click on the Start AFS Service command below them - that will re-invoke the startup process for AFS. Note that this requires you to enter an administrator password, which is required by the underlying process. 3. Don't put the system to sleep with AFS volumes mounted, especially with open files on those mounted volumes. It's always a good practice to close open files before putting a laptop to sleep anyway, if you open them through AFS rather than by copying them to your Mac first. If you violate this rule, you may get an error regarding the volume no longer being available when you wake the system. If you move across subnets, you will need to renew your login to MacLeland when you wake the system. Problems that can arise include losing any changes since the last save of any AFS file that was open when you put the Mac to sleep. Some applications will create backups in case of some loss of system fidelity, but not all do. If you do not have open files but do have mounted AFS volumes when you put your Macintosh to sleep, then when you wake the system, immediately try MacLeland's Renew Login command, which usually resolves any problems. |