

Entering DNS and WINS Server Addresses Manually
The procedure for connecting to SUNet via Ethernet recommends obtaining the the DNS and WINS server addresses automatically. However, if you experience problems -- such as not being able to access web pages that are not already saved on your computer -- you may need to enter these server addresses manually.
Note: You must be logged on as an administrator or a member of the Administrators group in order to complete this procedure.
- In Windows 2000, click the Start button. Select Settings, Control Panel, and Network and Dial-Up Connections.
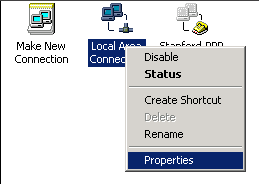
- Right-click the Local Area Connection icon and select Properties.
- In the Local Area Connection Properties window, verify that the Internet Protocol (TCP/IP) box is checked.
Note: If your Ethernet adapter is not listed in the Connect using box, you need to install your adapter.
Note: If your Ethernet adapter is listed but Internet Protocol (TCP/IP) is not displayed in the Components checked are used by this connection box, you need to install the TCP/IP protocol. Click the Install button. In the Select Network Component Type dialog box, select Protocol and then click Add. In the Select Network Protocol dialog box, select Internet Protocol (TCP/IP) from the list and then click OK to return to the Local Area Connection Properties screen.
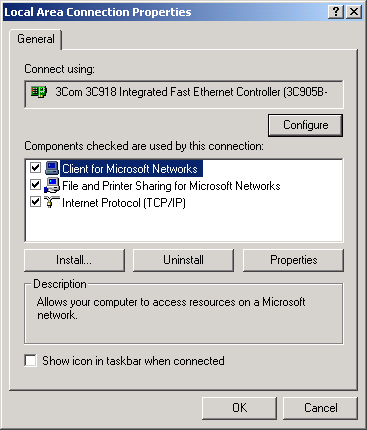
- Click Internet Protocol (TCP/IP) once to highlight it and then click the Properties button.
- In the Internet Protocol (TCP/IP) Properties window, do the following:
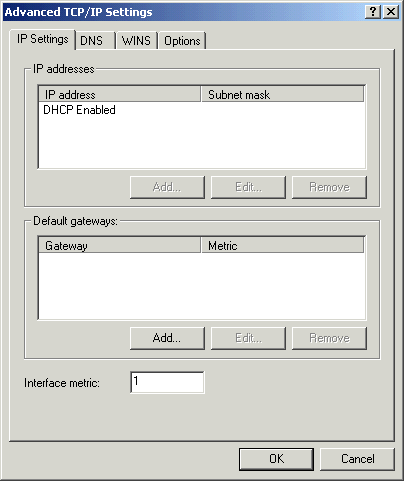
- Click Obtain an IP address automatically.
- Click Use the following DNS server addresses: and then enter the following DNS server addresses:
- Preferred DNS server: 171.64.7.55
- Alternate DNS server: 171.64.7.77

- Click Obtain an IP address automatically.
- Click the Advanced button to display the Advanced TCP/IP Settings window.
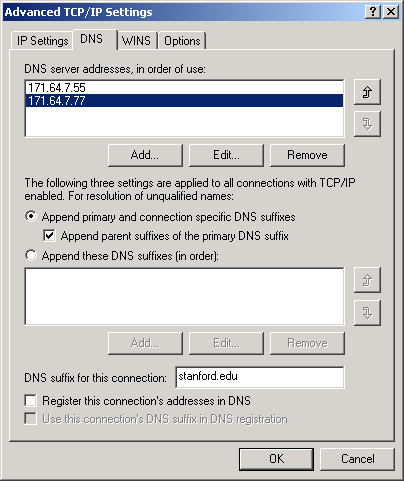
- Click the DNS tab and do the following:
- Make sure that the DNS servers you entered in the TCP/IP Properties dialog box are displayed in the DNS server addresses, in order of use
box.
- Click Append primary and connection specific DNS suffixes.
- Check the Append parent suffixes of the primary DNS suffix box.
- Enter stanford.edu in the DNS suffix for this connection box.
- Clear the Register this connection's addresses in DNS check box.
- Make sure that the DNS servers you entered in the TCP/IP Properties dialog box are displayed in the DNS server addresses, in order of use
box.
- Click the Add button directly beneath the DNS sever addresses, in order of use box.
- Enter the following DNS server address and then click Add to return to the Advanced TCP/IP Settings window.
- DNS server: 171.64.7.99

- DNS server: 171.64.7.99
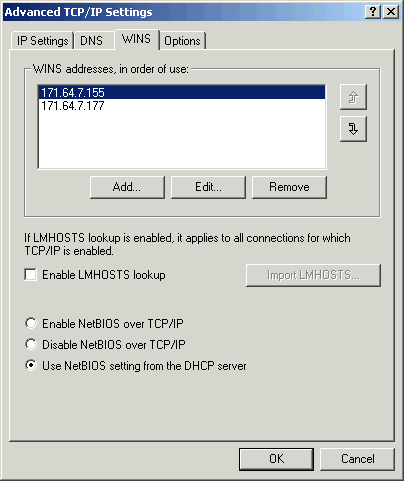
- Click the WINS tab and do the following:
- Click Add and enter the following WINS server addresses:
- WINS server: 171.64.7.155
- WINS server: 171.64.7.177
- Clear the Enable LMHOSTS lookup check box.
- Select Use NetBIOS setting from the DHCP server.
- Click Add and enter the following WINS server addresses:
- The Options tab can be left at the default settings. Click OK to exit the Advanced TCP/IP Settings window.
- Click OK to return to the Internet Protocol (TCP/IP) Properties window and Click OK to close the Internet Protocol (TCP/IP) window.