

Connecting Windows 2000 to SUNet Using Ethernet
On this page:
Your computer needs a unique Internet address in order for it to work in Stanford's computer network (SUNet). To get a valid Internet address assigned to your computer, you must first install a network adapter, configure the TCP/IP protocol, and determine your Ethernet hardware address. Once you know your Ethernet hardware address, you need to register it with Residential Computing if you are a student or with your Local Network Administrator (LNA) if you are faculty or staff. Your Residential Computing Coordinator or LNA must then enter this information in NetDB, (Stanford's network configuration database) before your computer can operate on SUNet.
Installing the Network Adapter
If you are connecting to SUNet by plugging a cable into a wall jack on campus, you are probably connecting via Ethernet.
To connect via Ethernet, you need to have an Ethernet adapter installed in your desktop computer, or use a PCMCIA Ethernet adapter if you have a laptop computer. If you had Windows 2000 and an Ethernet adapter pre-installed on your computer, your network card driver will have been installed for you. You may want to get the help of your Local Network Administrator (LNA) or Expert Partner for installing the network adapter.
Configuring the TCP/IP Protocol
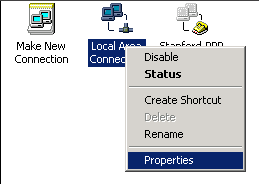
- In Windows 2000, click the Start button. Select Settings, Control Panel, and Network and Dial-Up Connections.
- Right-click the Local Area Connection icon and select Properties.
- In the Local Area Connection Properties window, verify that the Internet Protocol (TCP/IP) box is checked.
Note: If your Ethernet adapter is not listed in the Connect using box, you need to install your adapter.
Note: If your Ethernet adapter is listed but Internet Protocol (TCP/IP) is not displayed in the Components checked are used by this connection box, you need to install the TCP/IP protocol. Click the Install button. In the Select Network Component Type dialog box, select Protocol and then click Add. In the Select Network Protocol dialog box, select Internet Protocol (TCP/IP) from the list and then click OK to return to the Local Area Connection Properties window.
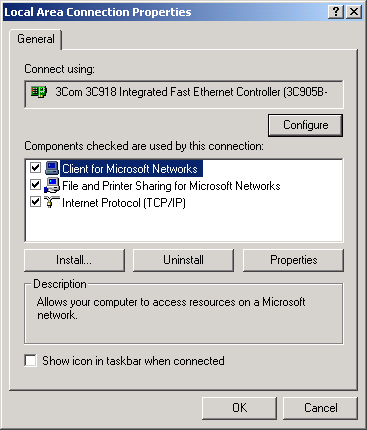
- Click Internet Protocol (TCP/IP) once to highlight it and then click the Properties button.
- In the Internet Protocol (TCP/IP) Properties window, do the following:
- Click Obtain an IP address automatically.
- Click Obtain DNS server address automatically.
Note: See the instructions for entering DNS and WINS server addresses manually if you want to enter the server addresses manually or if you encounter problems, such as being unable to access web pages that are not already saved on your computer.
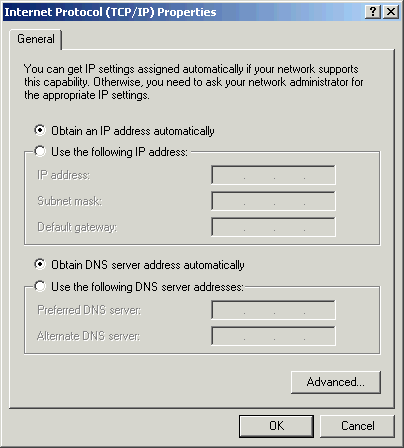
- Click Obtain an IP address automatically.
- Click the Advanced button to display the Advanced TCP/IP Settings window.
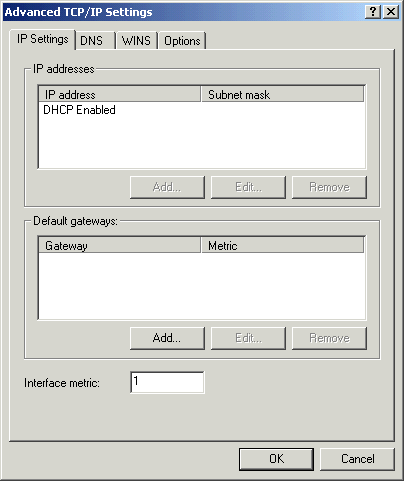
- Click the DNS tab and do the following:
- Click Append primary and connection specific DNS suffixes.
- Check the Append parent suffixes of the primary DNS suffix box.
- Enter stanford.edu in the DNS suffix for this connection box.
- Clear the Register this connection's addresses in DNS check box.
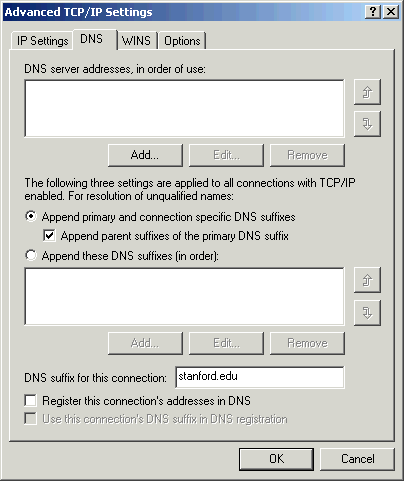
- Click Append primary and connection specific DNS suffixes.
- Click the WINS tab and do the following:
- Clear the Enable LMHOSTS lookup check box.
- Select Use NetBIOS setting from the DHCP server.
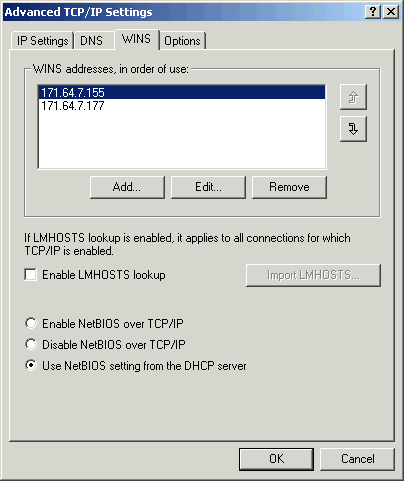
- Clear the Enable LMHOSTS lookup check box.
- The Options tab can be left at the default settings. Click OK to exit the Advanced TCP/IP Settings window.
- Click OK to return to the Internet Protocol (TCP/IP) Properties dialog box and Click OK to close the Internet Protocol (TCP/IP) window.
Determining Your Ethernet Address
Your hardware Ethernet address must be registered before your computer can communicate over SUNet via the Internet Protocols. If you already know your hardware Ethernet (Media Access Control) address, you can skip this step.
Note: This procedure will only work if the TCP/IP protocol is installed.
To determine your hardware Ethernet address:
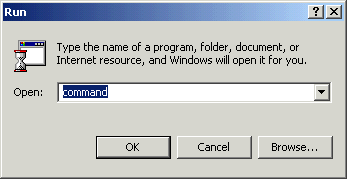
- Click the Windows 2000 Start button and select Run. Type command and then click OK.
- At the C:\ prompt, type ipconfig -all and press the Enter key on your keyboard.
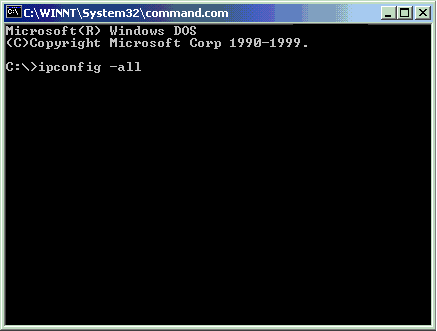
- The next screen displays information about your Ethernet adapter local area connection. Your twelve-digit, hardware Ethernet address is in the Physical
Address field.
In the following example, the Ethernet address is
00-C0-4F-74-F7-F0.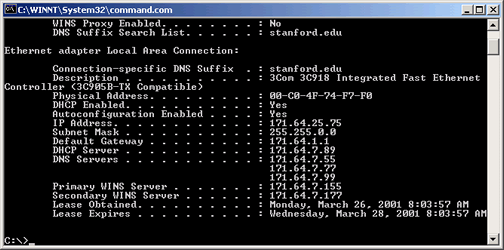
- At the C:\ prompt, type exit to close the command.com window.
Registering Your Ethernet Address
You will not be able to use your computer on the network until your hardware Ethernet address is registered.
- Faculty and staff: Give your hardware Ethernet address and other configuration information to your Local Network Administrator (LNA). You
can locate your LNA on the following web page:
http://www.stanford.edu/group/networking/dist/sunet.reports/LNA.html
- On-campus students: You must register your connections online at:
- Off-campus students: Submit a HelpSU request to the Stanford IT Help Desk. Be sure to include your hardware Ethernet address in the request description.
Graduate students living off campus who use their computer primarily in a department office should try contacting their LNA first.