Assign2: Mazes
A maze is a twisty and convoluted arrangement of paths that challenge the solver to find a route from the entry to the exit. This assignment is about using ADTs to represent, process, and solve mazes.
An introduction to mazes
Labyrinths and mazes have fascinated humans since ancient times (remember Theseus and the Minotaur?), but mazes can be more than just recreation. The mathematician Leonhard Euler was one of the first to analyze plane mazes mathematically, and in doing so, he founded the branch of mathematics known as topology. Many algorithms that operate on mazes are closely related to graph theory and have applications that include diverse tasks such as designing circuit boards, routing network traffic, motion planning, and social networking.
In this part of the assignment, we’ll be writing utility functions for solving problems with mazes, while also gaining practice with Grids, Stacks, and error checking. This project focuses on a particular type of maze known as a perfect maze. A perfect, or simply-connected, maze has no loops and no inaccessible areas. Any two locations within a perfect maze are connected by exactly one path.
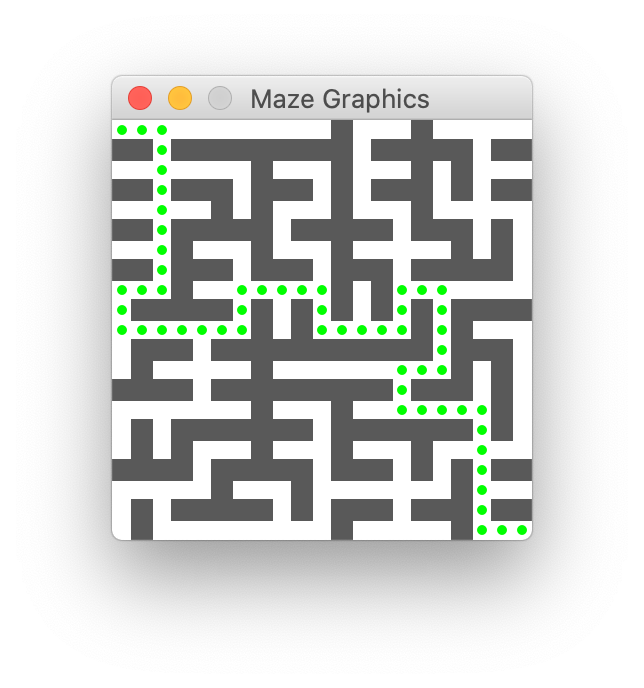
The image below shows a perfect maze and the path from the entry at upper left to exit at lower right:
In maze.cpp you’ll be filling in three functions, adding error handling to an existing function, and writing tests for the code. The starter code in main.cpp can be used to run your completed solveMaze function on specific files and to see the visual representation of the search and the solution path that it finds. The rest of this introduction will explain how we can programmatically represent mazes before asking you to jump into coding!
Using Grids to represent mazes
A maze can be modeled as a two-dimensional array where each element is either a wall or a corridor. The Grid class from the Stanford library is a good tool for representing a maze:
- We use a
boolas the stored element type, storingtruefor a cell that is an open corridor andfalsefor a wall. - To access a particular grid element to see if it is a wall or corridor, we use
grid[row][col].
Information about our mazes will be first stored in a text file before converting to a grid. Each line of the file corresponds to one row of the maze. Within a row, the character @ is used for walls and - for corridors. Here is a sample 5x7 maze file:
-------
-@@@@@-
-----@-
-@@@-@-
-@---@-
We’ve provided the code for generating a Grid from a maze text file inside the readMazeFile() function. All maze files are located inside the "Other files/res" folder, and if you wish to create your own maze file, you can right-click and duplicate an existing one inside Qt Creator.
Using Stacks and GridLocation to represent maze solutions
While working with the mazes, you may find it useful to use the GridLocation struct. A GridLocation pairs row and column information together into one aggregate type. Below is a snippet of code that demonstrates two different ways of creating a GridLocation variable, as well as other operations you can perform on the struct.
 // You can create a GridLocation by separately setting its row and col fields
 GridLocation chosen;
 chosen.row = 3;      // separate assignment to row
 chosen.col = 4;      // then col

 // Or you can create a GridLocation by setting its row and col during initialization
 GridLocation exit = { maze.numRows()-1, maze.numCols()-1 }; // last row, last col

 // You can use GridLocations to index into a Grid (maze is a Grid)
 if (maze[chosen]) // equivalent to maze[3][4]
 ...

 // You can directly compare two GridLocations
 if (chosen == exit)
 ...

 // You can also access and use a GridLocation's row,col separately
 if (chosen.row == 0 && chosen.col == 0)
 ...
In particular, when we store paths through our mazes, it’s useful to represent the paths as a Stack of GridLocations where the top (end) of our stack is the exit of the maze.
As with the maze text files, corresponding solutions to mazes are stored in .soln files within the "Other files/res" folder in the starter code. Note that the last item in these solution files represents the top, or end, of our stack. For example, this is the corresponding solution file for the 5x7 maze above:
{r0c0, r0c1, r0c2, r0c3, r0c4, r0c5, r0c6, r1c6, r2c6, r3c6, r4c6}
We’ve provided the code for reading in a solution file into a Stack via the readSolutionFile() function. Not every maze will have a corresponding .soln file, and part of your job will be writing code to generate solutions!
Grid and GridLocation references
- Lecture slides on Grid and GridLocation
- Documentation for
Grid - Section 6.1 of the textbook introduces
structtypes - Header files
grid.handgridlocation.hwithin the starter project subfolderlib/StanfordCPPLIb/collections/
Notes on collection ADTs before getting started
- The assignment operator works as expected for all our ADTs. Assigning from one Stack/Vector/Set/etc to another will create a copy of the ADT with a copy of the elements.
- Be on your toes about making sure that your template types are always properly specialized and that all types match. Using
Vectorwithout specifying the element type just won't fly, and aVector<int>is not the same thing as aVector<double>. The error messages you receive when you have mismatches can be cryptic and hard to interpret. Bring your template woes to the Ed forum, and we can help untangle them with you.
1) Warmup: Write a generateValidMoves() helper
For your first task, you'll complete the following helper function:
Set<GridLocation> generateValidMoves(Grid<bool>& maze, GridLocation cur)
Given a perfect maze represented as a Grid of bool and a current cell represented by the GridLocation cur, this function returns all valid moves from cur as a Set. Valid moves are defined as follows:
- Either directly north, south, east, or west (N, S, E, W) of
cur - Only one "step" away from
curin the grid - Not a wall
- Not out-of-bounds of the provided maze
While we've provided three tests for your generateValidMoves function, these are not comprehensive. You should write at least 2-3 additional tests to make sure your helper function works.
2) Verify paths with checkSolution()
Now that we have a helper to generate valid moves from a given maze location, we will write a function to verify if a solution is valid for a particular maze:
void checkSolution(Grid<bool>& maze, Stack<GridLocation> path)
A path represents a valid solution through the maze if it meets the following criteria:
- The path must start at the entry (upper left corner) of the maze.
- The path must end at the exit (lower right corner) of the maze.
- Each location in the path is within the maze bounds.
- Each location in the path is an open corridor (not wall).
- Each location is one cardinal step (N,S,E,W) from the next in path.
- The path contains no loops, i.e. a location appears at most once in the path.
If checkSolution detects any of the above problems, it should call the error function from the header "error.h" to report an error. This function is used to report a fatal error. When you call error, it halts the program right there and reports the message you passed as an argument:
error("Here is my message about what has gone wrong");
If all of the criteria for a valid solution are met, then the checkSolution function should complete normally.
This function has a lot of things to check! However, after writing checkSolution you will not only be very familiar with our digital representation of mazes, but you will also have a function that makes testing our next milestone much easier. Once again, we've provided some initial tests to get you started, but you should also write tests of your own. You should write at least 3-4 additional tests of the checkSolution function. Be sure to very thoroughly test your checkSolution on a variety of invalid paths so that you can be confident that it is the oracle of truth when it comes to validating a solution. Your future self will thank you.
Note the use of the special kinds of test cases EXPECT_ERROR and EXPECT_NO_ERROR in our provided tests. An EXPECT_ERROR test case evaluates an expression, expected that the operation with raise an error. While the test is running, SimpleTest framework will catch the error, note that it was generated, and then resume. Because the error that was raised was expected, the test case is considered to be passed. If an error was expected but didn't materialize, the test case fails. This is the opposite of an EXPECT_NO_ERROR test case, which does not expect errors and treats a raised error as a test failure. More information on the different test macros and how they all work can be found in the CS106B Testing Guide
- Q6. So far in this class, we've passed our data structures by reference. Why do you think
checkSolutionpassespathby value instead of by reference? - Q7. After you have written your tests, describe your testing strategy to determine that your checkSolution works as intended
3) Find solutions with solveMaze()
We can now turn our attention to figuring out how we will escape mazes. In particular, you are now going to implement the following function, which will use breadth-first search (BFS) to find a valid path through a given maze:
Stack<GridLocation> solveMaze(Grid<bool>& maze)
There are a wide variety of algorithms for solving a maze. Solving a maze can be seen as a specific instance of a shortest path problem, where the challenge is to find the shortest route from the entrance to the exit. Shortest path problems come up in a variety of situations such as packet routing, robot motion planning, analyzing gene mutations, spell correction, and more. In the case of the perfect maze, the shortest path is also the only path, but the general process is the same regardless.
Breadth-first search (BFS) is a classic and elegant algorithm for finding a shortest path. A breadth-first search reaches outward from the entry location in a radial fashion until it finds the exit. The first paths examined take one hop from the entry. If any of these reach the exit location, you’re done. If not, the search expands to those paths that are two hops long. At each subsequent step, the search expands radially, examining all paths of length three, then of length four, etc.), stopping at the first path that reaches the exit. See our BFS lecture for more explanation and visualizations of the search process.
Breadth-first search is typically implemented using a queue. The queue stores partial paths that represent possibilities to explore. The paths are processed in order of increasing length. The first paths enqueued are all length one, followed by the length two paths, and so on. Given the FIFO handling of the queue, all shorter paths are dequeued before the longer paths make their way to the front of queue, ready for their turn to be processed.
At each step, the algorithm considers the current path at the front of the queue. If the current path ends at the exit, it is a complete solution. If not, the algorithm takes the current path and extends it to reach locations that are one hop further away in the maze, and enqueue those extended paths to be examined later.
Since a path is represented as a Stack of GridLocations, putting these paths into a queue for processing means you'll have a nested ADT, a Queue<Stack<GridLocation>>. A nested container type looks a little scary at first, but it is just the right tool for this job.
Here are steps followed by a breadth-first search:
- Create a queue of paths. A path is a stack of grid locations.
- Create a length-one path containing just the entry location. Enqueue that path.
- For simplicity, assume entry is always the upper-left corner and exit in the lower-right.
- While there are still more paths to explore:
- Dequeue path from queue.
- If this path ends at exit, this path is the solution!
- If path does not end at exit:
- For each viable neighbor of path end, make copy of path, extend by adding neighbor and enqueue it.
- A location has up to four neighbors, one in each of the four cardinal directions. A neighbor location is viable if it is within the maze bounds, the cell is an open corridor (not a wall), and it has not yet been visited.
A couple of notes to keep in mind as you're implementing BFS:
- You should avoid repeatedly revisiting the same location in the maze or creating a path with a cycle, lest the search get stuck in a infinite loop. For example, if the current path leads from location
r0c0tor1c0, you should not extend the path by moving back to locationr0c0. - You shouldn't use
checkSolutionin yoursolveMazeimplementation itself, but you should use it to write tests that will check thevalidity of outputted paths from yoursolveMazefunction. - One strategy that will help with both visualizing and debugging your search process will be to add calls to our provided graphics functions, explained below.
We have provided some existing tests that put your solveMaze functions to the test. You should take advantage of the extra maze files we've provided you and add 2-3 more tests that verify the correct functionality of the solveMaze function.
Add graphics functions to draw the maze
The Stanford C++ library has extensive functionality for drawing and interacting with the user, but we generally don't ask you to dig into those features. Instead, we have supplied the graphics routines you need pre-written in a simple, easy-to-use form. For this program, the provided mazegraphics.cpp module has functions to display a maze and highlight a path through the maze. Read the mazegraphics.h header file in the starter project for details of these functions:
MazeGraphics::drawGrid(Grid<bool>& grid)MazeGraphics::highlightPath(Stack<GridLocation> path, string color)
Note that when calling these functions, you must call them using their full name (including the weird looking MazeGraphics:: prefix). We will talk more about what this notation means a little later on in the quarter!
We've included the call to MazeGraphics::drawGrid to display the maze for you. The function MazeGraphics::highlightPath should be used to mark the cells along a path as part of animating the search for a solution.
As your solveMaze algorithm hunts for a solution, you can call the function MazeGraphics::highlightPath function to visually mark the current path on the graphics window so the user can follow along with the algorithm.
Be sure to only call MazeGraphics::highlightPath after having first called MazeGraphics::drawGrid once since the function tries to add dots to an already created grid.
4) Add maze-file error-checking into readMazeFile()
Your last task is to improve readMazeFile by making it robust to malformed input in maze text files. There are two specific issues in the file format that you are to detect and report:
- A maze row that is longer or shorter than the other rows.
- Each maze row is required to have same length as all the others.
- A maze location containing a character that is not
@or-.- The valid options for a location are open or wall. Anything else is an error.
First, read over the code for the function:
void readMazeFile(string filename, Grid<bool>& maze)
The provided functionality correctly reads well-formed mazes (confirmed by the existing unit tests), but the function currently makes no effort to detect problems with the text files. Therefore, when given bad data, it might do anything from misinterpreting the file to possibly crashing.
We’ve provided some unit tests and one badly malformed maze file. You are to add student tests that further verify that your maze reading is now robust. You will need to create additional malformed files, as described in the introduction section Using Grids to represent mazes. The project resource files are listed under Other files -> res. Your program can open a resource file by specifying the path to open as "res/myfilename". Follow the format of the other maze files: one line for each row in the grid. Once you have created these files, you should add 1-2 additional tests that verify the error-checking functionality of readMazeFile.
- Q8. Describe the malformed maze files you created in order to verify the robustness of your maze reading.
Once you've added error-checking into readMazeFile, you're all finished! 👏 Congratulations! 👏
References
There are many interesting facets to mazes and much fascinating mathematics underlying them. Mazes will come up again several times this quarter. Chapter 9 of the textbook uses a recursive depth-first search as path-finding algorithm. At the end of the quarter when we talk about graphs, we'll explore the equivalence between mazes and graphs and note how many of the interesting results in mazes are actually based on work done in terms of graph theory.
- Walter Pullen, Maze Classification. http://www.astrolog.org/labyrnth/algrithm.htm Website with lots of great info on mazes and maze algorithms
- Jamis Buck. Maze Algorithms. https://www.jamisbuck.org/mazes/ Fun animations of maze algorithms. He also wrote the excellent book about Mazes for Programmers: Code Your Own Twisty Little Passages.
Extensions
- Instead of reading pre-written mazes from a file, you could instead generate a new random maze on demand. There is an amazing (I could not resist…) variety of algorithms for maze construction, ranging from the simple to the sublime. Here are a few names to get you started: backtracking, depth-first, growing tree, sidewinder, along with algorithms named for their inventor: Aldous-Broder, Eller, Prim, Kruskal, Wilson, and many others.
- Try out other maze solving algorithms. How does BFS stack up against the options in terms of solving power or runtime efficiency? Take a look at random mouse, wall following, depth-first search (either manually using a Stack or using recursion once you get the hang of it), Bellman-Ford, or others.
- There are many other neat maze-based games out there that make fun extensions. You might gather ideas from Robert Abbott's http://www.logicmazes.com or design a maze game board after inspiration from Chris Smith on mazes.