Why testing?
Anybody that writes code for some purpose (whether as a researcher, a software engineer, or in any other profession) will get to the point where others are relying on their code. Bugs in software can be dangerous or even deadly. Additionally, users do not enjoy using software that is buggy and crashes, and fixing bugs once the software is in production is very costly. Most importantly, good engineers take pride in building things that work well and are robust.
The key to writing working software is developing good tests. In this course we follow an approach called test-driven development. As you write code, you will also write companion tests. These tests are used to verify that the code you just finished writing works as intended.
This strategy is sometimes called "test-as-you-go." You work in small steps, being sure to test thoroughly, and only move on after you having confirmed the correctness and fixed all issues. The beauty of this approach is that each step is relatively straightforward and easy to debug. Imagine the opposite approach: you write hundreds of lines of code, the code does not work, and now you need to figure out which one of those hundreds of lines of code isn't working as expected! That is the sort of frustration that we want to help you all avoid as you continue to develop your skills as programmers.
SimpleTest
For CS106B, we provide a unit-test framework called SimpleTest that you will use to test your code. This framework was pioneered by our ace colleague Keith Schwarz. SimpleTest provides a simple, clean approach to writing and running test cases.
Here is an example of how you might see the SimpleTest framework used in the starter code of an assignment.
// reversed(str) returns copy of str with characters in reverse order.
string reversed(string s)
{
    string result;
    for (int i = s.length() - 1; i >= 0; i--) {
        result += s[i];
    }
    return result;
}

/* * * * * * Test Cases * * * * * */

PROVIDED_TEST("Demonstrate different SimpleTest use cases") {
    EXPECT_EQUAL(reversed("but"), "tub");
    EXPECT_EQUAL(reversed("stanford"), "drofnats");
}
When we provide tests for you in the starter code, each test case is wrapped in the special macro PROVIDED_TEST. The string argument in parentheses describes the purpose of the test, and the code block that follows (enclosed in curly braces) defines the actual test behavior.
When you add your own test cases, you will wrap your test code blocks in the STUDENT_TEST macro instead. The STUDENT_TEST functionality and structure are exactly the same as PROVIDED_TEST; it simply distinguishes the tests you've written yourself from those we provide for the benefit of your grader. You will see many examples of this in the following sections.
EXPECT_EQUAL
Within the code block, the test macro most commonly used is EXPECT_EQUAL, which confirms the two arguments are equal. A typical use case for EXPECT_EQUAL is to take a value produced by your code (e.g. the return value from a call to one of your functions) and confirm that value matches to the expected outcome. For example, in the above code, EXPECT_EQUAL is used to compare the result of the call reversed("but") to the string "tub". If the two are indeed equal, the test passes. If they do not match, the test is reported as a failure.
For example, after adding your own tests (using the STUDENT_TEST identifier as previously mentioned) to the above file, it could look something like this:
// reversed(str) returns copy of str with characters in reverse order.
string reversed(string s)
{
    string result;
    for (int i = s.length() - 1; i >= 0; i--) {
        result += s[i];
    }
    return result;
}

/* * * * * * Test Cases * * * * * */

PROVIDED_TEST("Demonstrate different SimpleTest use cases") {
    EXPECT_EQUAL(reversed("but"), "tub");
    EXPECT_EQUAL(reversed("stanford"), "drofnats");
}

STUDENT_TEST("my added cases not covered by the provided tests") {
    EXPECT_EQUAL(reversed("racecar"), "racecar");
    EXPECT_EQUAL(reversed(""), "");
    EXPECT_EQUAL(reversed("123456789"), "987654321");
}
Important note: You should never modify the provided tests – these are the same tests that will be used for grading, so it is not in your best interest to modify them. If you want to test different scenarios, always add new tests using the
STUDENT_TESTmacro.
EXPECT
Another test macro that is regularly used is EXPECT, which confirms the truth of a single expression. If the expression evaluates to true, the test passes. If false, it reports a test failure. For example, if you added the isPalindrome function to the above program, you could add a test case that uses EXPECT to confirm the correct result from isPalidrome, as shown below.
// reversed(str) returns copy of str with characters in reverse order.
string reversed(string s) {
    string result;
    for (int i = s.length() - 1; i >= 0; i--) {
        result += s[i];
    }
    return result;
}

bool isPalindrome(string s) {
    return s == reversed(s);
}

/* * * * * * Test Cases * * * * * */

PROVIDED_TEST("Demonstrate different SimpleTest use case") {
    EXPECT_EQUAL(reversed("but"), "tub");
    EXPECT_EQUAL(reversed("stanford"), "drofnats");
}

STUDENT_TEST("test additional cases not covered by the provided tests") {
    EXPECT_EQUAL(reversed("racecar"), "racecar");
    EXPECT_EQUAL(reversed(""), "");
    EXPECT_EQUAL(reversed("123456789"), "987654321");
}

STUDENT_TEST("test my isPalindrome function") {
    EXPECT(isPalindrome("racecar"));
    EXPECT(!isPalindrome("stanford"));
}
When would you use EXPECT instead of EXPECT_EQUAL?
EXPECT_EQUAL which is appropriate for any situation in which you have two values that can be compared for equality (two numbers, two strings, two Vectors, etc.). EXPECT allows you to express a wider variety of conditions beyond simple equality. For example, you could confirm the truth of a complex set of conditions by passing a compound expression such as EXPECT(x > y && y != z || y == 0);
EXPECT_ERROR
The EXPECT_ERROR macro is useful for verifying that code reports an error when expected. When you pass an expression to EXPECT_ERROR, it evaluates the expression and observes whether or not it calls the error() function to report an error. If an error is raised, this causes the test to pass. If not, the test fails and reports that the expression failed to trigger an error. EXPECT_ERROR is used in the specific situation of confirming expected handling of errors within your code.
EXPECT_NO_ERROR
This macro is exactly the opposite of EXPECT_ERROR. With this macro, you pass it an expression, and if the expression successfully runs to completion without running into an error, then the test passes. However, if evaluating the expression calls the error() function somewhere along the way, the test fails. EXPECT_NO_ERROR is used in specific situations where you want to confirm that functions behave properly on correct input.
TIME_OPERATION
SimpleTest also has support for simple execution timing.
To time an operation, evaluate the expression within the macro TIME_OPERATION(size, expression), as shown below:
STUDENT_TEST("Time operation vector sort on tiny input")
{
    Vector<int> v = {3, 7, 2, 45, 2, 6, 3, 56, 12};
    TIME_OPERATION(v.size(), v.sort());
}
The first argument to TIME_OPERATION is the input size; this is used to label this timing result to distinguish from other results. The second argument is the expression to evaluate. TIME_OPERATION will start a new timer, evaluate the expression, stop the timer, and report the elapsed time.
You can have more than one use of TIME_OPERATION within a test case. Each operation is individually evaluated and timed. Below demonstrates use of TIME_OPERATION in a loop to time how long it takes to sort the items in successively larger vectors.
STUDENT_TEST("Time operation vector sort over a range of input sizes")
{
    for (int size = 50000; size < 1000000; size *= 2) {
        Vector<int> v;
        for (int i = 0; i < size; i++) {
            v.add(randomInteger(1, 1000)); // fill vector with random values
        }
        TIME_OPERATION(v.size(), v.sort());
    }
}
Here are the test results for running the test cases above:
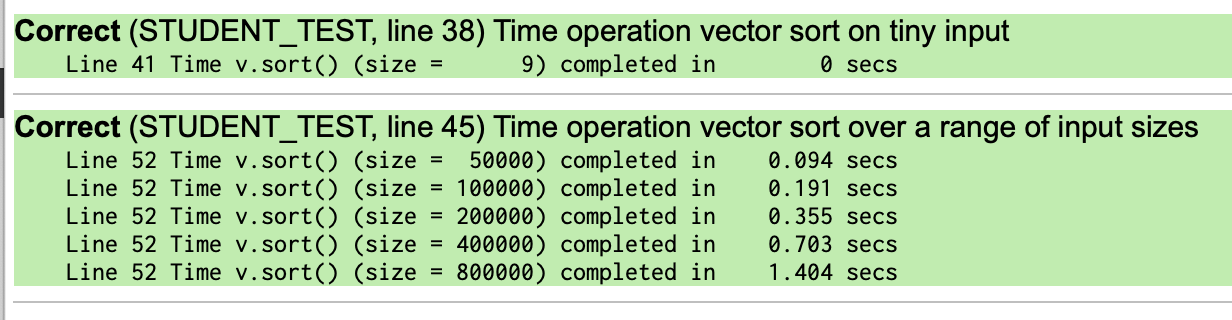
Using TIME_OPERATION over a range of sizes lets you see how the time required for an operation changes with respect to input size – i.e. it predicts the algorithm's Big O. Handy!
By default, a test case that uses TIME_OPERATION will be reported as Correct as long as the expression being evaluated does not result in an error or crash. If you want to verify the actual correctness of the result as well as time it, you can mix in regular use of EXPECT_EQUAL and EXPECT into the test case as shown below:
STUDENT_TEST("Time operation vector sort on tiny input and verify is sorted")
{
    Vector<int> v = {3, 7, 2, 45, 2, 6, 3, 56, 12};
    TIME_OPERATION(v.size(), v.sort());
    EXPECT(checkIsSorted(v));
}
runSimpleTests
The main program of every project will be configured so that you have three choices every time you want to run your program: run all the tests, run a selected portion of the tests, or run no tests at all and proceed with normal execution of the program. The way you can control which of these choices to use is demonstrated below:
int main()
{
    if (runSimpleTests( <test choice argument> ))
        return 0;
    ...
}
The argument to runSimpleTests is one of:
NO_TESTS(skip testing altogether, just run rest of normalmainfunction)ALL_TESTS(run all tests for all files)SELECTED_TESTS(provide menu to select which file to run tests)
Debugging a failing test
Your goal when testing your code should be to get all of your tests to pass. However, if you get a failed test result, don't look at this as sad times; this test result is news you can use. The failing test case indicates an operation that behaved unexpectedly. This means you know where to focus your attention.
Dig into that test case under the debugger to analyze how it has gone astray. Set a breakpoint inside the text code block, and choose to stop at the line that is at or before the failing EXPECT/EXPECT_EQUAL statement.
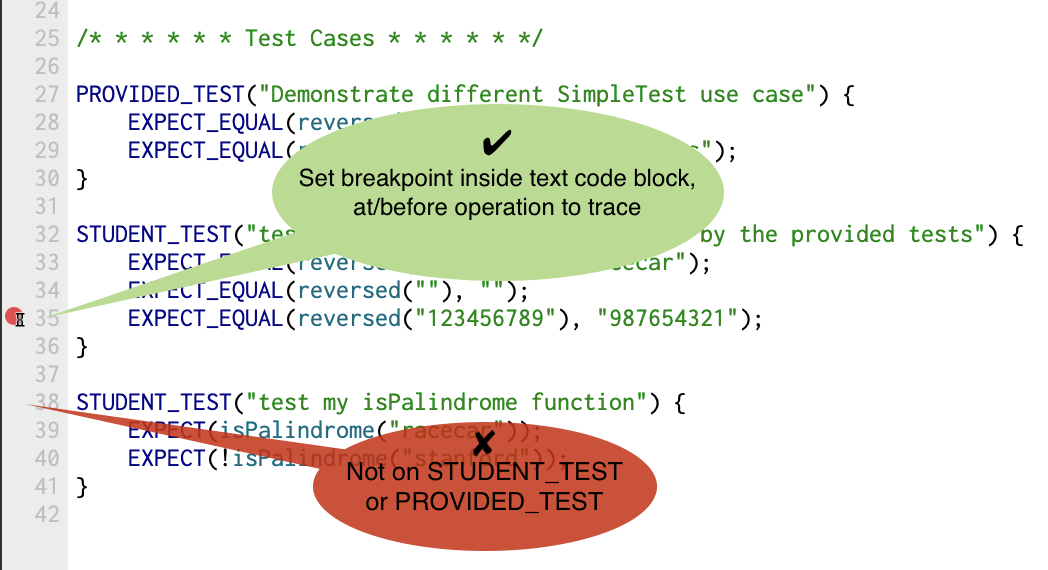
Now run the tests using the debugger. When the program stops at the breakpoint, single-step through the code while watching the variables pane to observe how the state of your program changes, using a technique just like you did in the debugging tutorial in Assignment 0.
After you understand the failure and apply a fix, run that test again. When you see the test pass, you can celebrate having squashed that bug!
Test-driven development
We highly recommend employing test-driven development when working on your assignments. To do so, follow these steps:
- identify a small, concrete task (bug to fix, feature to add, desired change in behavior)
- construct tests for the desired outcome, add them to the file in which you're currently working, and verify the current code fails these tests
- implement the changes in your code to complete the task
- re-run your newly added tests and verify they now succeed
- test the rest of the system (by running all tests) to verify you didn't inadvertently break something else
This process allows you to change only a small amount of code at once and validate your results with carefully constructed tests before and after. It keeps your development moving forward while ensuring you have a functional program at each step!
Test cases and grading
The SimpleTest framework will be supplied with each assignment, and there will be some initial test cases provided in the starter project, but you will also be expected to add your own tests.
You will submit your tests along with the code, and the grader's review will consider the quality of your tests. We will also provide comments on your tests to help you improve your testing approach. Please incorporate our feedback into future assignments; it will improve your grade and, more importantly, your effectiveness as a programmer. We guarantee future employers will appreciate your ability to write good tests and well-tested code!
Here are some things we look for in good tests.
-
Are the tests comprehensive? Is all the functionality tested?
-
Where possible, are the tests self-contained and independent?
-
Did you anticipate potential problems, tricky cases, and boundary conditions?
-
Did you develop the tests in a good order? Did you test basic functionality before more advanced functionality? Did you take small, carefully chosen steps?
Common questions
Should each EXPECT/EXPECT_EQUAL be in a STUDENT_TEST code block of its own or can I list several within one code block?
For tests that are closely related, it may be convenient to group them together in the same code block under one test name. The tests will operate as one combined group and show up in the report as one aggregate success (if all pass) or one failure (if at least one fails).
However, there are advantages to separating each individual test case into its own code block. You will be able to choose a clear, specific name for this block. The separation isolates each test so you can easily identify exactly which cases are passing and which are failing. For example, if you have,
STUDENT_TEST("Many tests together"){
    EXPECT(... Test A ...)
    EXPECT(... Test B ...)
    EXPECT(... Test C ...)
}
then if Test B fails, Test C will never run and you won't be able to see the output – you won't know if Test C passed or failed. On the other hand, if you structure your tests like this
STUDENT_TEST("Test A"){
    EXPECT(... Test A ...)
}

STUDENT_TEST("Test B"){
    EXPECT(... Test B ...)
}

STUDENT_TEST("Test C"){
    EXPECT(... Test C ...)
}
then all the tests will run individually, and even if Test B fails, you will still get independent information about Tests A and C. Having this sort of isolated behavior might make debugging any problems you encounter a little bit easier!
When the instructions say to "add 2 tests," do we count each STUDENT_TEST or each EXPECT_EQUAL?
Each use of EXPECT/EXPECT_EQUAL is counted as a test case. Read the answer to the previous question for some things to consider when deciding whether to group multiple test cases under a single STUDENT_TEST group or keep separated.
What happens if my test case is bogus or malformed?
When testing your code, you should construct each test case so that a correct program will pass (receive a "CORRECT") for each case. A "bogus" test case is one that has been designed to "fail" given a correct program. If a test case is bogus, it is usually asking the wrong question about a problem.
For example, suppose you wrote a function to check if a stoplight is green. But in order to check that it works, you write a test case that you want to deliberately fail in order to show that your function correctly returns false when given "red":
STUDENT_TEST("check if isStoplightGreen() works") {
    stoplightColor = "red";
    EXPECT(isStoplightGreen(stoplightColor));
}
If your isStoplightGreen() function returns true only when passed "green," a correctly written program will always fail this test case. Instead, you would want to ask the question, "Does the function work when passed green?" or "Does the function return false when passed red?" Either of the tests below would be better designs to do this.
STUDENT_TEST("check if isStoplightGreen() works for green lights") {
    stoplightColor = "green";
    EXPECT(isStoplightGreen(stoplightColor));
}

STUDENT_TEST("check if isStoplightGreen() returns false when given red") {
    stoplightColor = "red";
    EXPECT(!isStoplightGreen(stoplightColor));
}
Both of these tests will pass for correctly written code. In short, make sure to design tests that pass rather than fail to demonstrate that your code is working.
The font/sizes/colors in the Simple Test result window are not pleasing to me. Can I customize the display?
Yes! Look in the Qt project browser under Other files->testing for a file named styles.css. This file is the CSS stylesheet for the Simple Test window. Edit this file to change the display styles. Each project has its own copy of the stylesheet. Copy the edited stylesheet from this project into a new project to carry those customizations forward.