More on Linked Lists
CS 106B: Programming Abstractions
Spring 2023, Stanford University Computer Science Department
Lecturer: Chris Gregg, Head CA: Neel Kishnani
 (linked wrists)
Slide 2
Announcements
- Assignment 5 due today
- Assignment 6 out today (today's lecture is critical for this assignment)
Slide 3
Today's Topics
- Writing More Linked List code
- Head and Tail pointers
- Doubly linked lists
- References to pointers
- Accessing a struct's elements via a pointer
Slide 4
Let's write some more linked list code
- We'll start with a
Cellstruct (it could also be called aNode):
/* Type: Cell
 *
 * A cell in a linked list.
 */
struct Cell {
    string value;
    Cell* next;
};
This is the same basic definition we saw before: we will use Cells as the objects in our linked list. Our linked list will hold strings.
Let's start simply: we'll start with a list with zero elements, then add three elements, with each new element being added to the front of the list (which we will call the head of the list.
 1 int main() {
 2     Cell *head = nullptr; // just a pointer! This is not a Cell!
 3
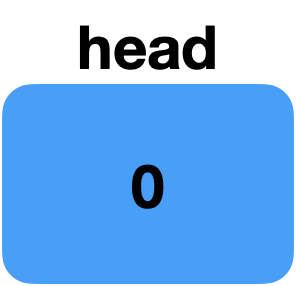
So far, this is a boring list. It has no elements. So, let's create one (we'll make up values for the heap addresses):
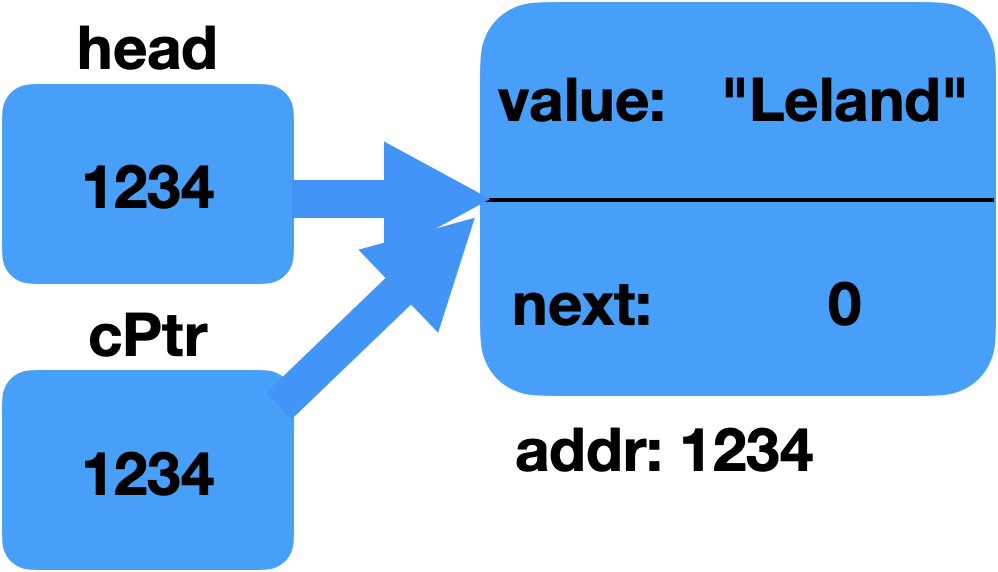
 4    Cell *cPtr = new Cell; // request memory for a Cell object.
 5    cPtr->value = "Leland";
 6    cPtr->next = nullptr; // this is the end of our list
 7
 8    head = cPtr;
 9
Now our list has one element!
Both head and cPtr point to the element.
Let's add another cell!
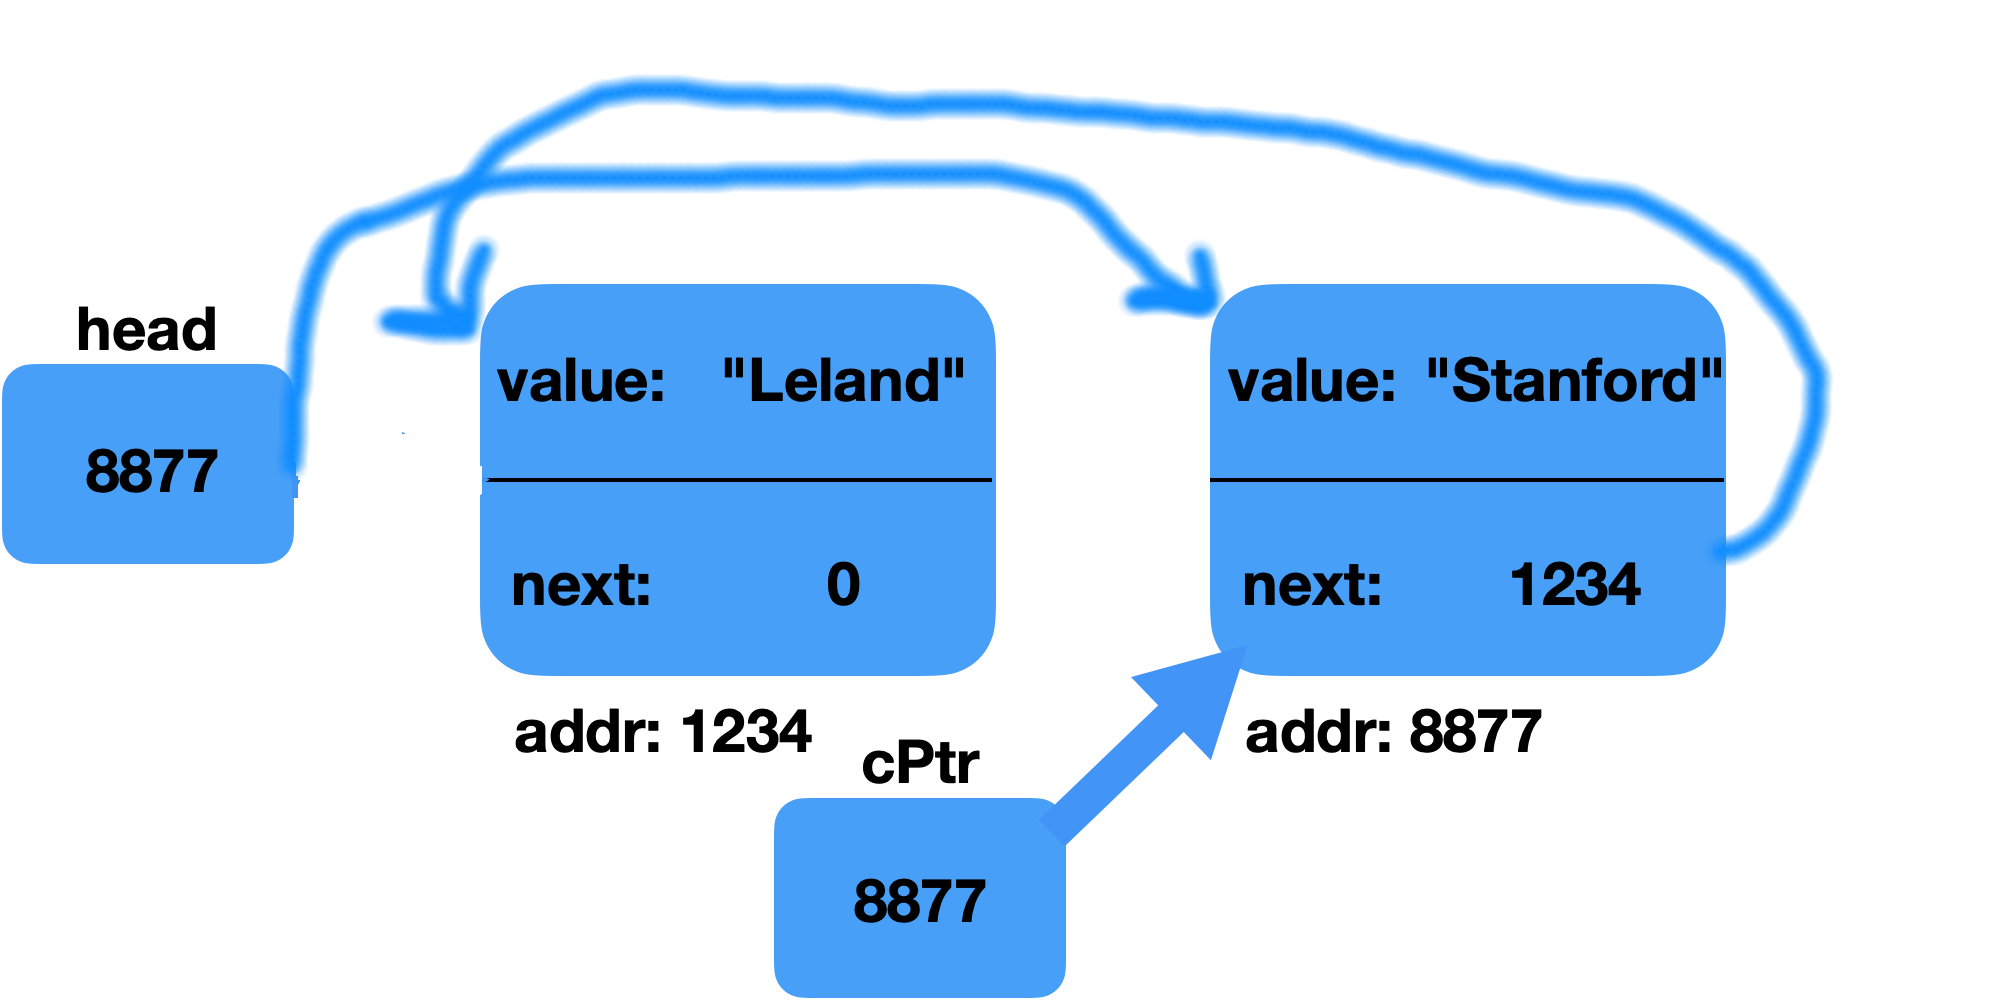
10    cPtr = new Cell; // don't need to redefine the variable!
11    cPtr->value = "Stanford";
12    cPtr->next = head; // we're putting this cell onto the front of the list
13
14    head = cPtr;
15
Let's build this up piece by piece:
After line 10:
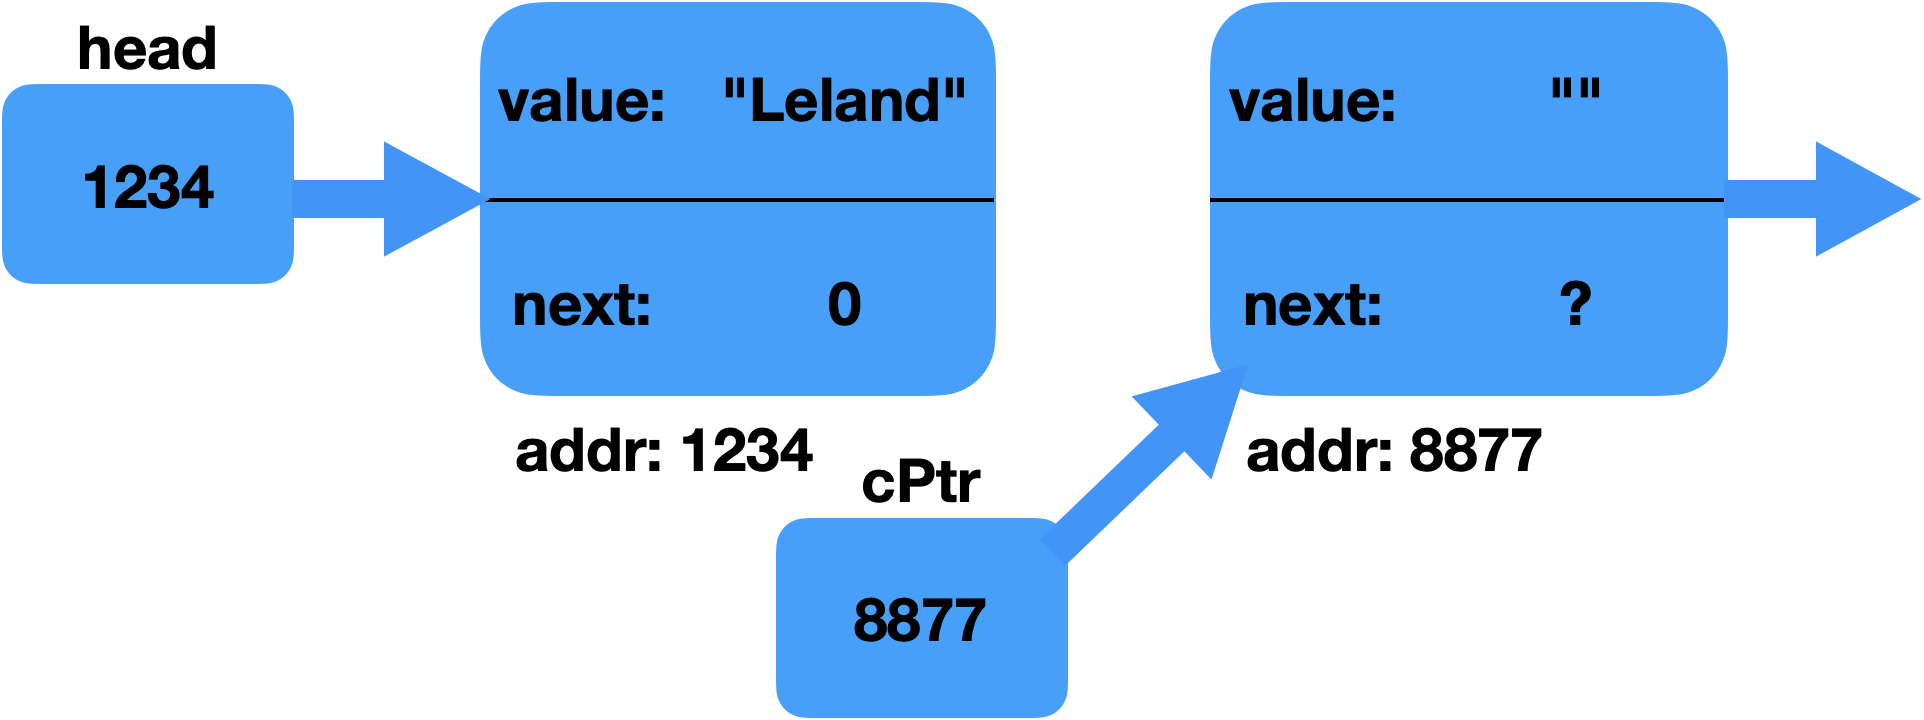
After line 12:
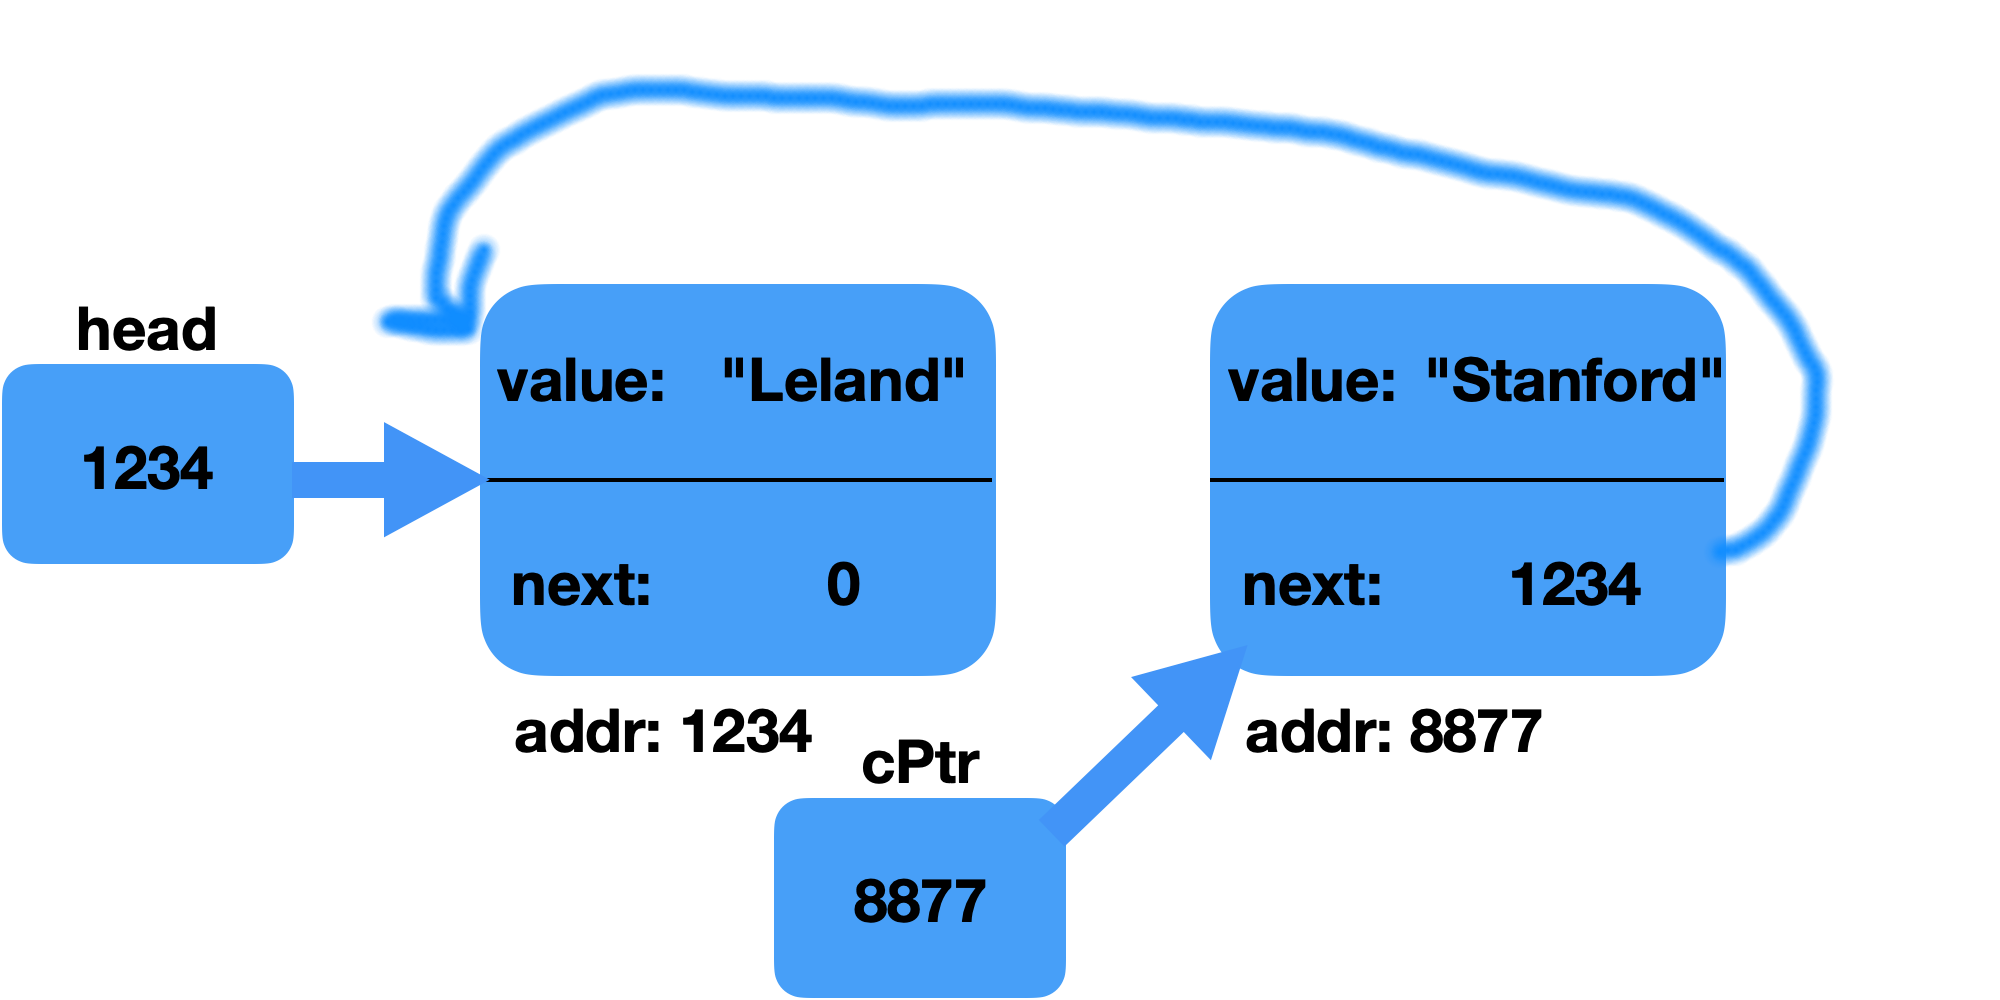
After line 14:
We'd better re-draw this (nothing changes, we're just cleaning up the picture):

We simply added the new cell onto the front of the linked list. We had to "rewire" the list. Make sure you understand how we got to this drawing!
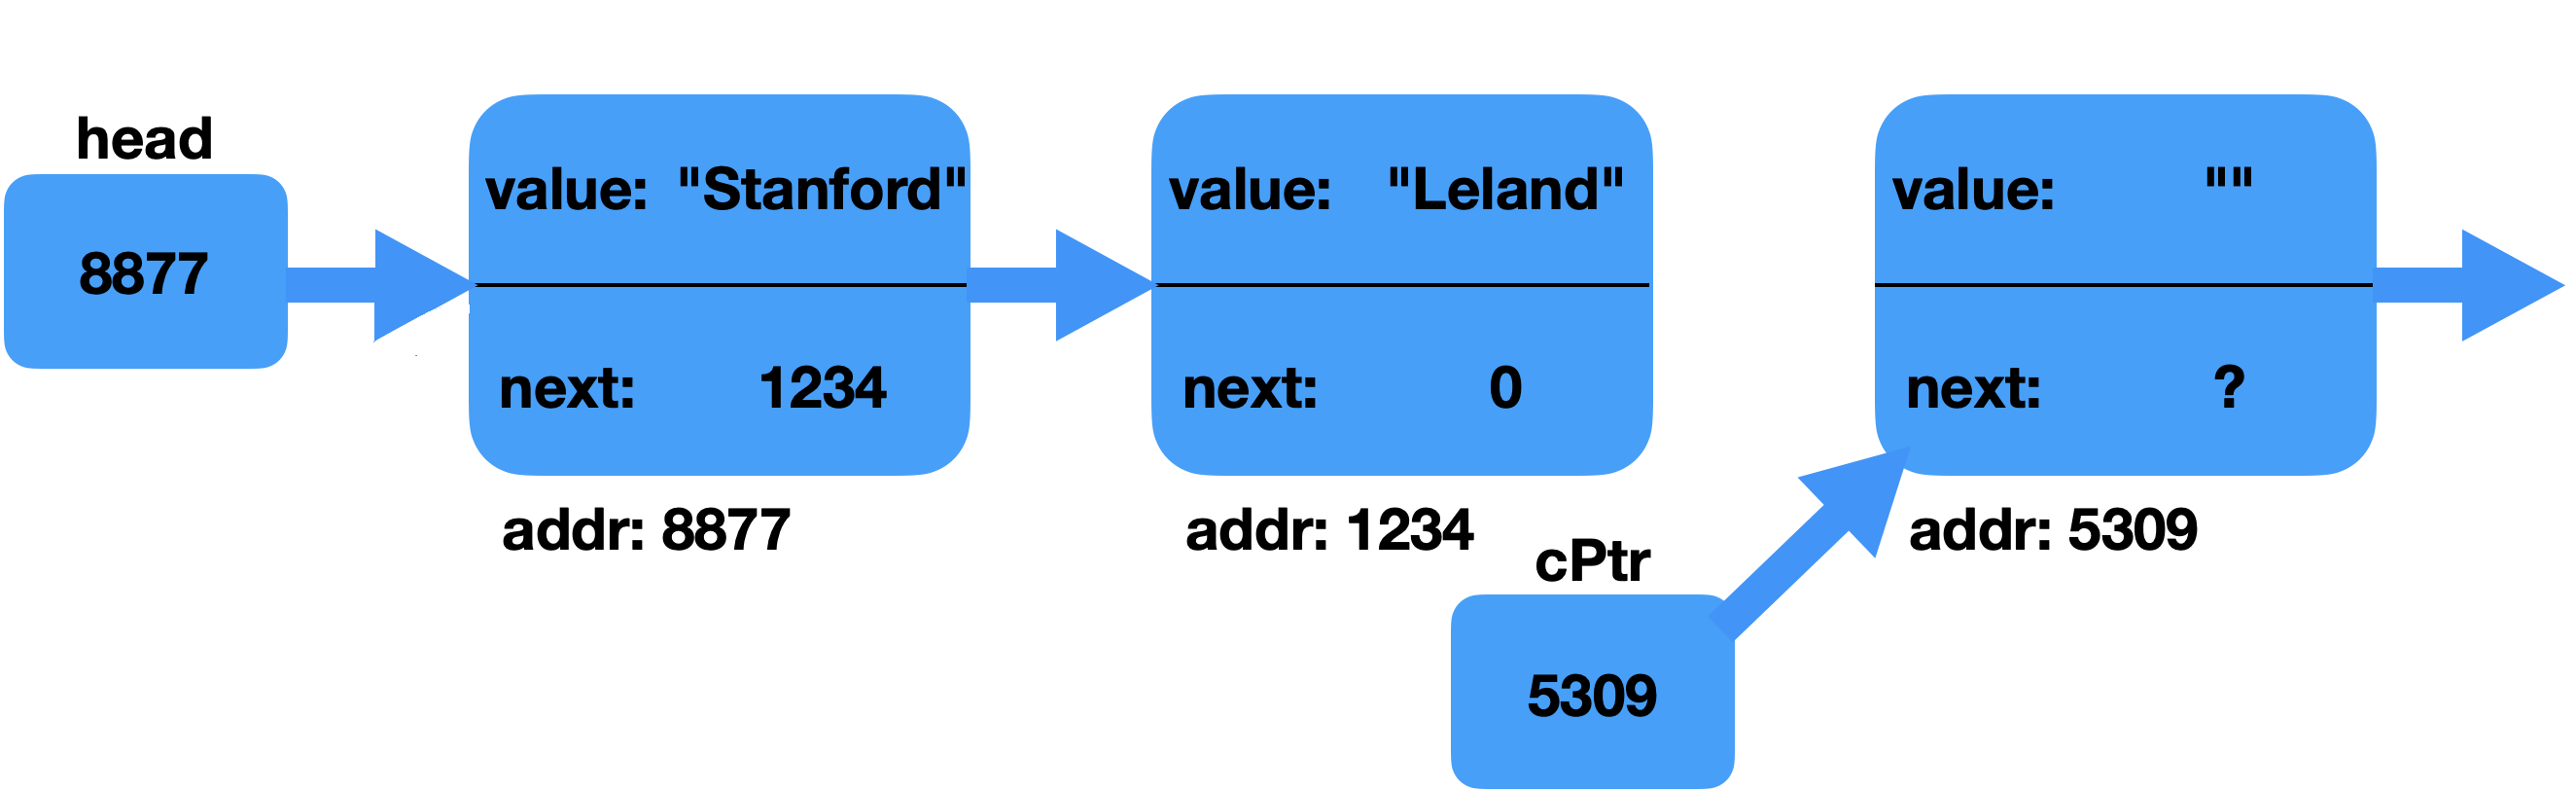
Let's add one more cell:
16 cPtr = new Cell; // don't need to redefine the variable!
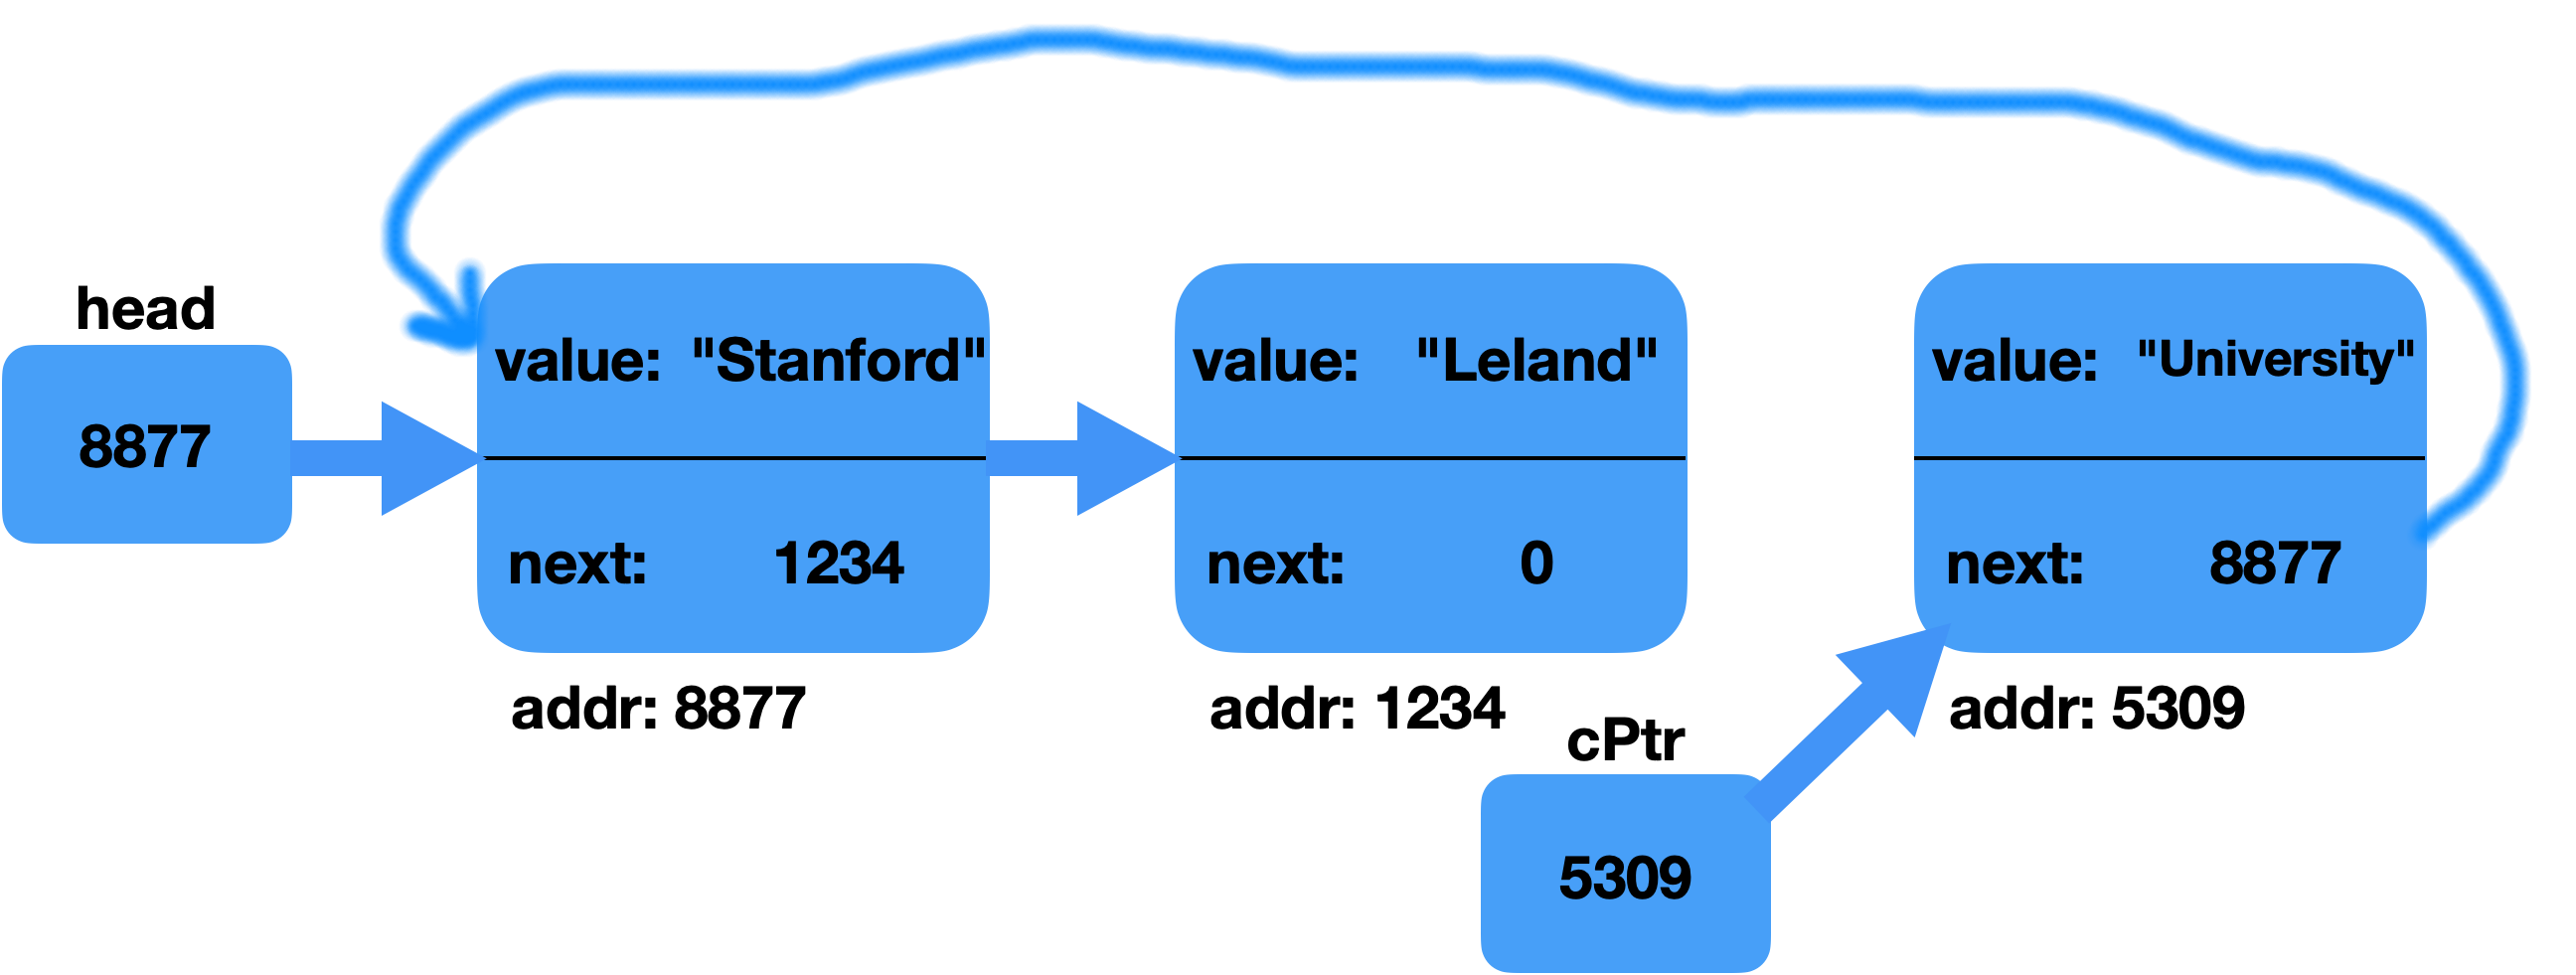
17 cPtr->value = "University";
18 cPtr->next = head; // we're putting this cell onto the front of the list
19
20 head = cPtr;
21
This code looks suspicially like the last bit of code!
Let's build it up the same way we did before:
After line 16:
After line 18:
After line 20:
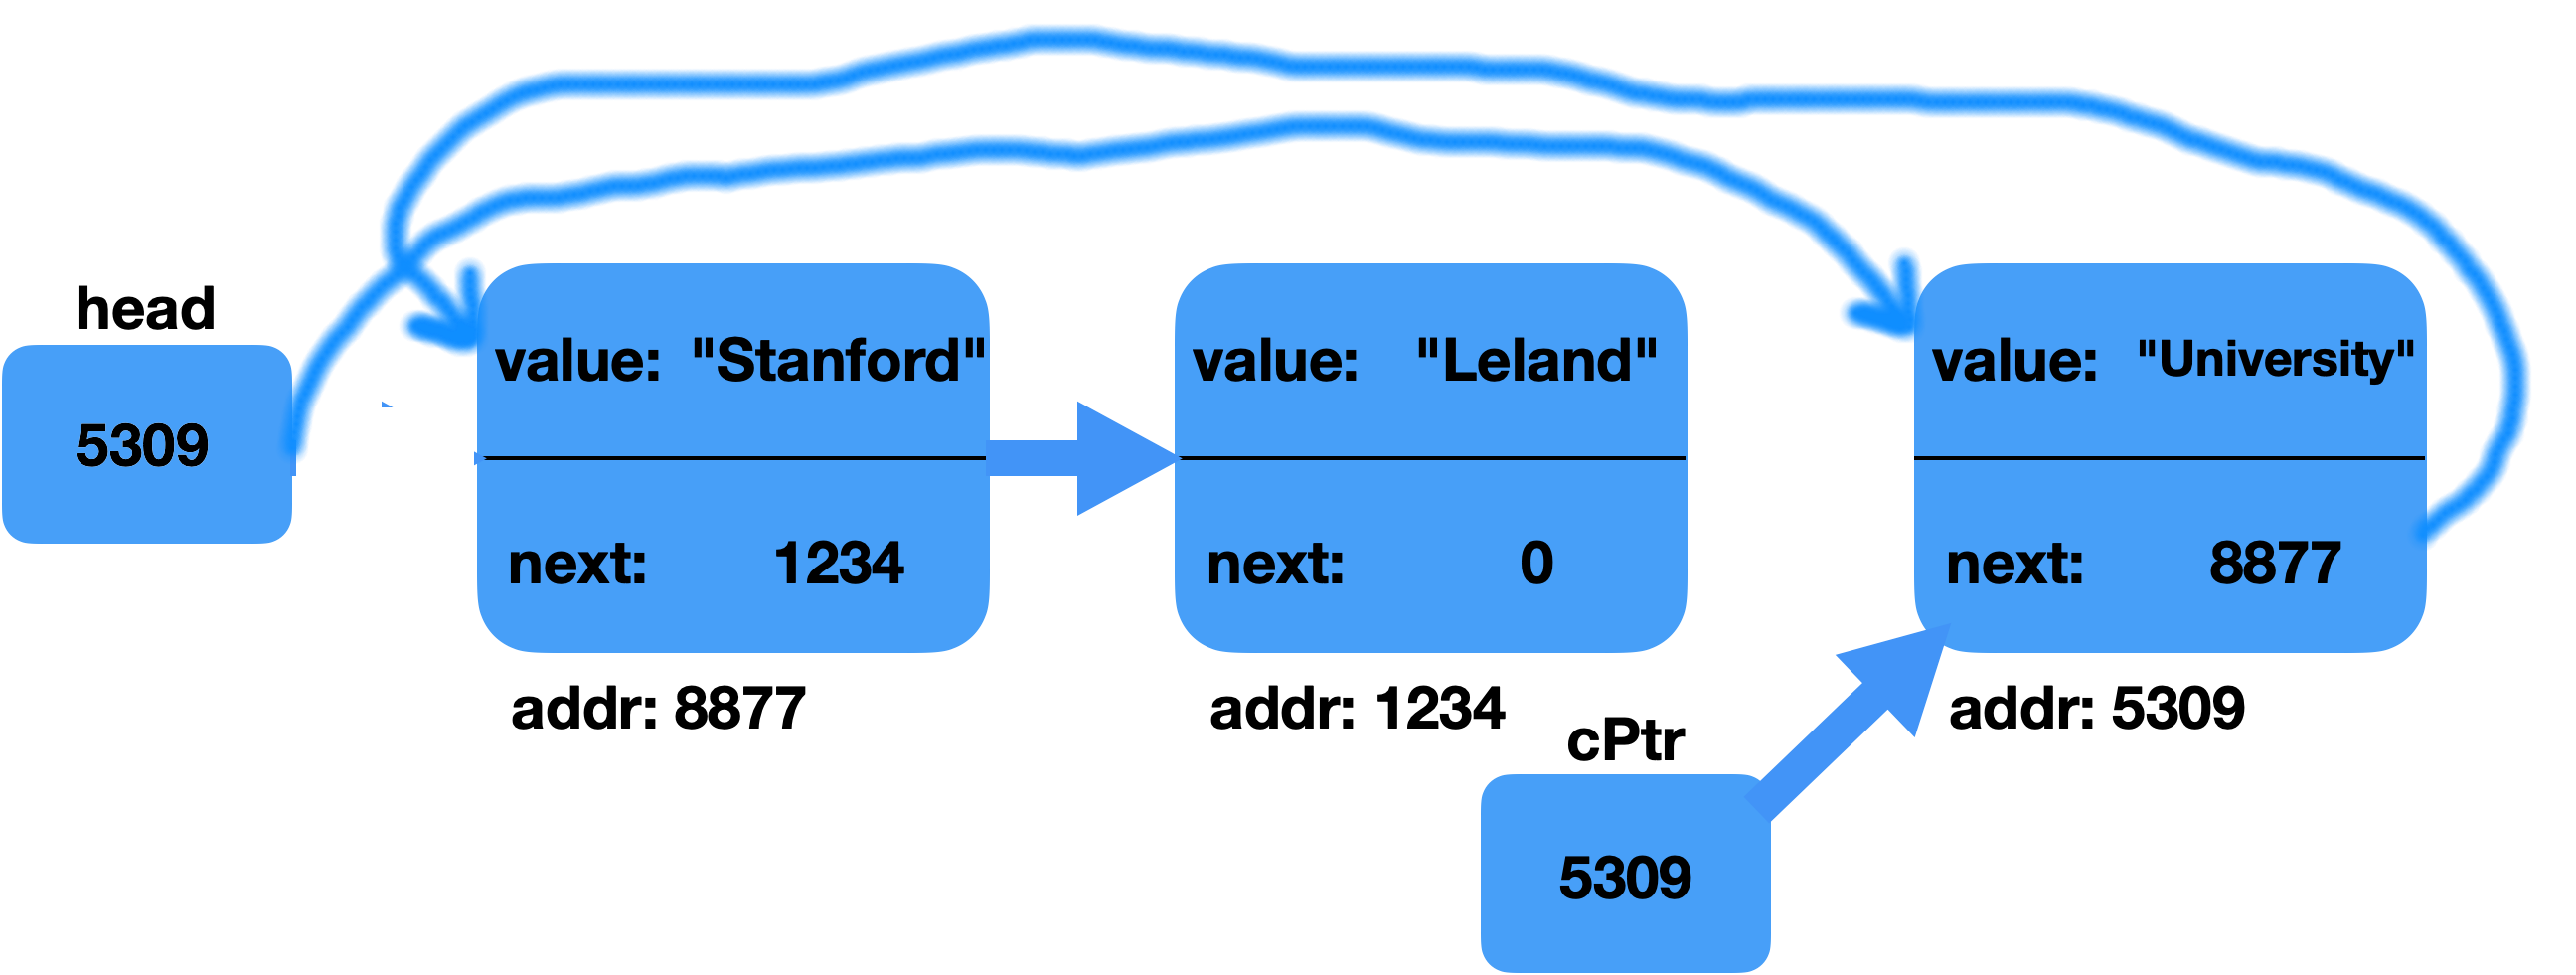
Again, we'll re-draw this (nothing changes, we're just cleaning up the picture):
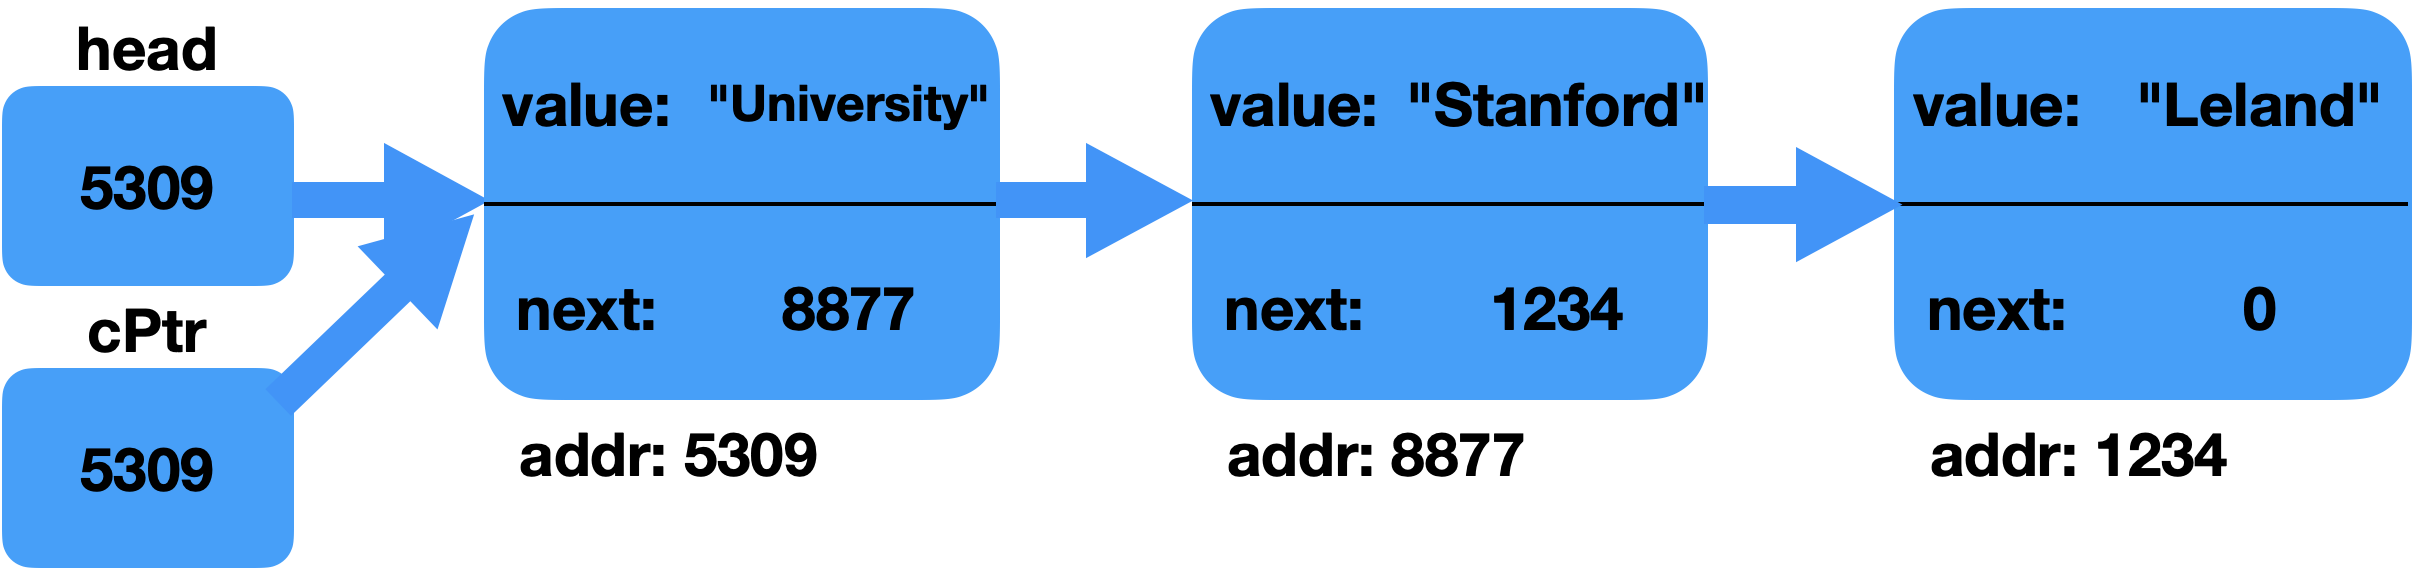
Slide 5
Can we make adding to the head ("prepending") a function? Sure:
void prependTo(Cell*& list, const string& value)
There is something new here: the list parameter is a reference to a Cell pointer. This means that if we change list's value (an address), we change the original from the calling function! That's nice. That means that we can update the head (which is the value we will pass in) by reference.
Here is the code:
void prependTo(Cell*& list, const string& value) {
    /* Create a new cell. */
    Cell* cPtr  = new Cell;
    cPtr->value = value;

    /* This cell needs point to the start of the old list. */
    cPtr->next = list;

    /* Update the head of the list. */
    list = cPtr;
}
Slide 6
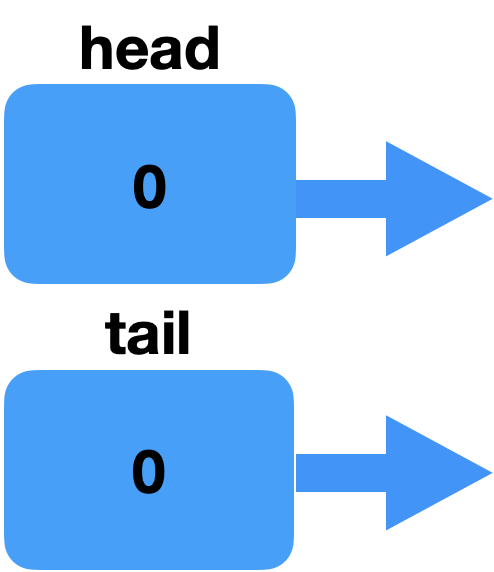
Hmm – this whole adding to the front business is a bit annoying. Let's figure out a way to add to the end. To do that, we need to also have a tail pointer. Let's start from scratch (the drawings will be easier!):
 1 int main() {
 2    Cell *head = nullptr; // just a pointer! This is not a Cell!
 3    Cell *tail = nullptr; // just a pointer! Also not a Cell!
 4
Okay, let's add our elements again, but this time at the end (tail) of the list:
5 Cell *cPtr = new Cell; // request memory for a Cell object.
6 cPtr->value = "Leland";
7 cPtr->next = nullptr; // this is the end of our list
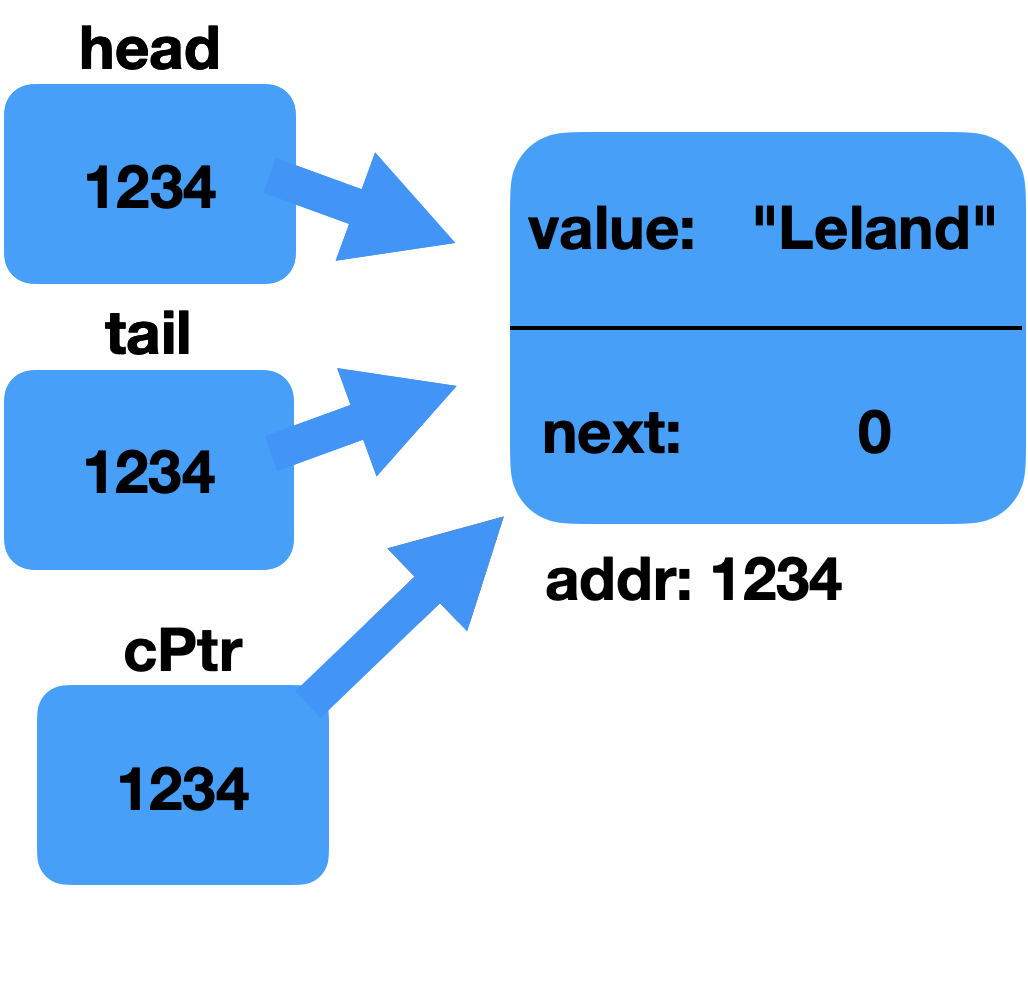
8
9 head = tail = cPtr;
10
This is really close to the original, but we also have to update the tail.
Now we can add another element, but this time just to the tail:
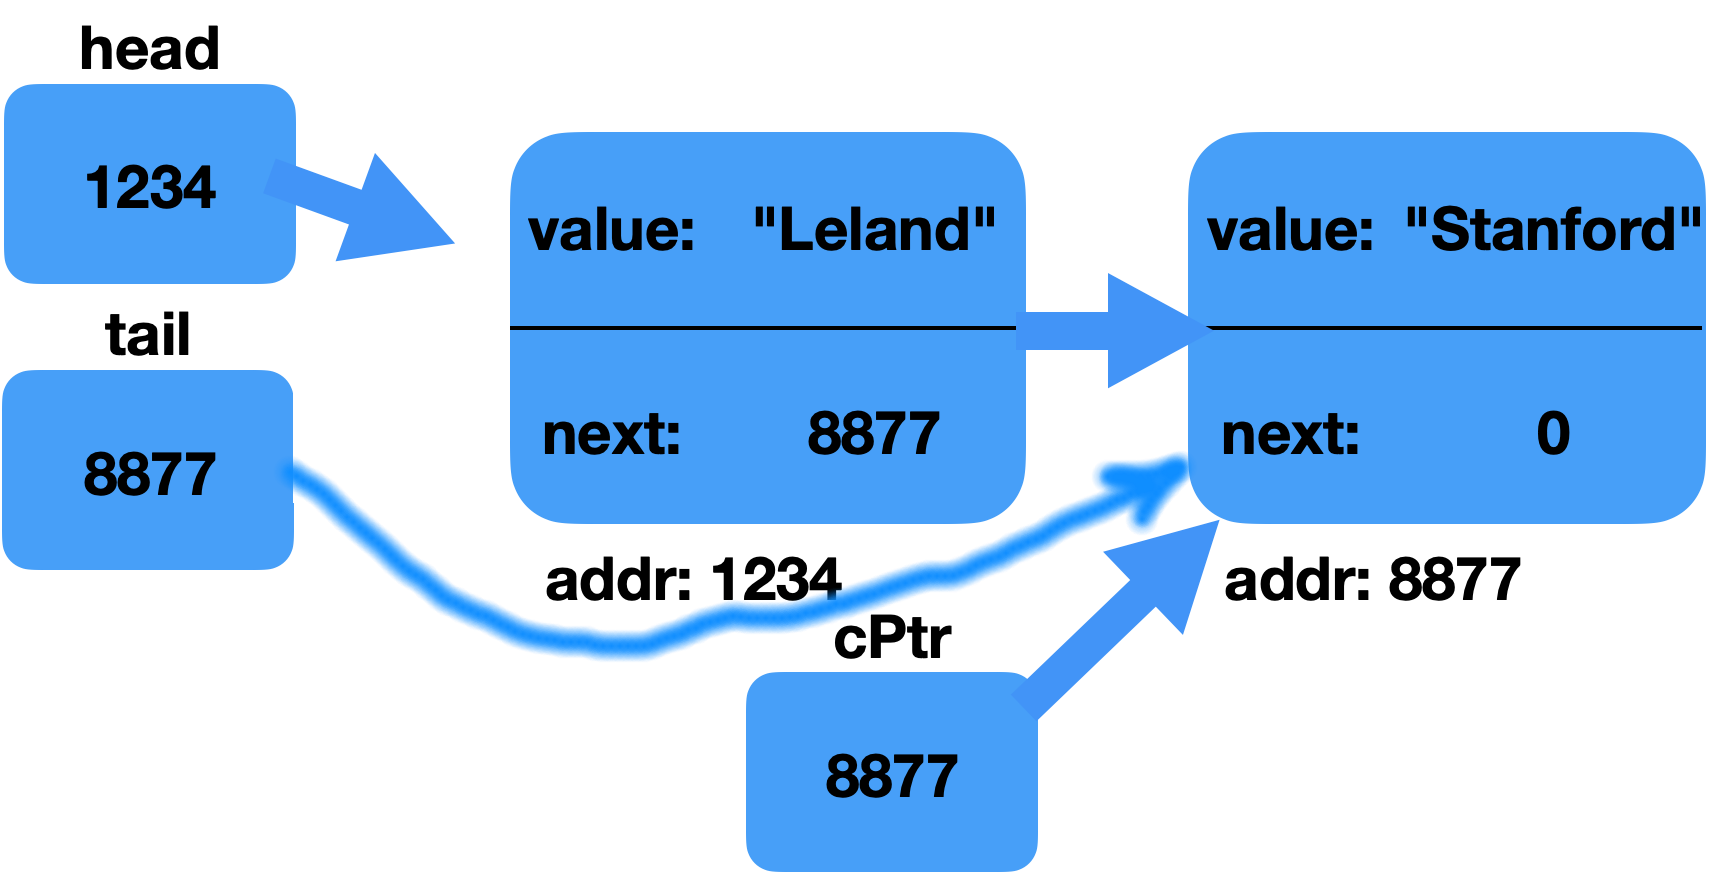
11    Cell *cPtr = new Cell; // request memory for a Cell object.
12    cPtr->value = "Stanford";
13    cPtr->next = nullptr; // this is the end of our list
14
15    tail->next = cPtr; // update the current tail!
16    tail = tail->next; // update the tail pointer itself
17
After line 13:

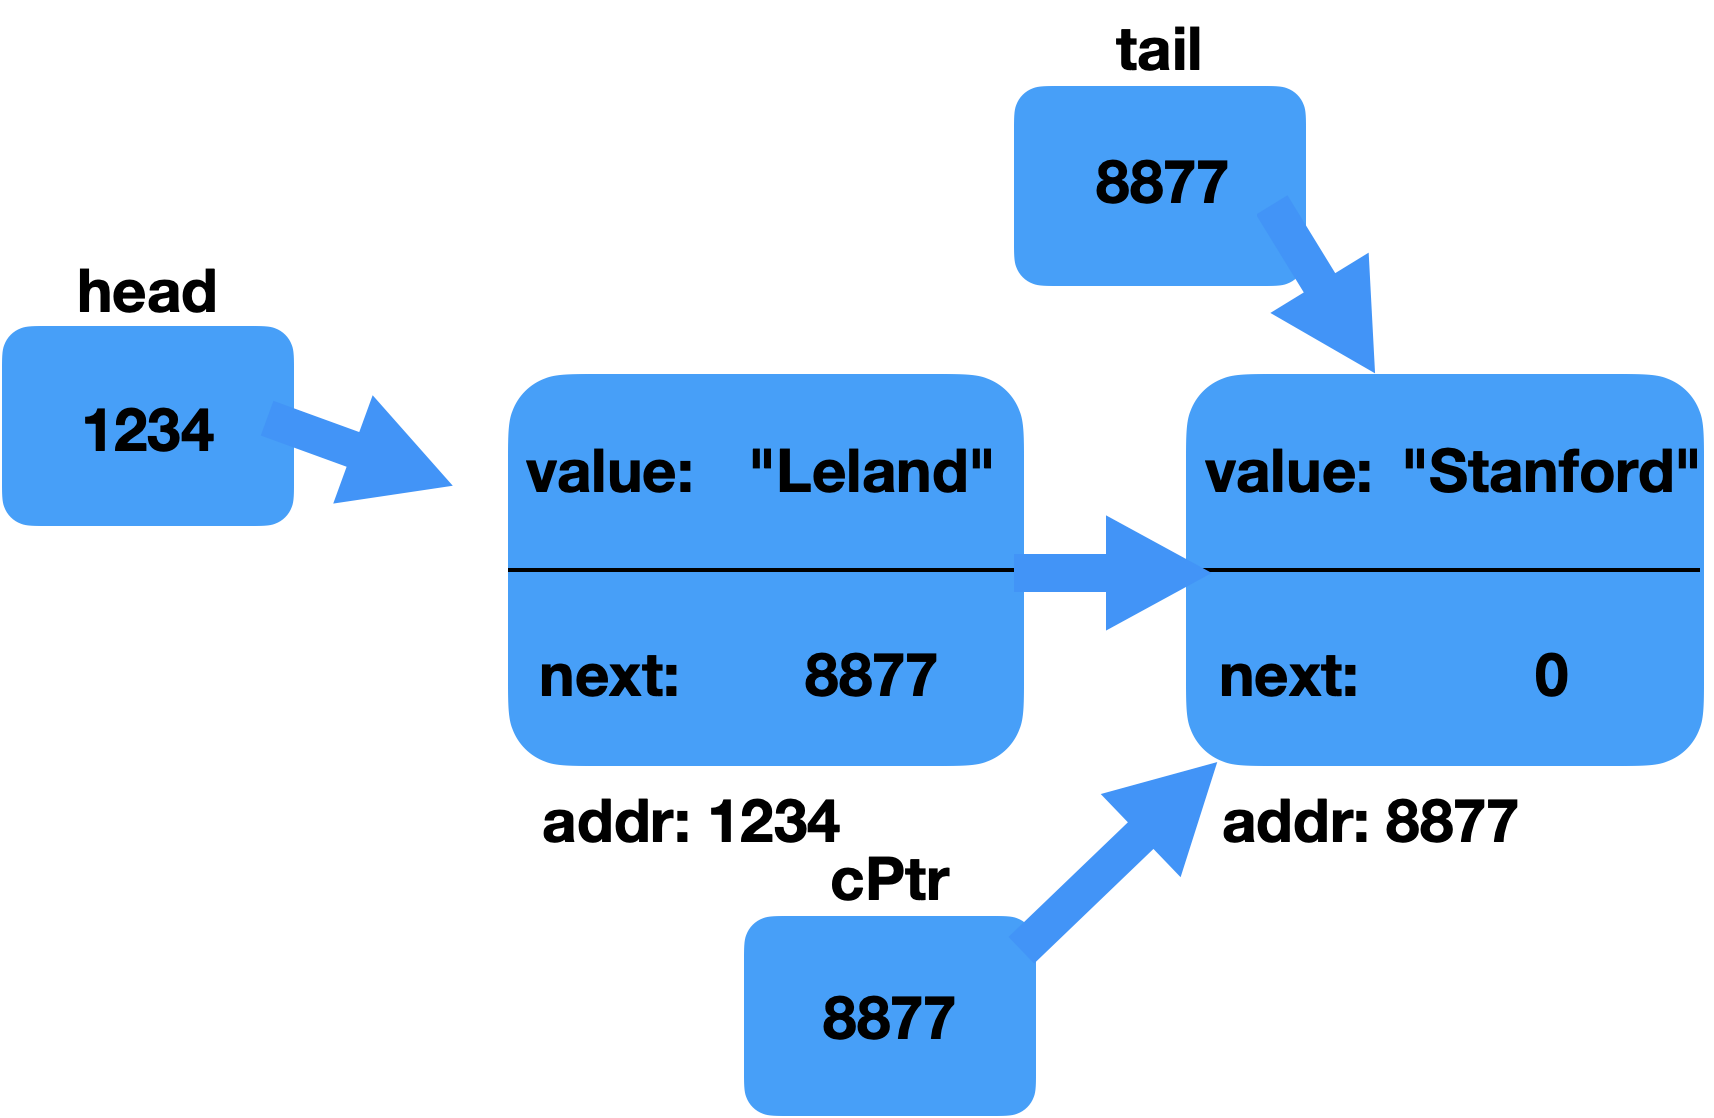
After line 15:
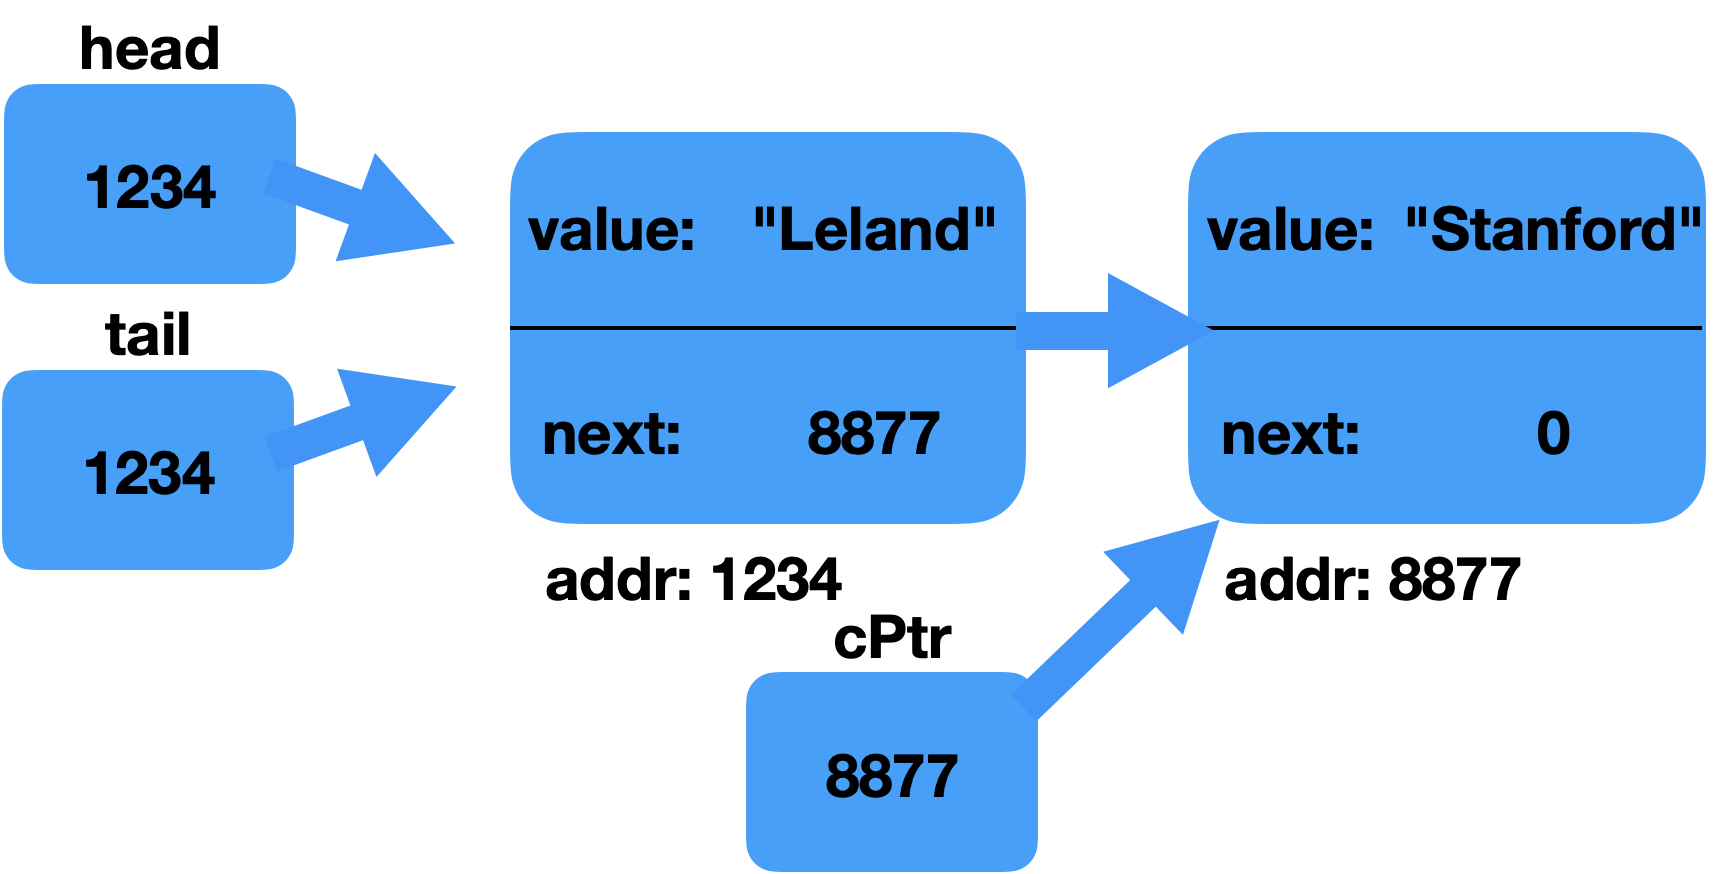
After line 16:
We can re-draw this (nothing changes, we're just cleaning up the picture):
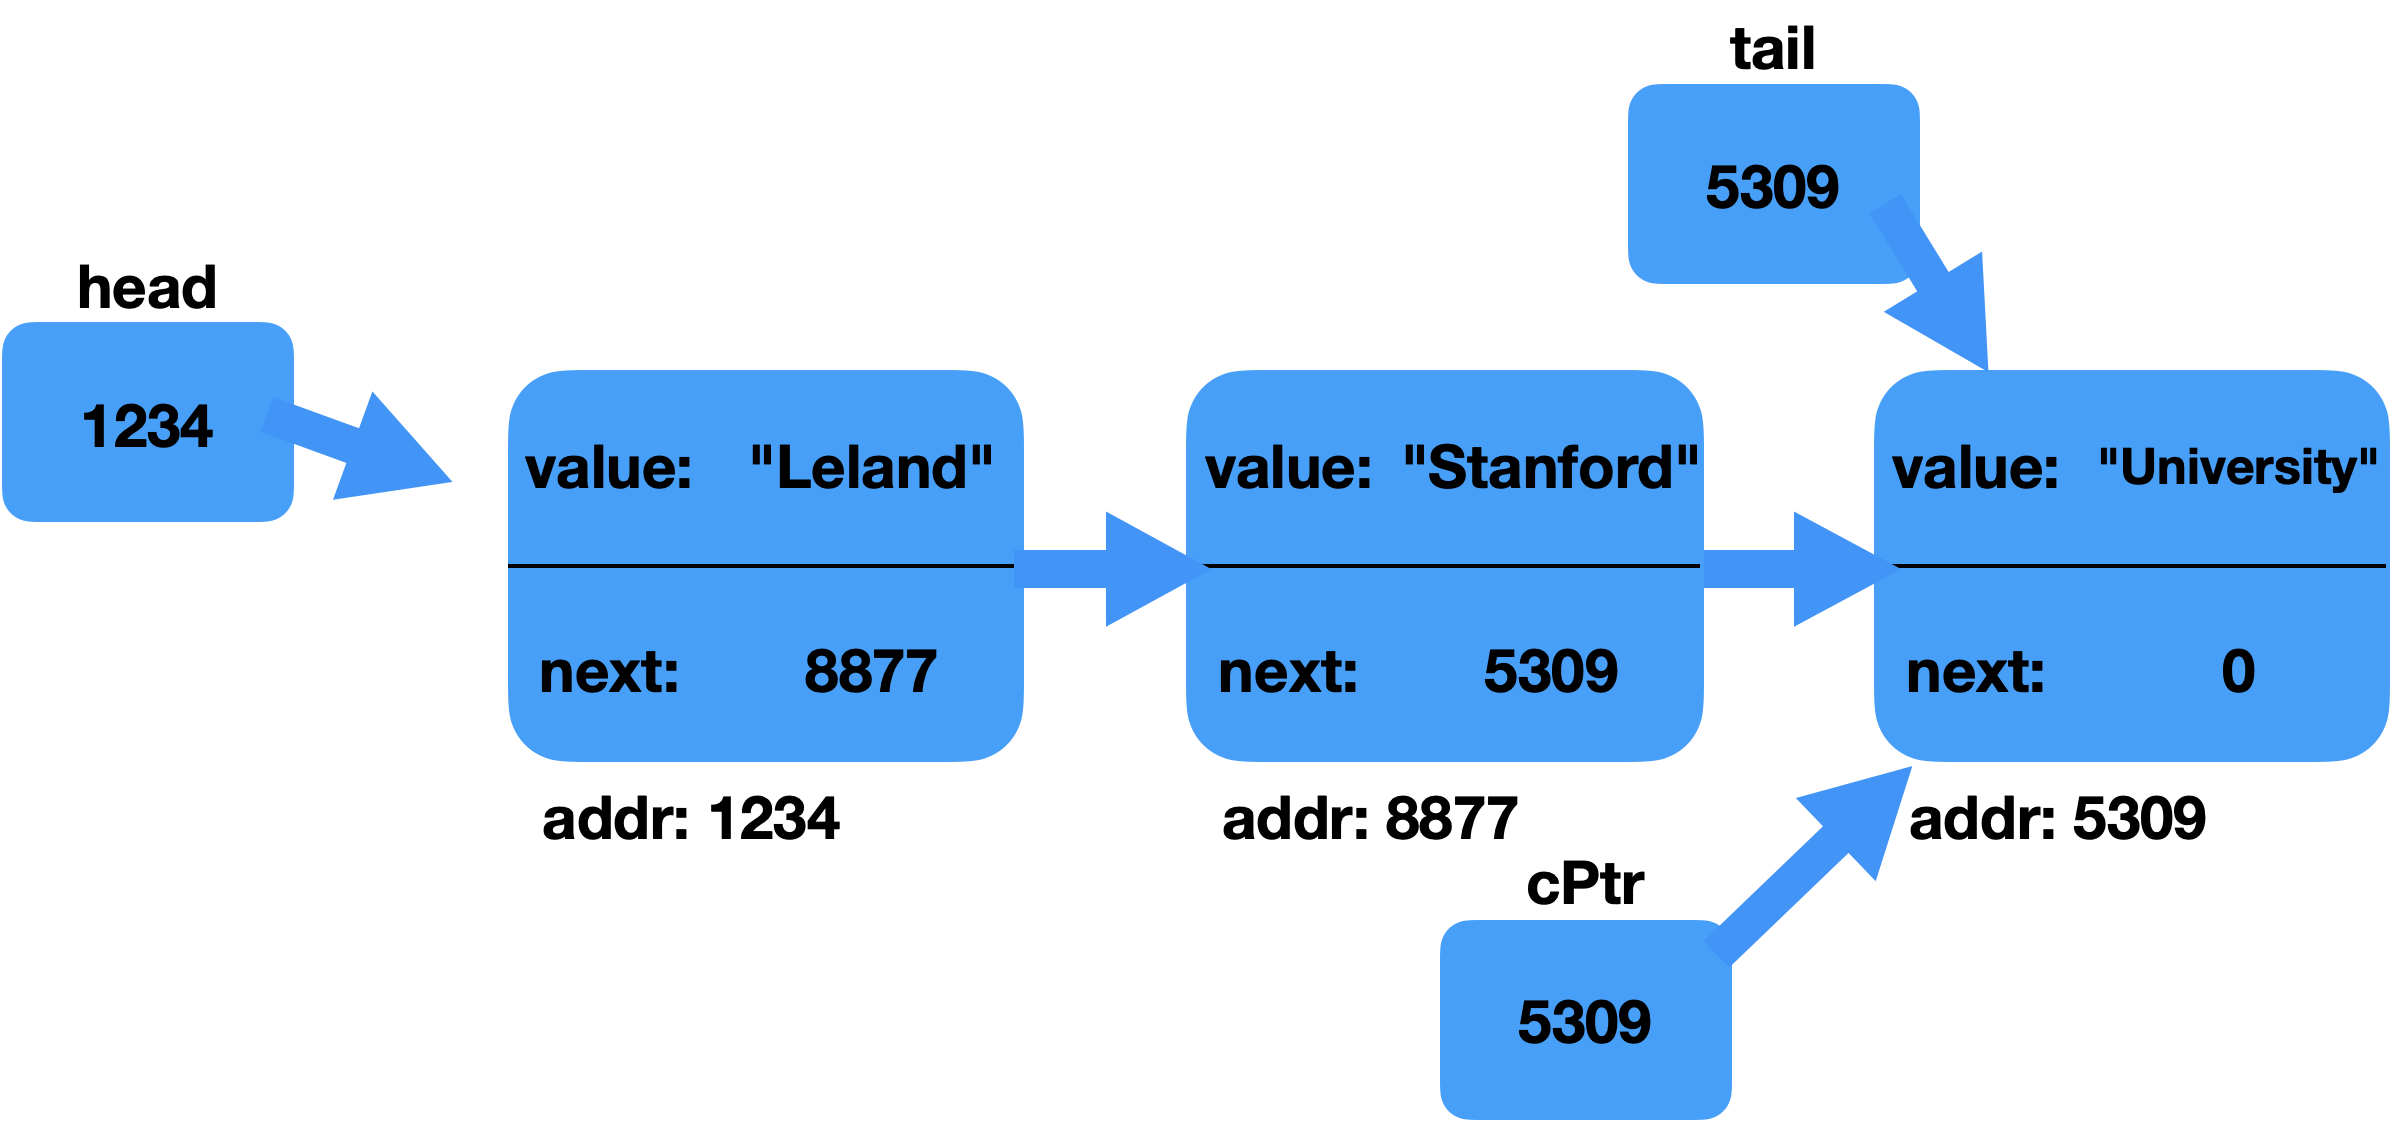
Let's append one more element to the tail:
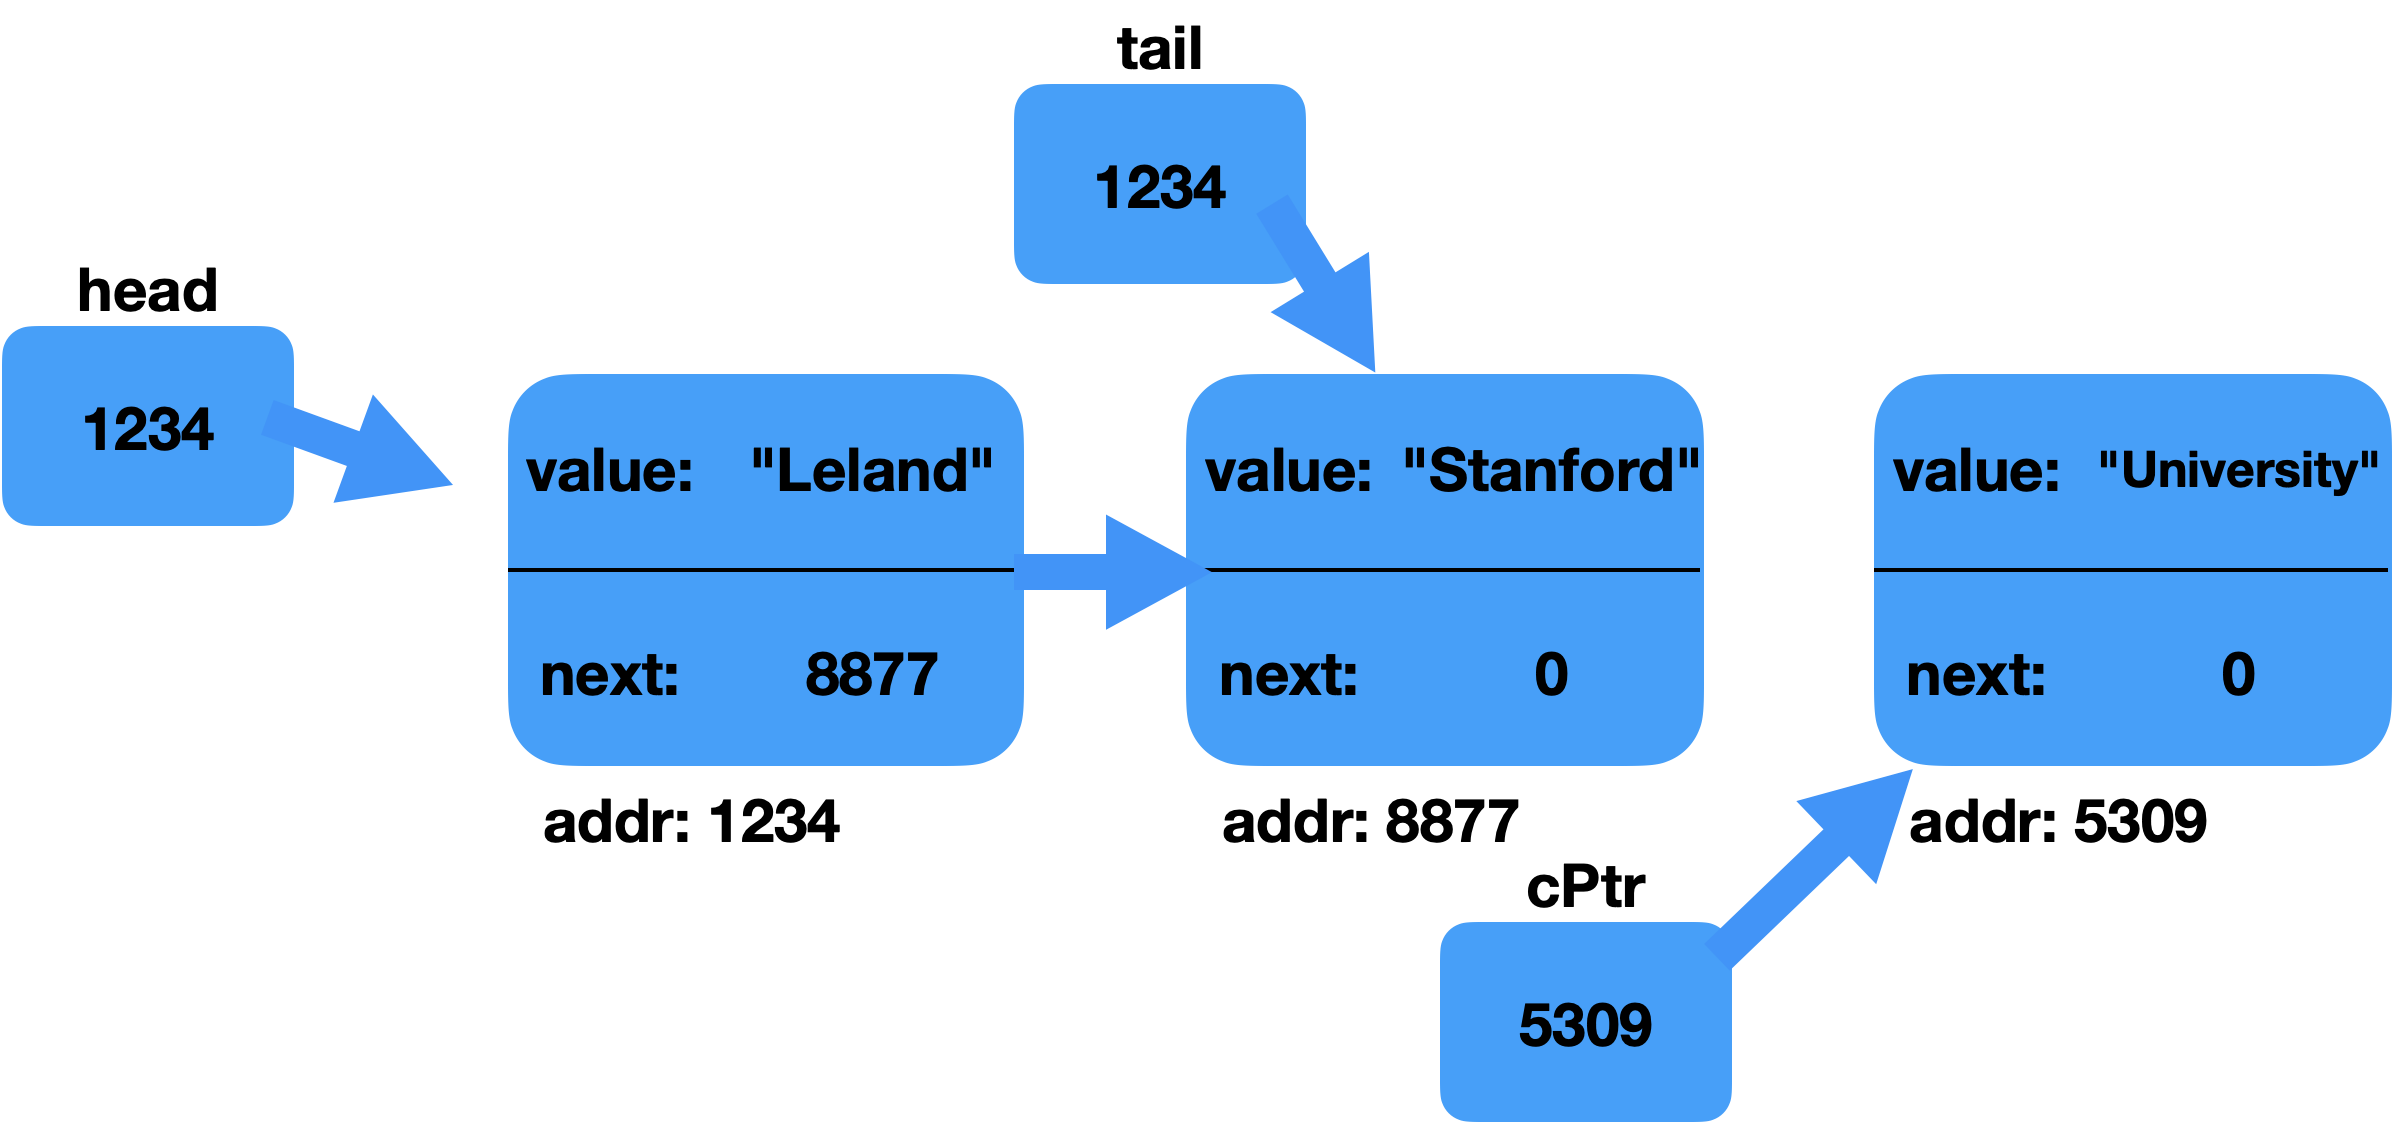
18    Cell *cPtr = new Cell; // request memory for a Cell object.
19    cPtr->value = "University";
20    cPtr->next = nullptr; // this is the end of our list
21
22    tail->next = cPtr; // update the current tail!
23    tail = tail->next; // update the tail pointer itself
24
After line 20:
After line 22:
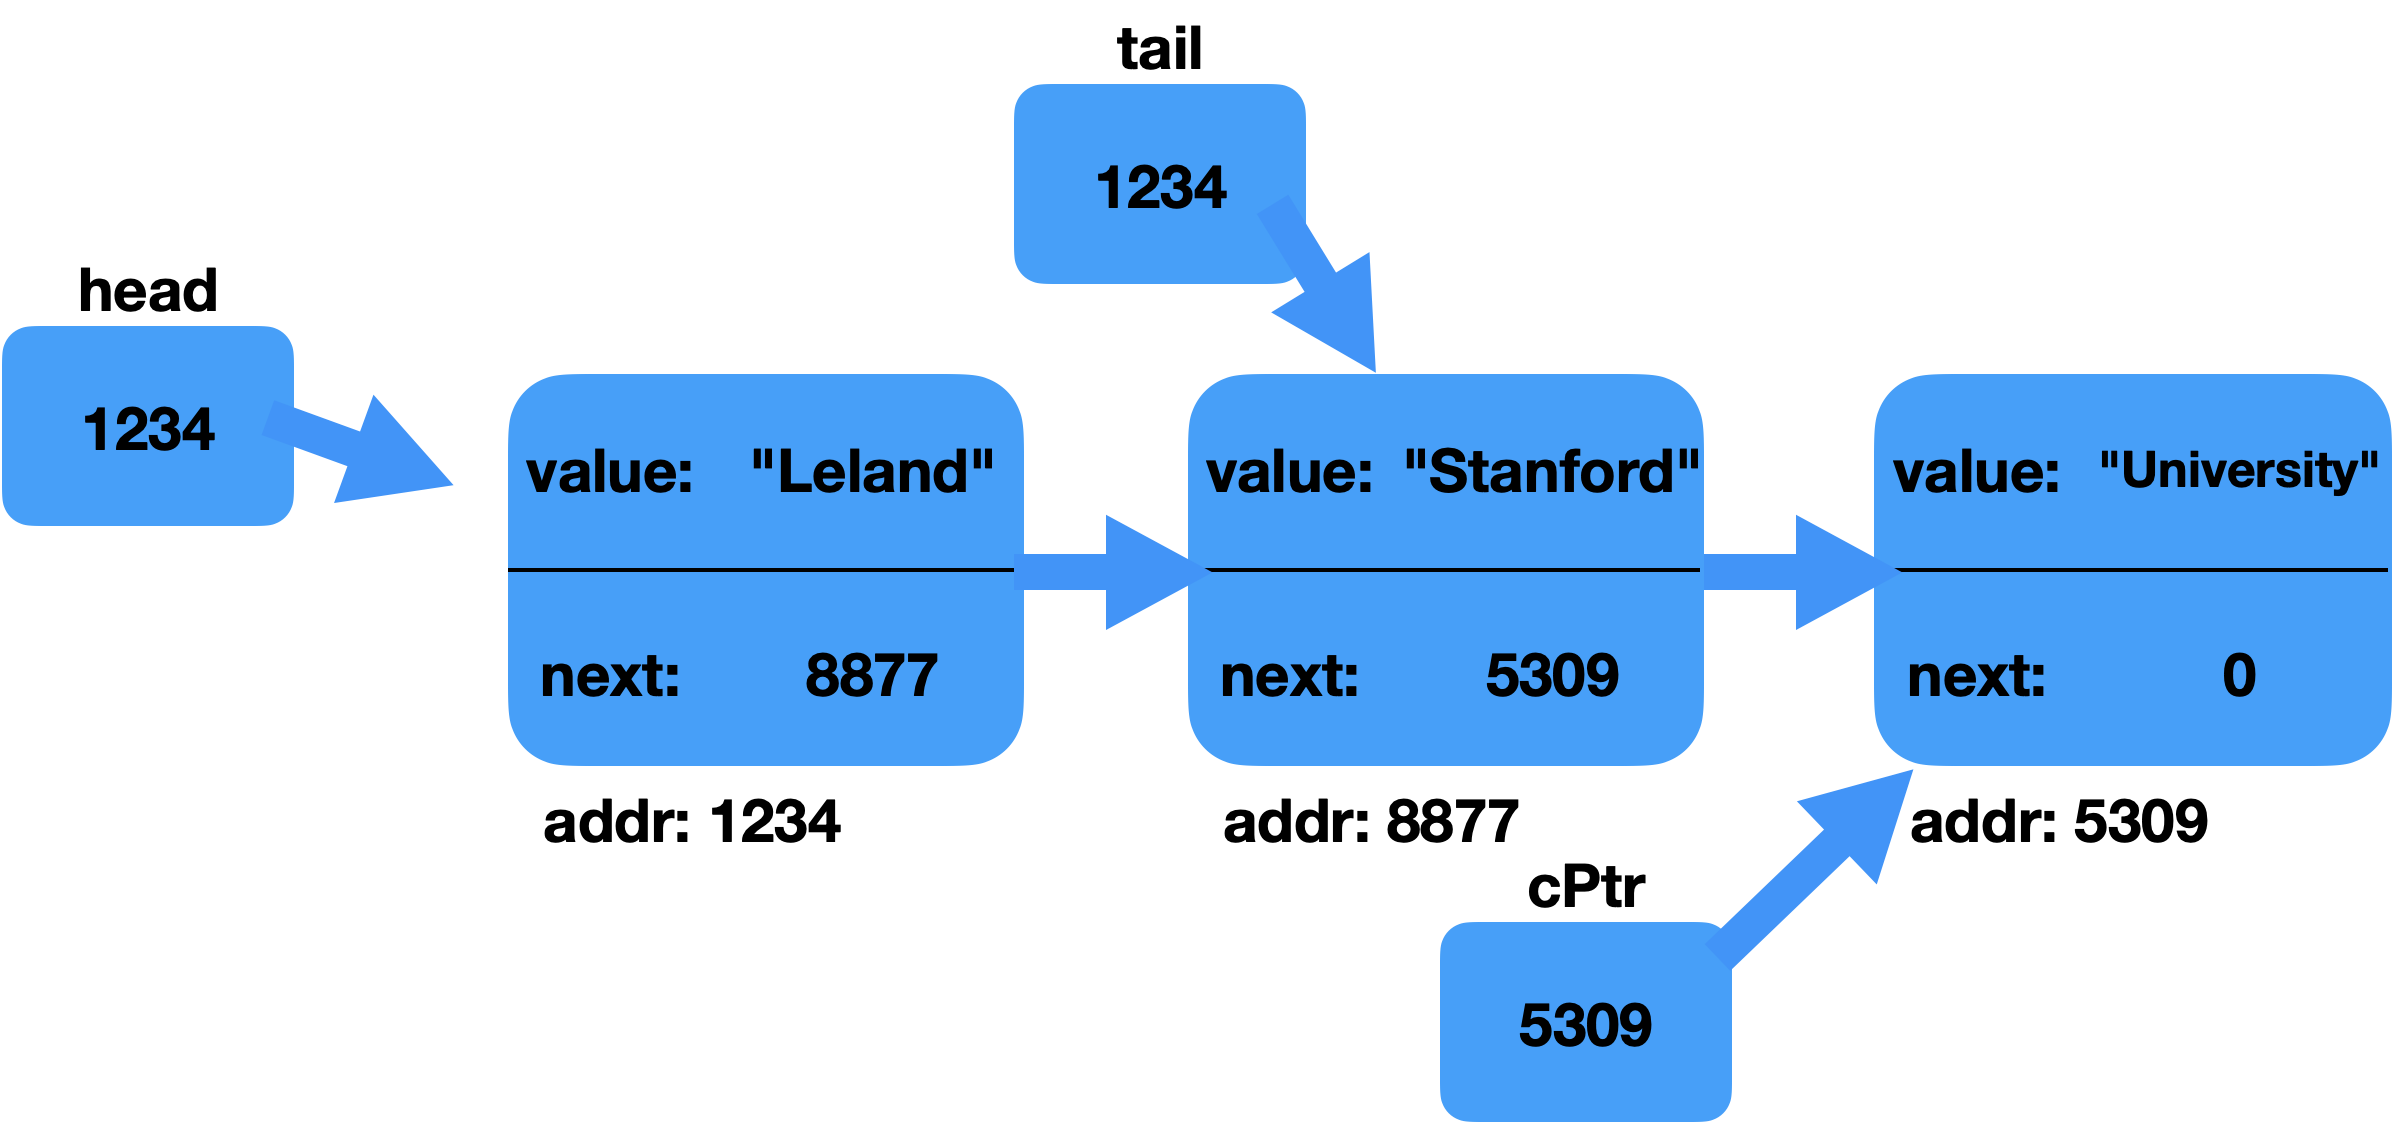
After line 23:
Slide 7
Let's write another function that can add to the tail of the list:
void appendTo(Cell*& head, Cell*& tail, const string& value)
This function passes in the head and the tail because we will need to update the head if the list is empty (this is a special case). Again, both head and tail are passed in by reference, so we can update the original:
/* Appends an item to a linked list. This uses a head and tail pointer
 * so that appends take time O(1).
 */
void appendTo(Cell*& head, Cell*& tail, const string& value) {
    Cell* cell  = new Cell;
    cell->value = value;
    cell->next  = nullptr;

    /* If the list is empty, it becomes a list of one thing,
     * and that one thing is the new cell.
     */
    if (head == nullptr) {
        head = tail = cell; // weird syntax! What's going on here?
    }
    /* Otherwise: Go to the end of the list, and append the
     * item there.
     */
    else {
        tail->next = cell;
        tail = tail->next; // or tail = cell; (the first way is arguably clearer)
    }
}
Slide 8
Let's write three more short functions:
int lengthOf(Cell* list); // returns the length of the list

void printList(Cell* list); // prints the list to the screen

void deleteList(Cell* list); // deletes the entire list
For the lenghtOf function, let's write it recursively! For linked lists, this isn't actually a great way to do it becasue it can lead to a stack overflow for large lists (you'll write an interative version for this week's assignment). But, it's instructive:
int lengthOf(Cell* list) {
    /* Base case: An empty list has length zero. */
    if (list == nullptr) return 0;

    /* Recursive case: The length is one, plus the length of the
     * remaining list.
     */
    return 1 + lengthOf(list->next);
}
Notice that we are passing list->next in the recursive call. This is a smaller version of the same list!
Why could this cause a stack overflow for a large list?
Here's an iterative implementation of printList:
void printList(Cell* list) {
    while (list != nullptr) {
        cout << "  " << list->value << endl;
        list = list->next;
    }
}
This demonstrates a common (and useful) linked list idea: update a cell with it's next pointer, and you traverse the list one element at a time:
list = list->next;
This does have the effect of losing track of the prior element (you cannot go backwards in a singly-linked list), but that's okay here because we're using a copy of the original pointer, and just using it to keep track of where in the list we are.
Here is our deleteList function:
void deleteList(Cell* list) {
    while (list != nullptr) {
        Cell* next = list->next;
        delete list;
        list = next;
    }
}
Again, we are traversing the list, but we can't quite use the list = list->next idea, because we cannot access a Cell * after calling delete on it. So, we temporaily store the next pointer, and then update list's value after we call delete on the original list pointer (remember, delete does not delete anything!).
Also note that in order to delete the entire list, we have to delete every Cell individually – because the list is not an array, we have to individually delete the cells.
Slide 9
So far, we have been working with singly linked lists, meaning that each Cell only has a next pointer. There is no way to traverse backwards through the list, and certain operations are harder, such as removing a Cell from the middle of a list. But, there is another type of linked list, the doubly linked list, which has two pointers per Cell, a next and a prev ("previous"):
struct Cell {
    string value;
    Cell* next;
    Cell* prev;
};
Let's draw out a three-element doubly-linked list. We will have a head pointer but not a tail pointer:
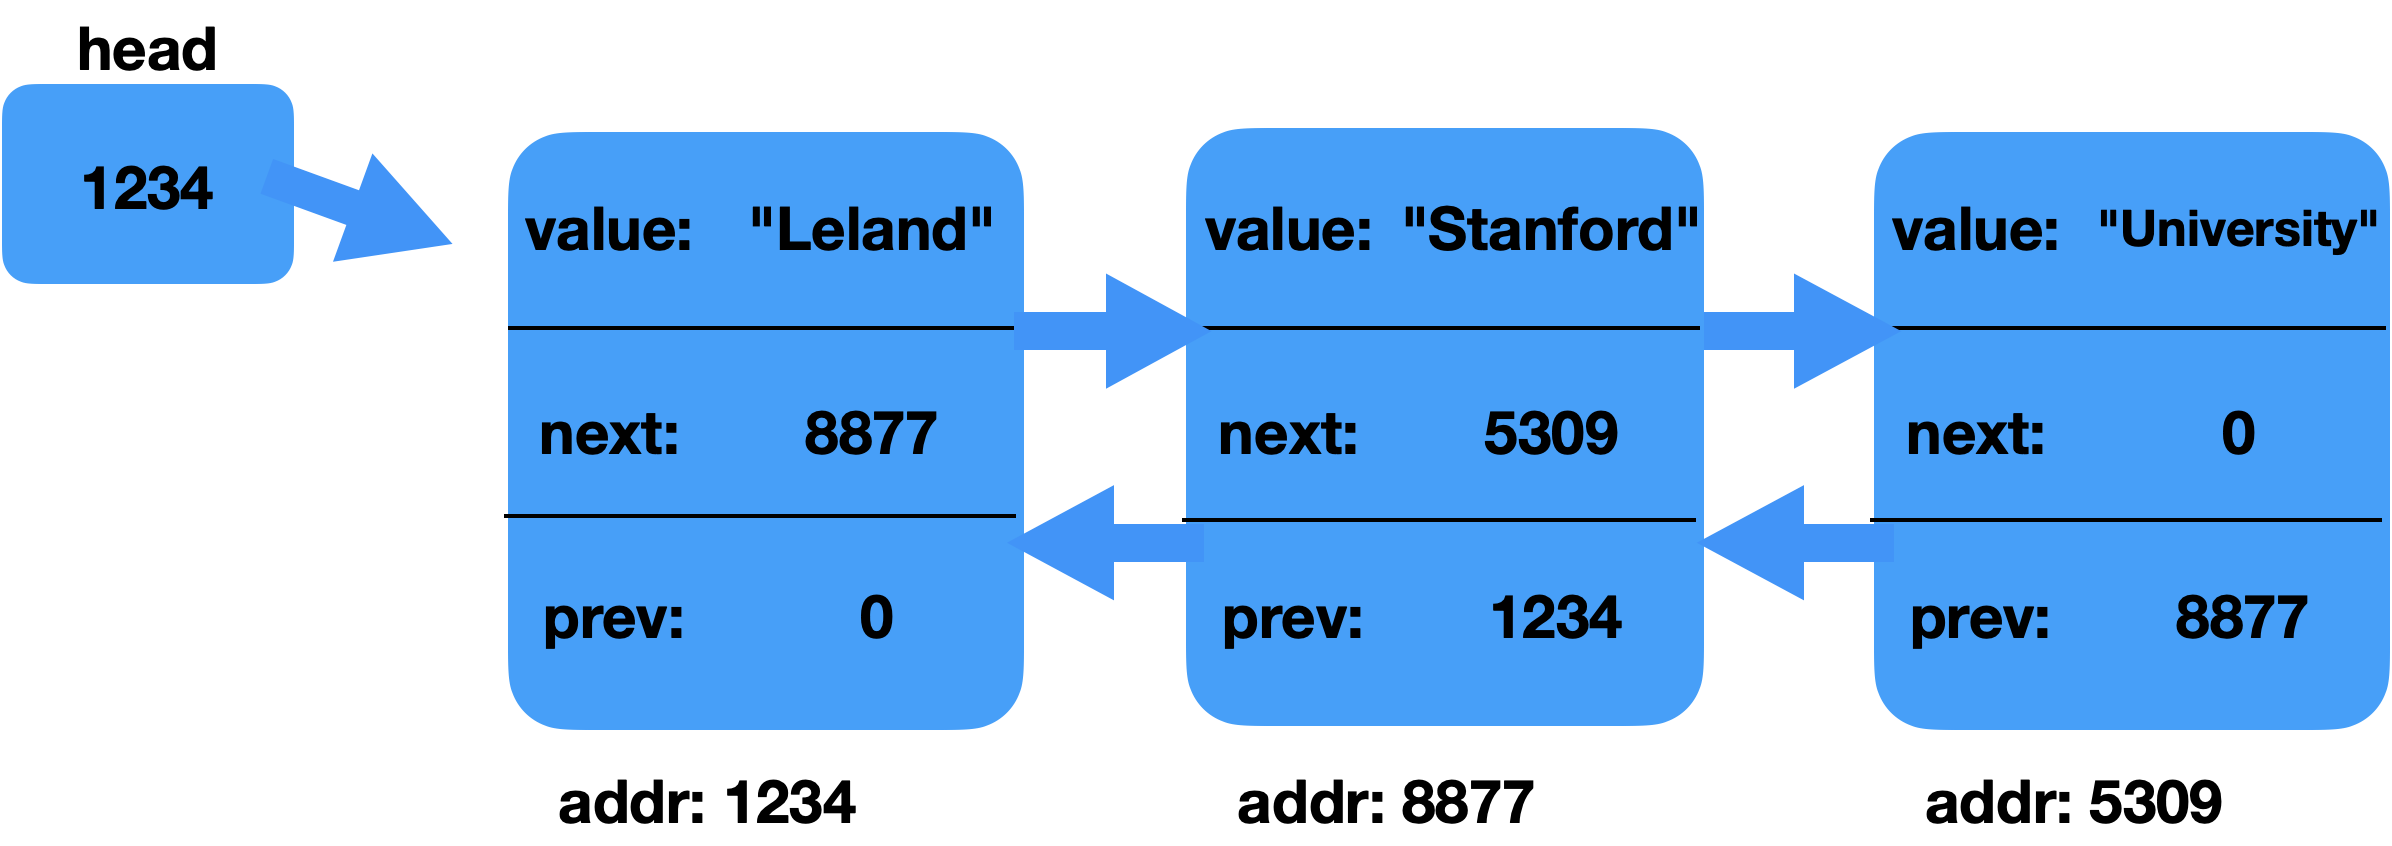
Make sure you are able to follow all of the pointers. The first cell in the list does not have a previous cell, so its prev is nullptr. The last cell does not have a next cell, so its next is nullptr.
What if we wanted to remove the "Stanford" cell from the list? We would have to rewire the list. This has to be done in a particular order. Assume we have a pointer to the "Stanford" cell already, called cellToRemove. Here's the code that will remove it:
Cell *priorCell = cellToRemove->prev;
Cell *nextCell = cellToRemove->next;
priorCell->next = cellToRemove->next;
nextCell->prev = cellToRemove->prev;
delete cellToRemove;
The "rewiring" for linked lists gets tricky, so again it is a very, very good idea to draw pictures.
By the way, if the cell we wanted to remove happend to be at the beginning or end, it would be a special case! This is where checking for nullptr for either the next or prev is critical.
Slide 10
One last item: pointers to structs that also contain structs
In your homework, you'll have two structs:
struct Particle {
    double x;
    double y;
    Color color;
    double dx;
    double dy;
    int lifetime = A_LONG_TIME;
    ParticleType type = ParticleType::STREAMER;
};

struct ParticleCell {
        Particle particle;
        ParticleCell* next;
        ParticleCell* prev;
}
Notice that ParticleCell has a Particle as part of its definition, with the variable name, particle.
As part of the assignment, you will also have pointers to ParticleCell objects, e.g.,
ParticleCell* cell;
If you want to access the x field of particle in cell, you can do so as follows:
cell->particle.x = 42;
This mixes both arrow notation and dot notation, which can get confusing. But, you could break it down as follows: You have a pointer to a struct, so you need to use arrow notation to get the fields of that struct. If you want the particle field, you could get a reference to the particle, and then you could modify it and it would update in the original cell:
Particle &p = cell->particle;
Now, you just have a particle object, and you can access its fields with dot notation, e.g.,
p.x = 42;
p.y = 88;