Eclipse
In CS 106A, we'll be using Stanford's customized version of Eclipse to build our programs. Eclipse is an enormously popular industrial strength Java environment with many features. Fortunately, Eclipse is also open source -- anyone is free to change Eclipse to work the way they want. We have taken advantage of that freedom to install special Stanford features into Eclipse, tailoring it specifically for CS 106A. This document gives instructions on how to get started using Stanford Eclipse. Please pay close attention to these instructions and do not skip steps!
If you run into any trouble installing Eclipse, please feel free to stop by office hours or the LaIR, or ask before or after lecture.
Installing Eclipse on a Mac
Our version of Eclipse will only work on macOS 10.6 (2009) or higher. If you don't have a supported version of the operating system, you'll need to either upgrade or do your class work on a cluster machine. You can check your version of macOS using these instructions.
- Download and install the Java SDK for Mac
- Download the Mac version of Eclipse
- Click on the downloaded eclipse_mac.tar file to unarchive Eclipse (You can delete eclipse_mac.tar afterwards).
- Drag the Eclipse app into the Applications folder on your Mac.
- Drag the Eclipse icon from there to your Dock to create a shortcut.
- Click on the icon in the Dock to open Eclipse. If you see an error that says Eclipse "can't be opened because it is from an unidentified developer," right-click on the Eclipse icon and select "open" instead. You will be able to open Eclipse without right-clicking from now on.
-
When you run Eclipse for the first time, you may get a screen that looks like this:
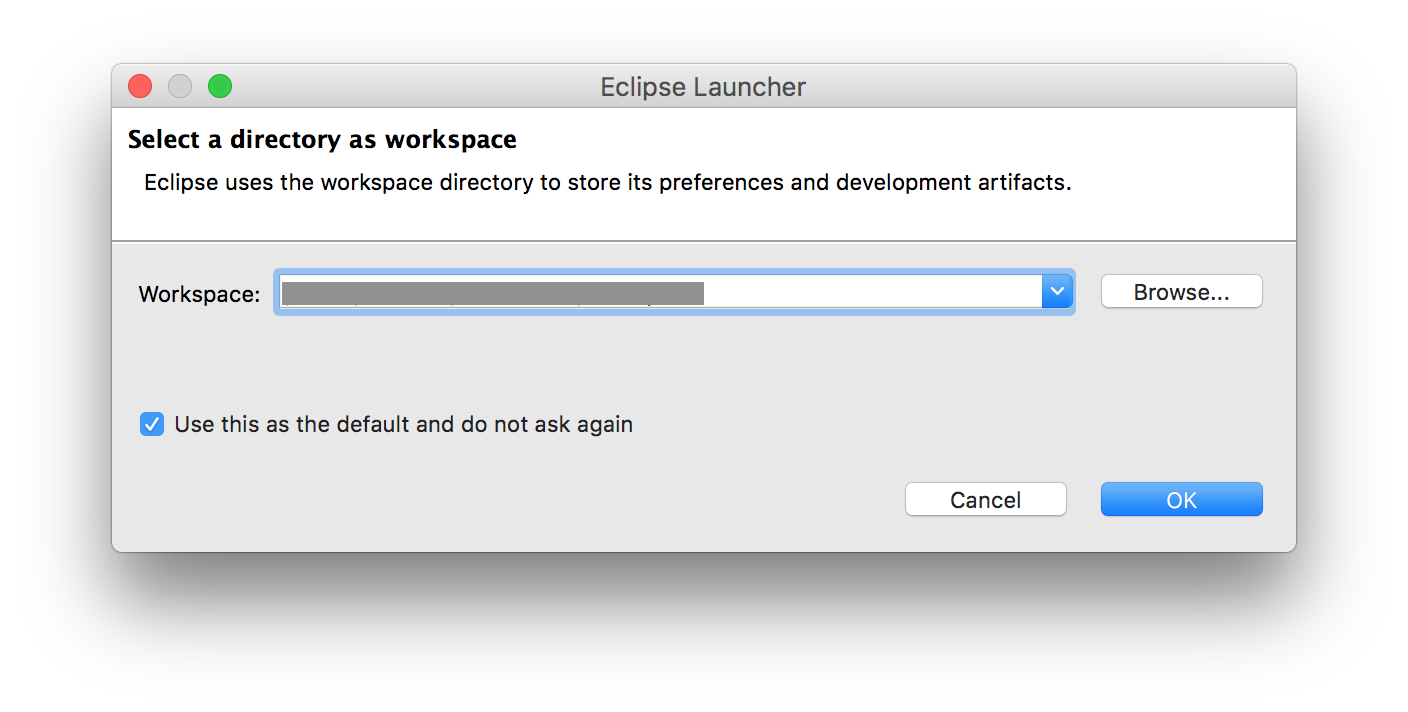
A workspace is just a directory that Eclipse will use to place new projects in. In CS 106A you won't have to make any new projects from scratch. We will always give you skeleton projects for your assignments, so you don't need to worry about where the workspace is. The suggested location is fine. Click the Use this as the default and do not ask again checkbox, and then click OK. - Now we need to install the "Stanford Plugin". This is what adds the "Stanford Menu" to Eclipse, as well as the icons to run, import, and submit projects. Once Eclipse has started, click Help -> Install New Software.
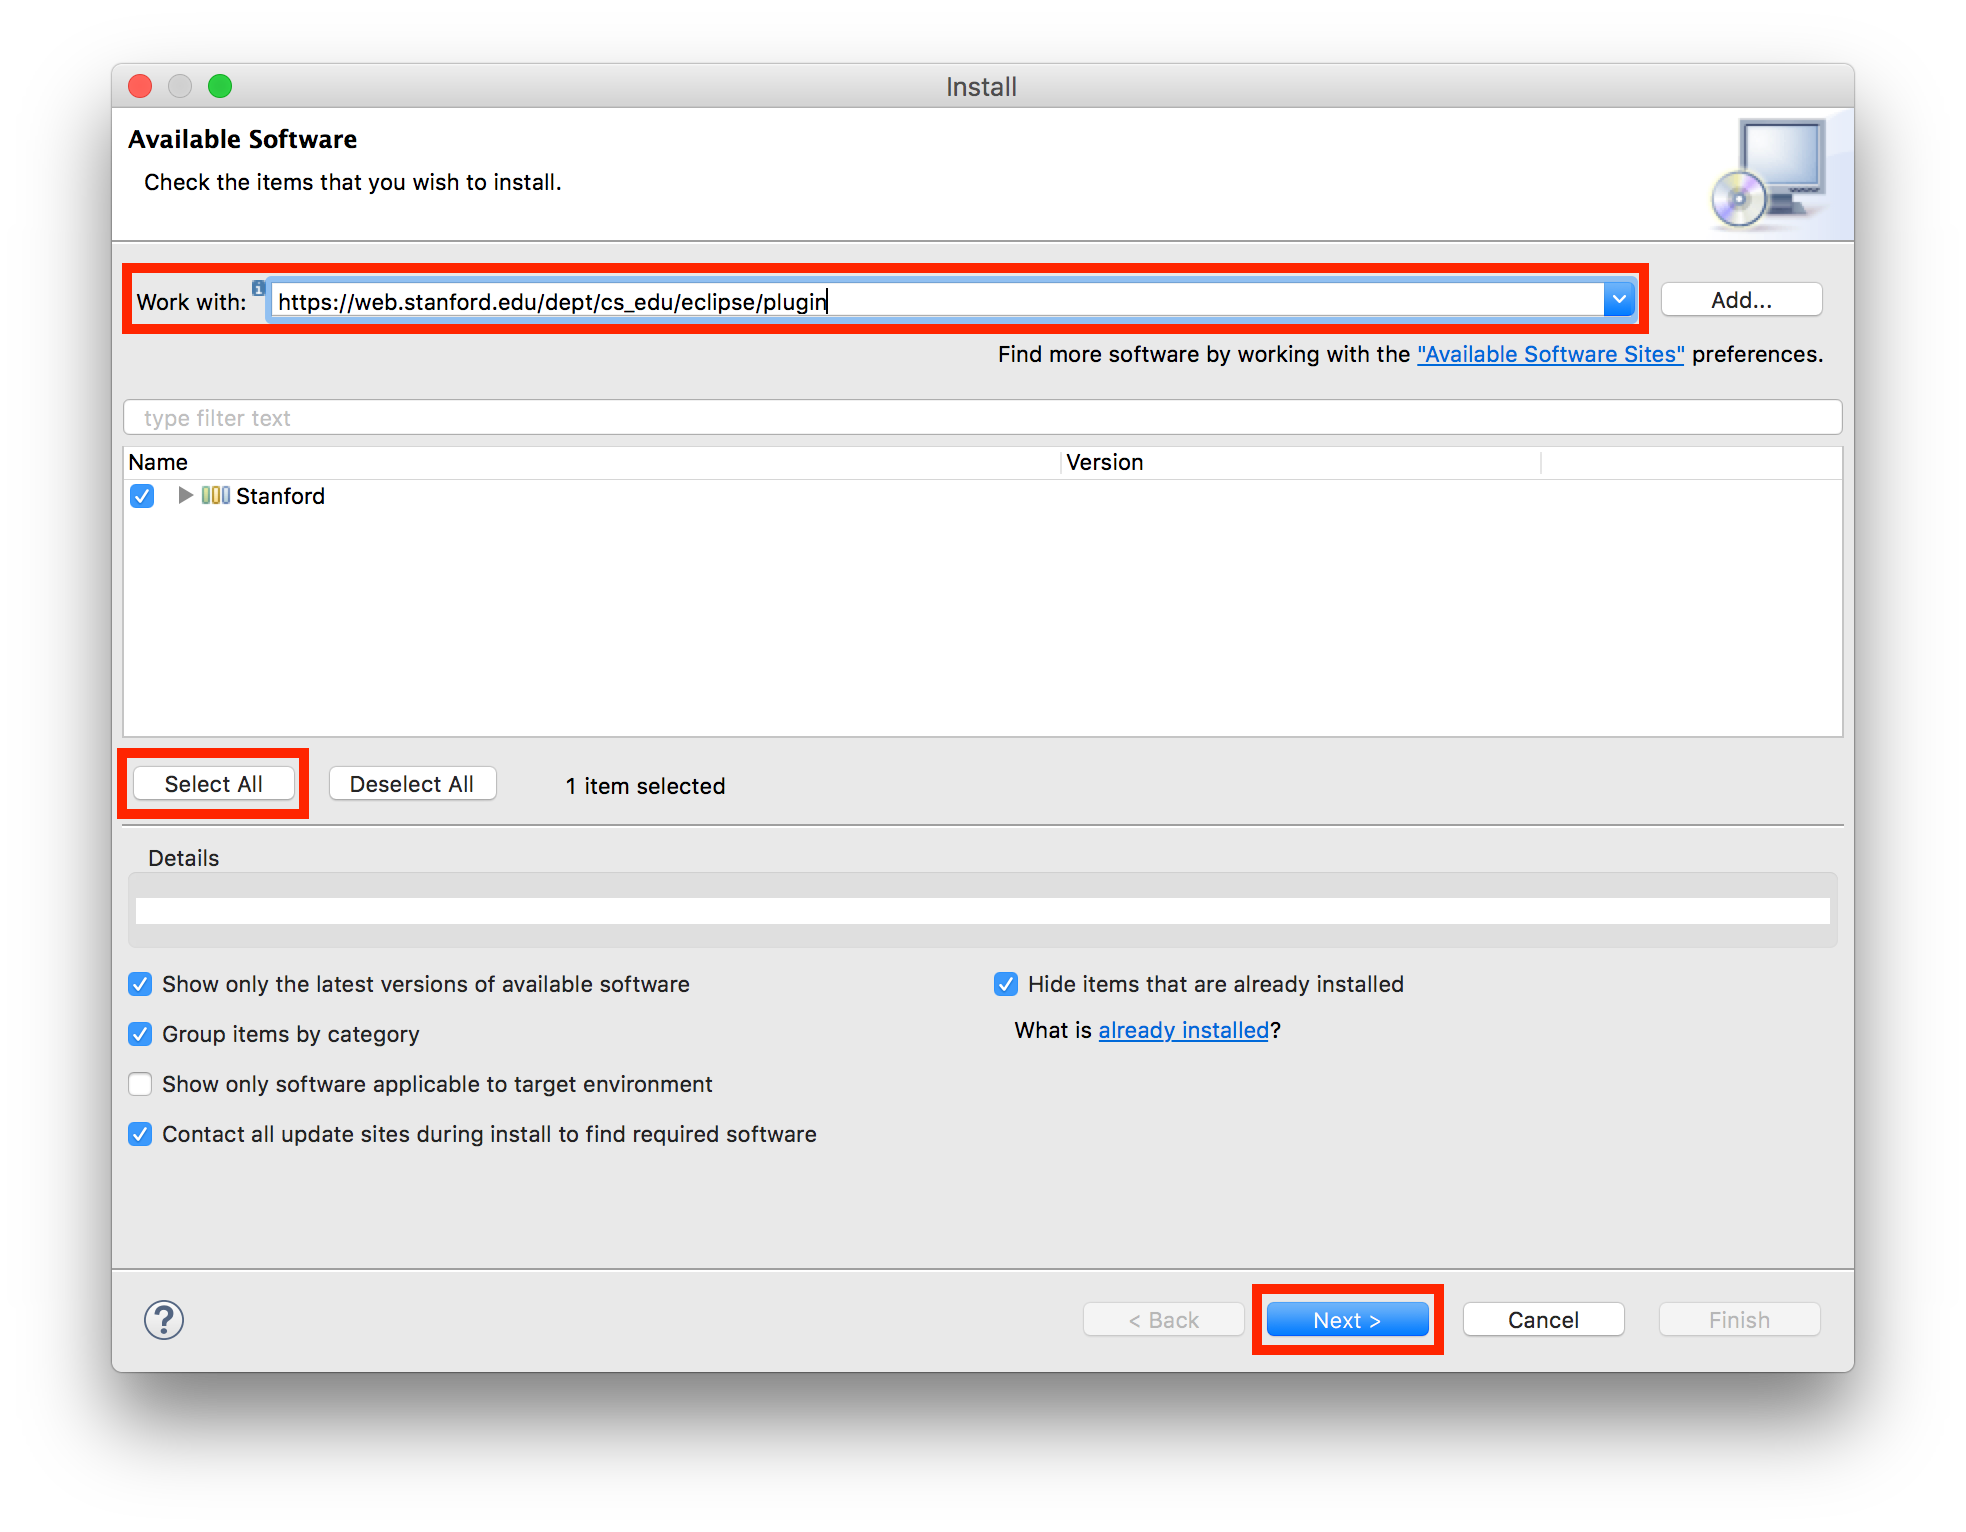
- In the "Work with" text box, type https://web.stanford.edu/dept/cs_edu/eclipse/plugin and press Enter.
-
Click "Select All," then click Next.
-
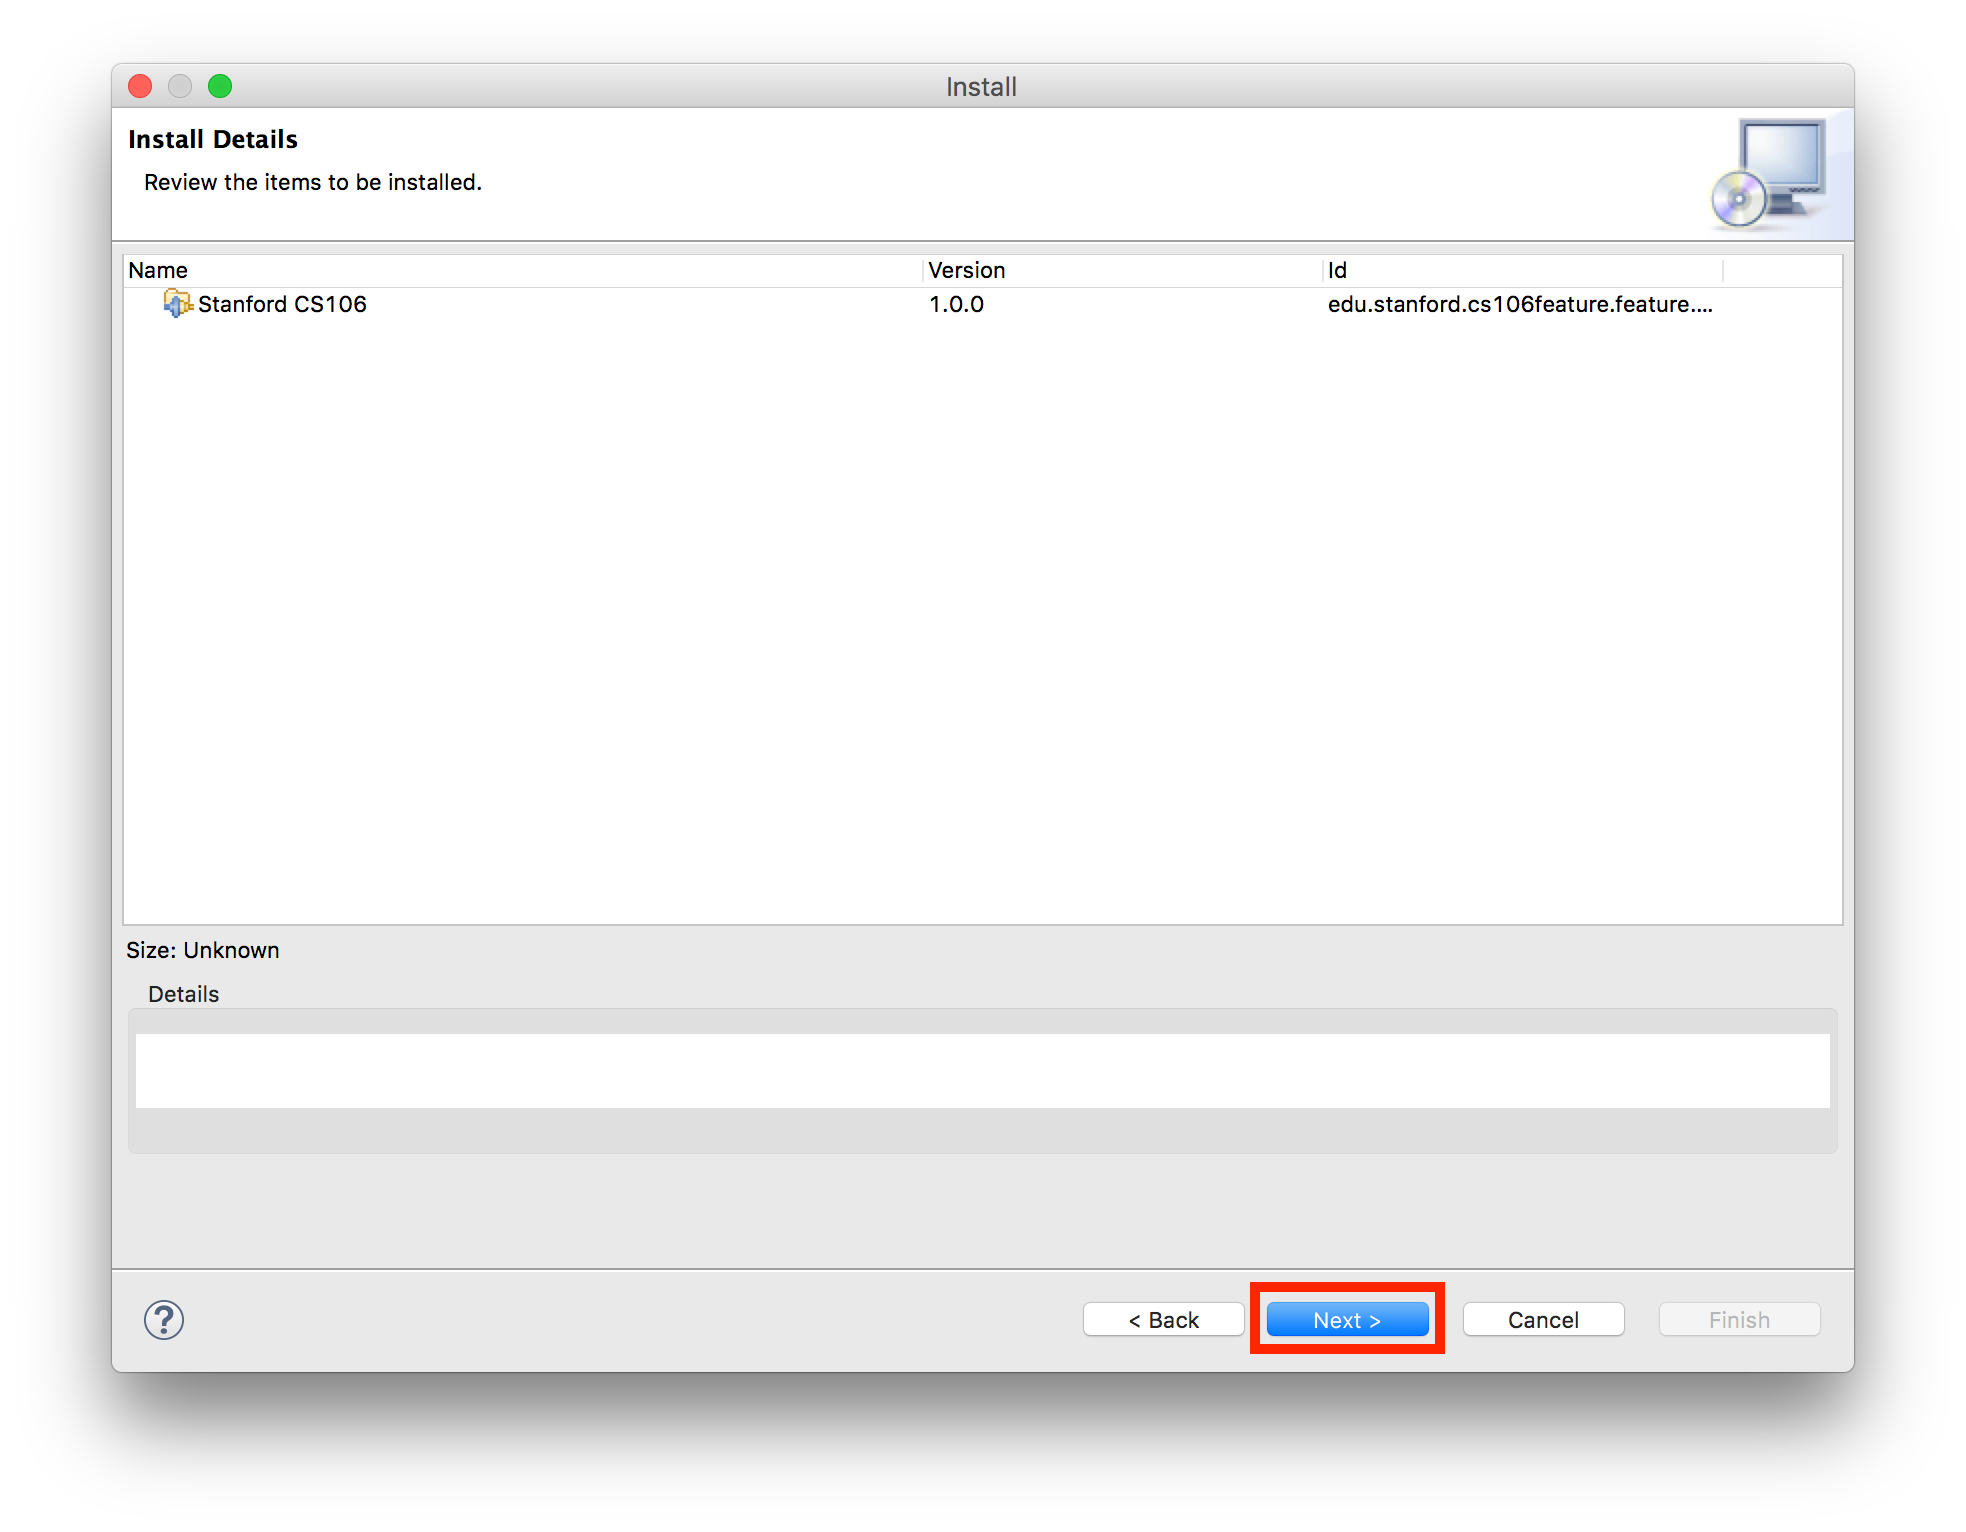
Click Next again.
-
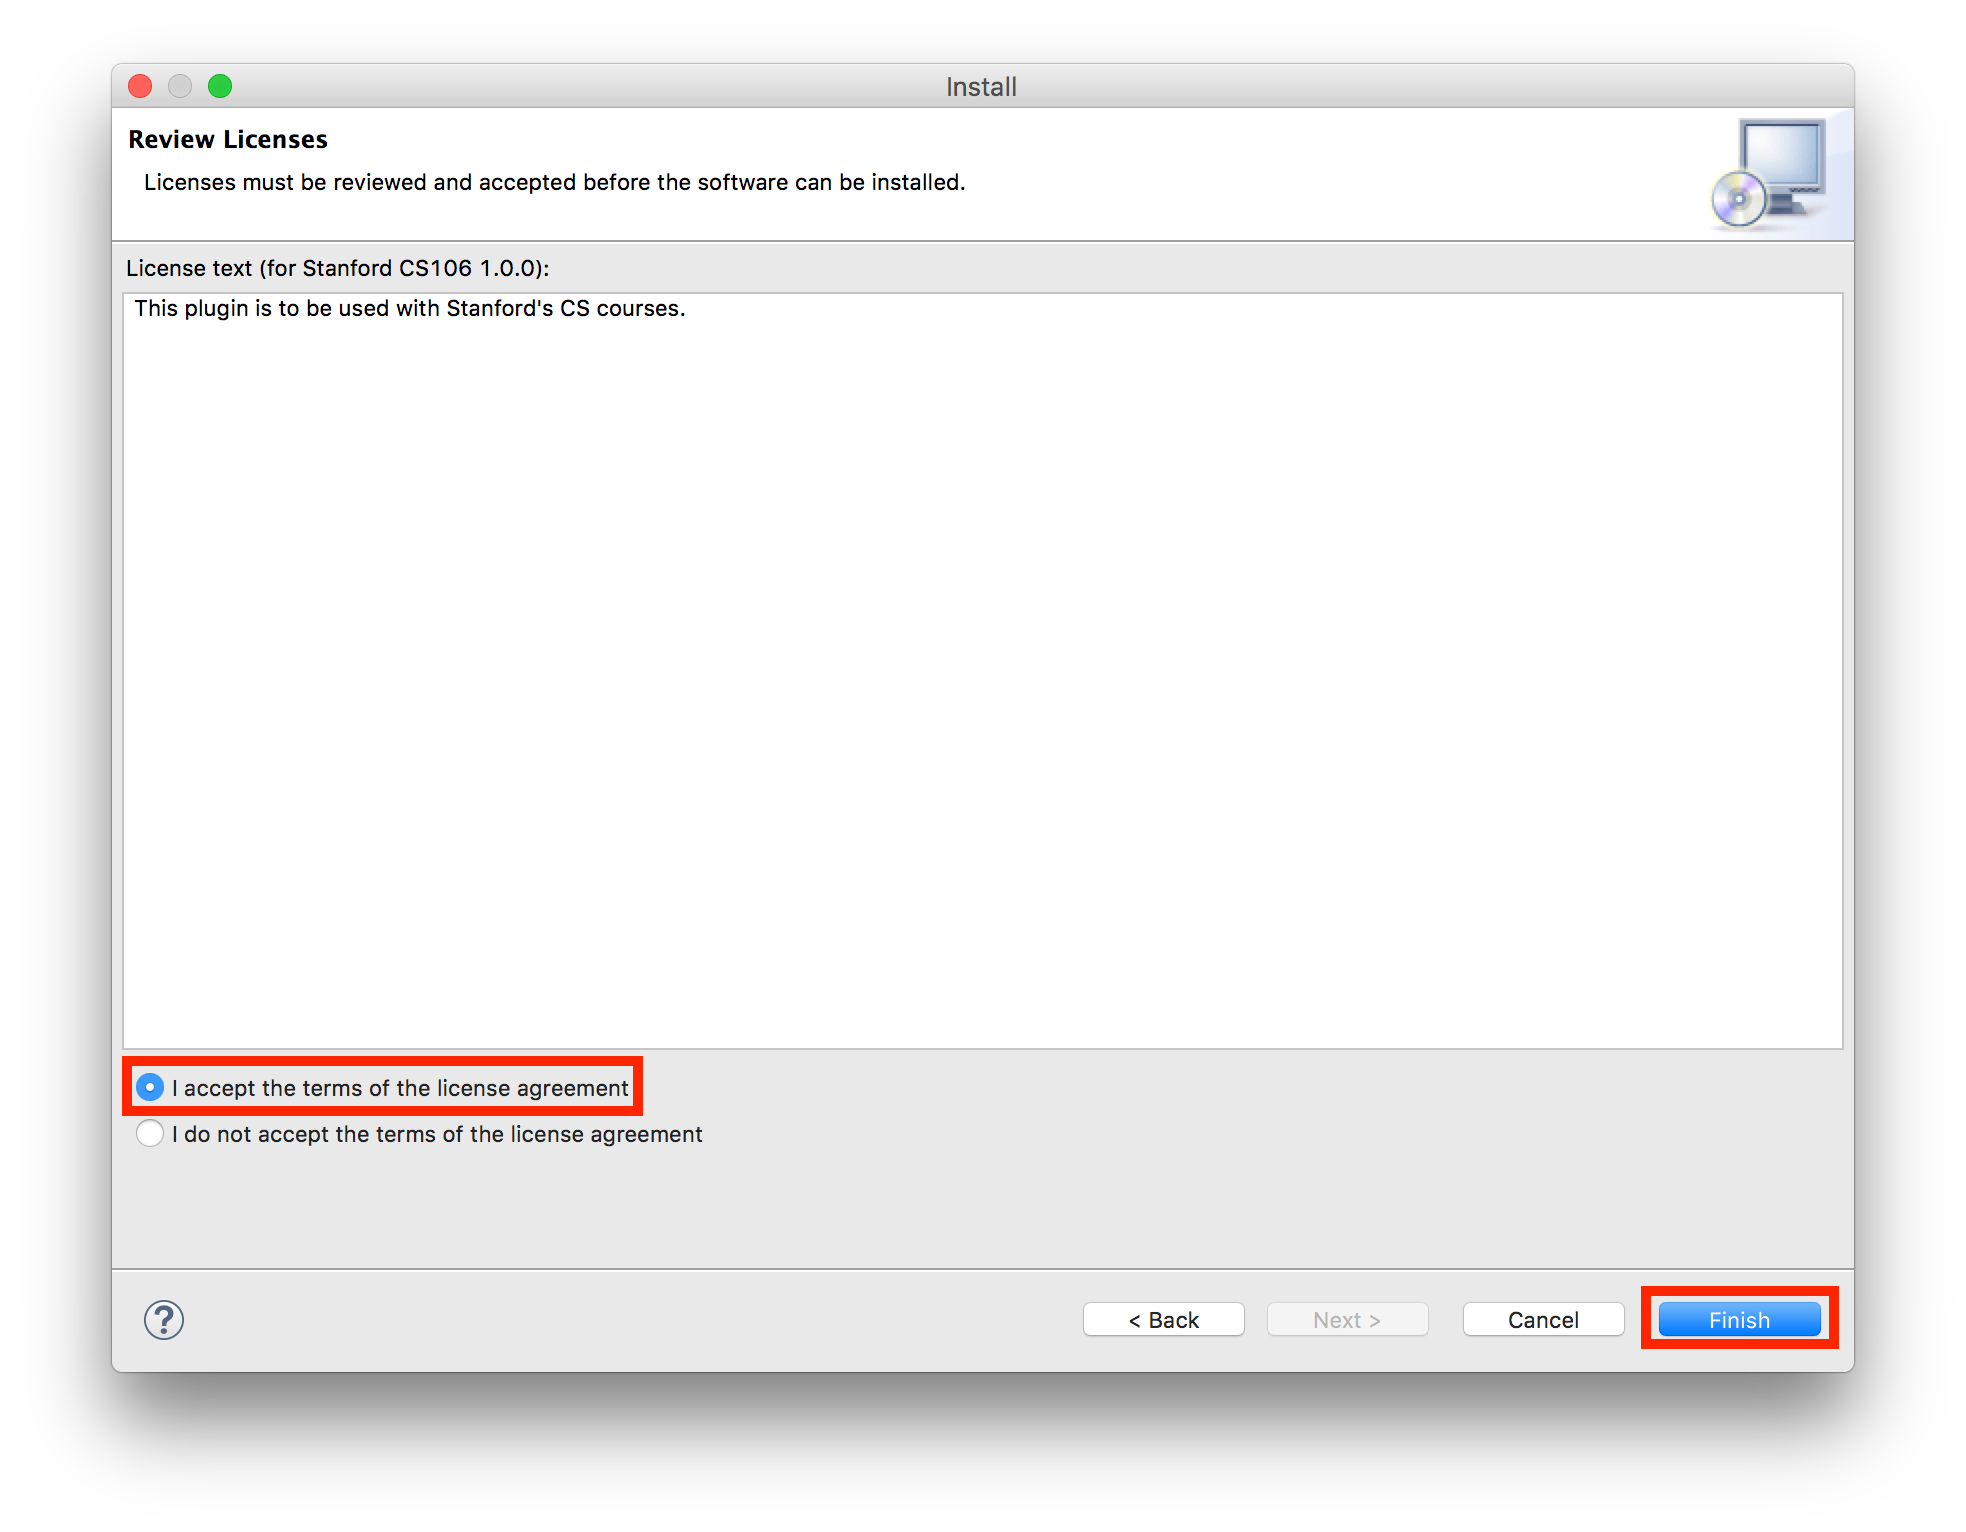
Click "I accept the terms of the license agreement," then click Finish.
-
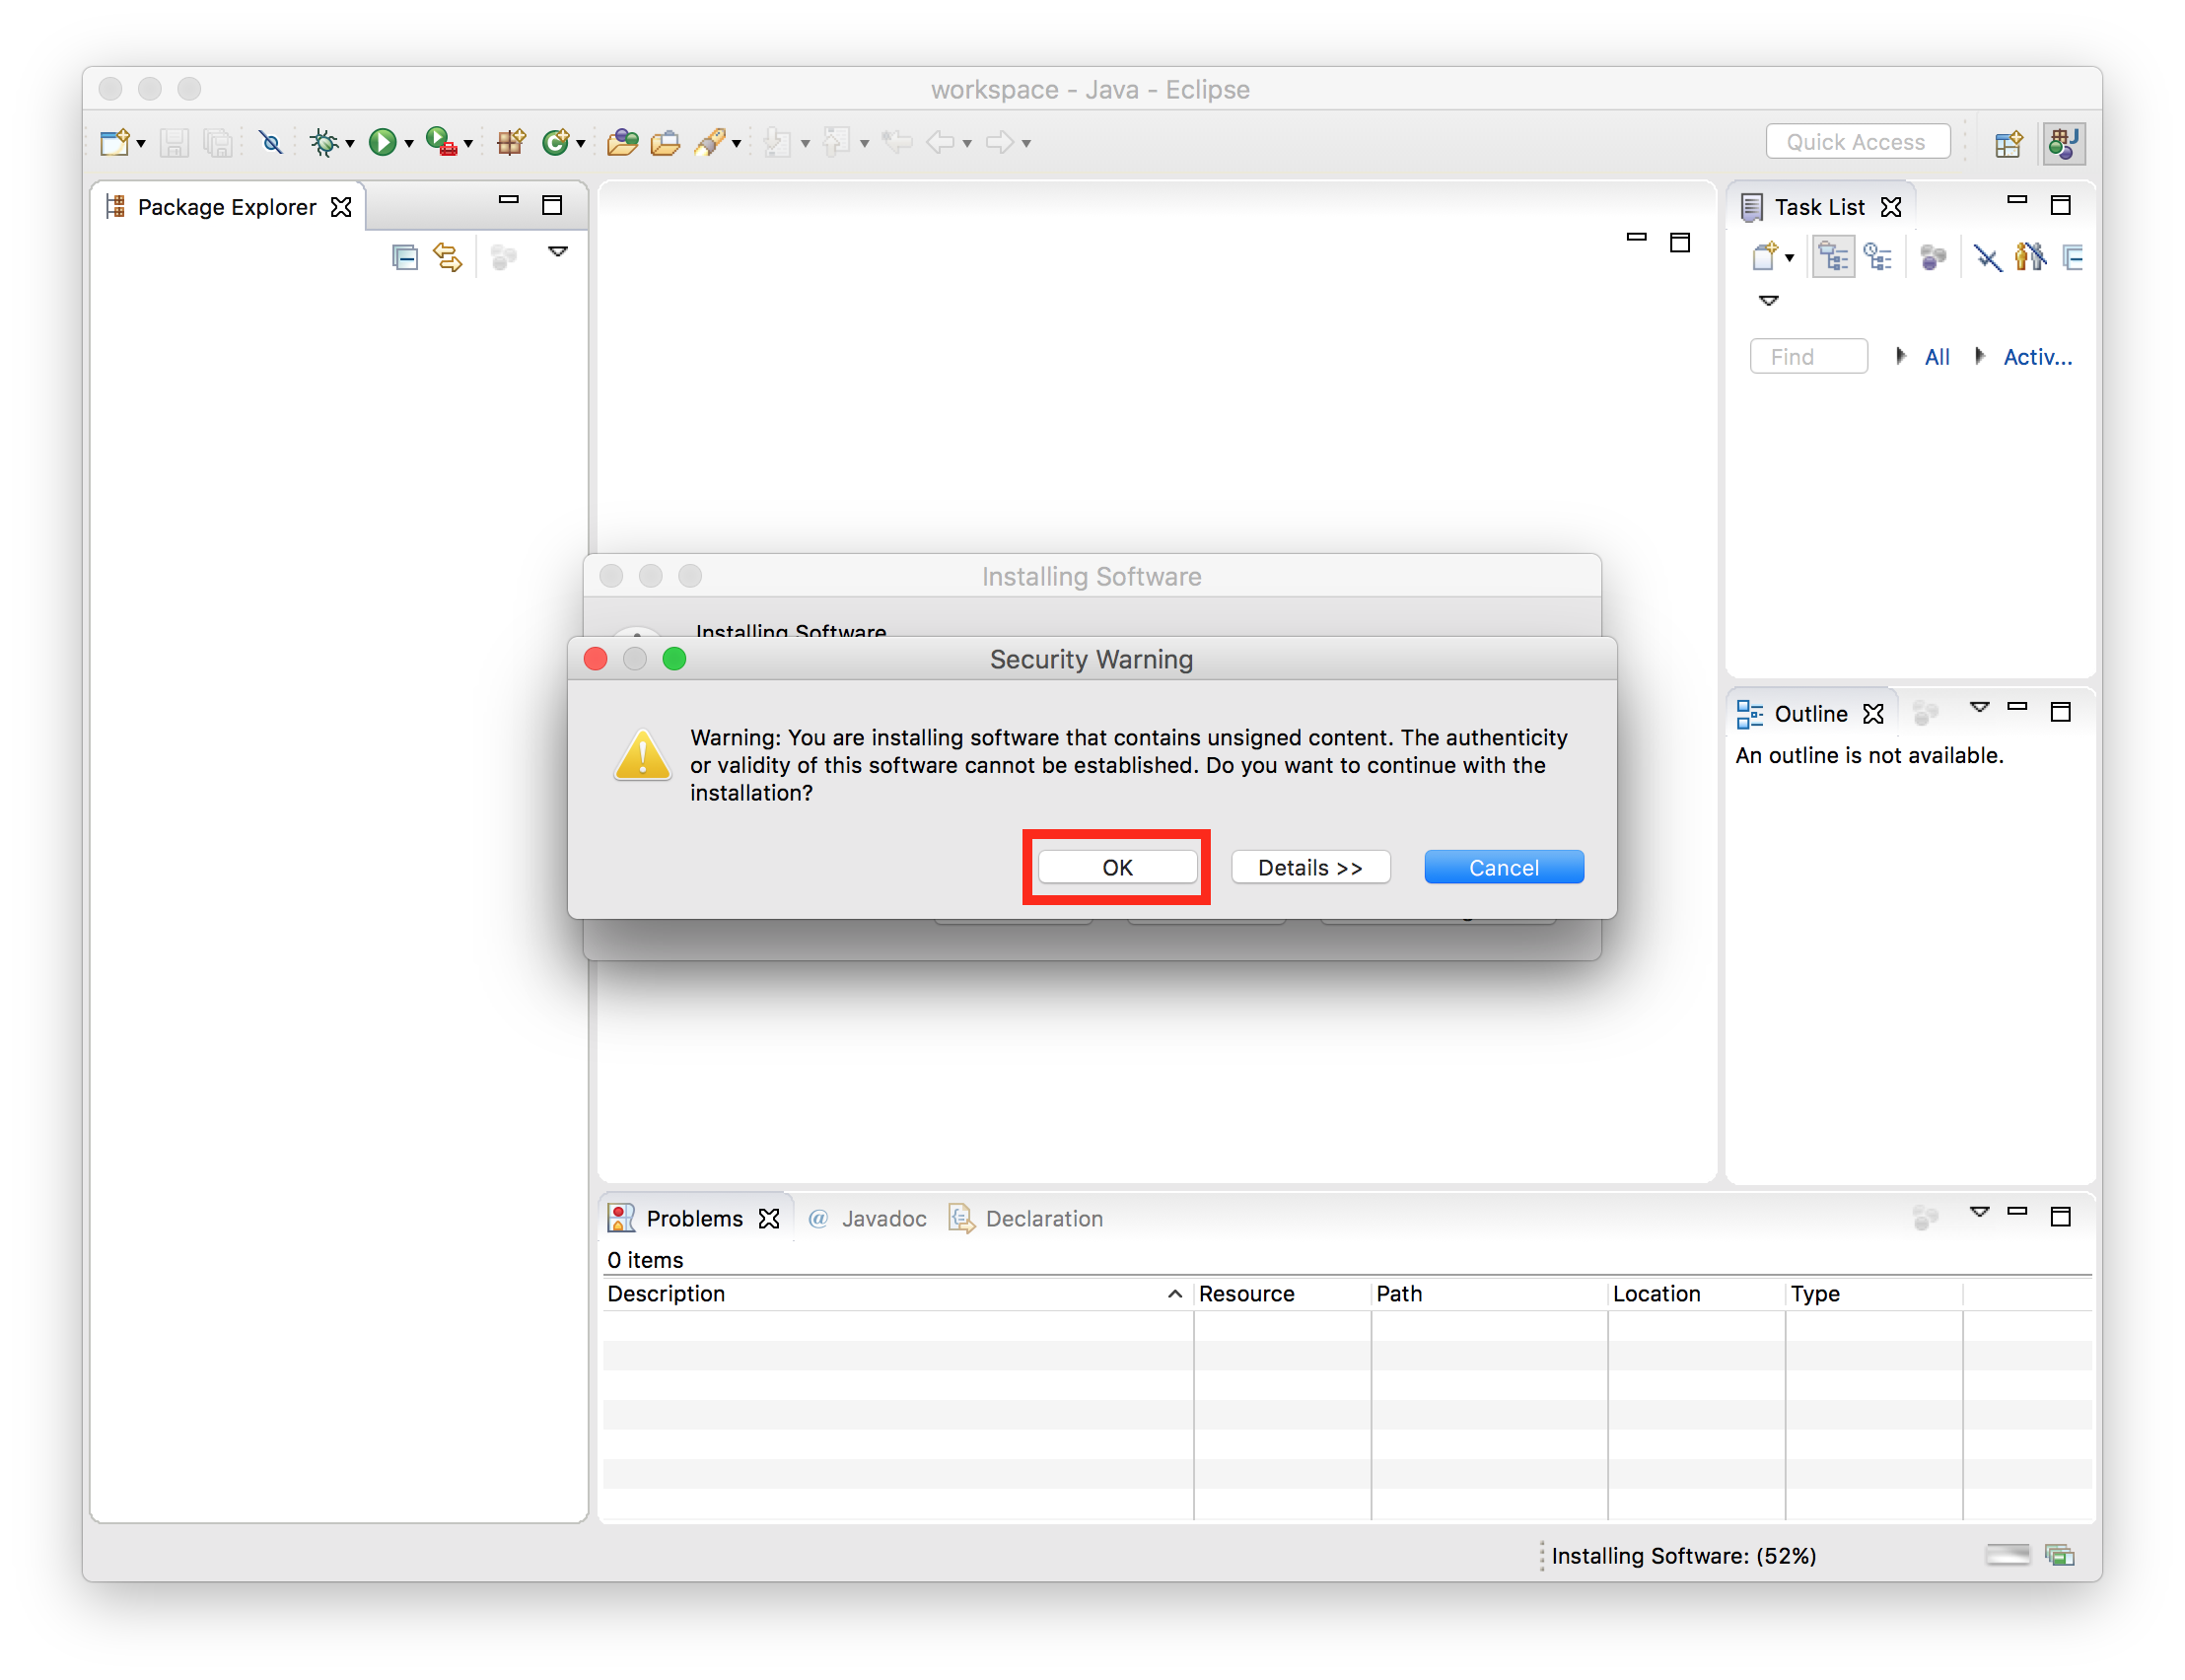
Click OK when you see the warning about installing unsigned content.
- Click Yes when asked to restart Eclipse.
-
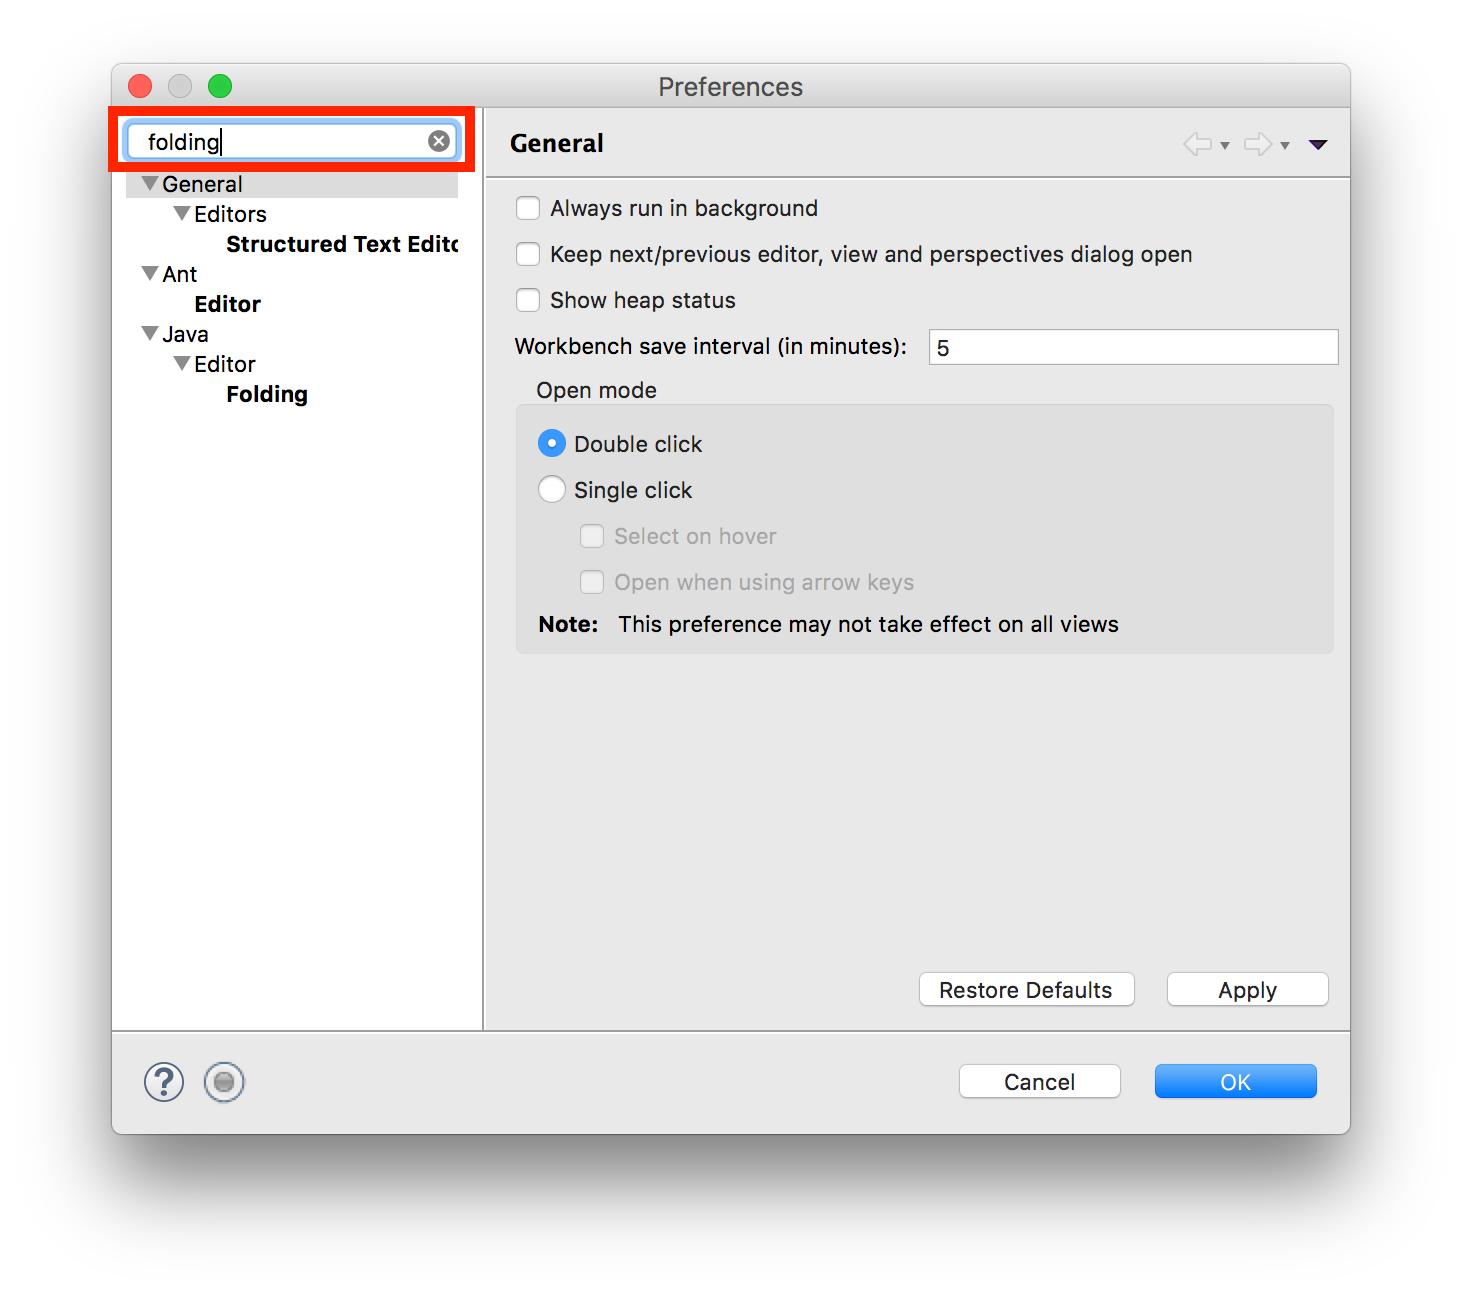
Finally, we need to change one Eclipse setting. By default, Eclipse hides (or "folds") the program comment at the top of each code file; we want to have those always be visible. To change this, first open Eclipse preferences (Eclipse -> Preferences on Mac or Windows -> Preferences on Windows). In the filter text box, type folding.
-
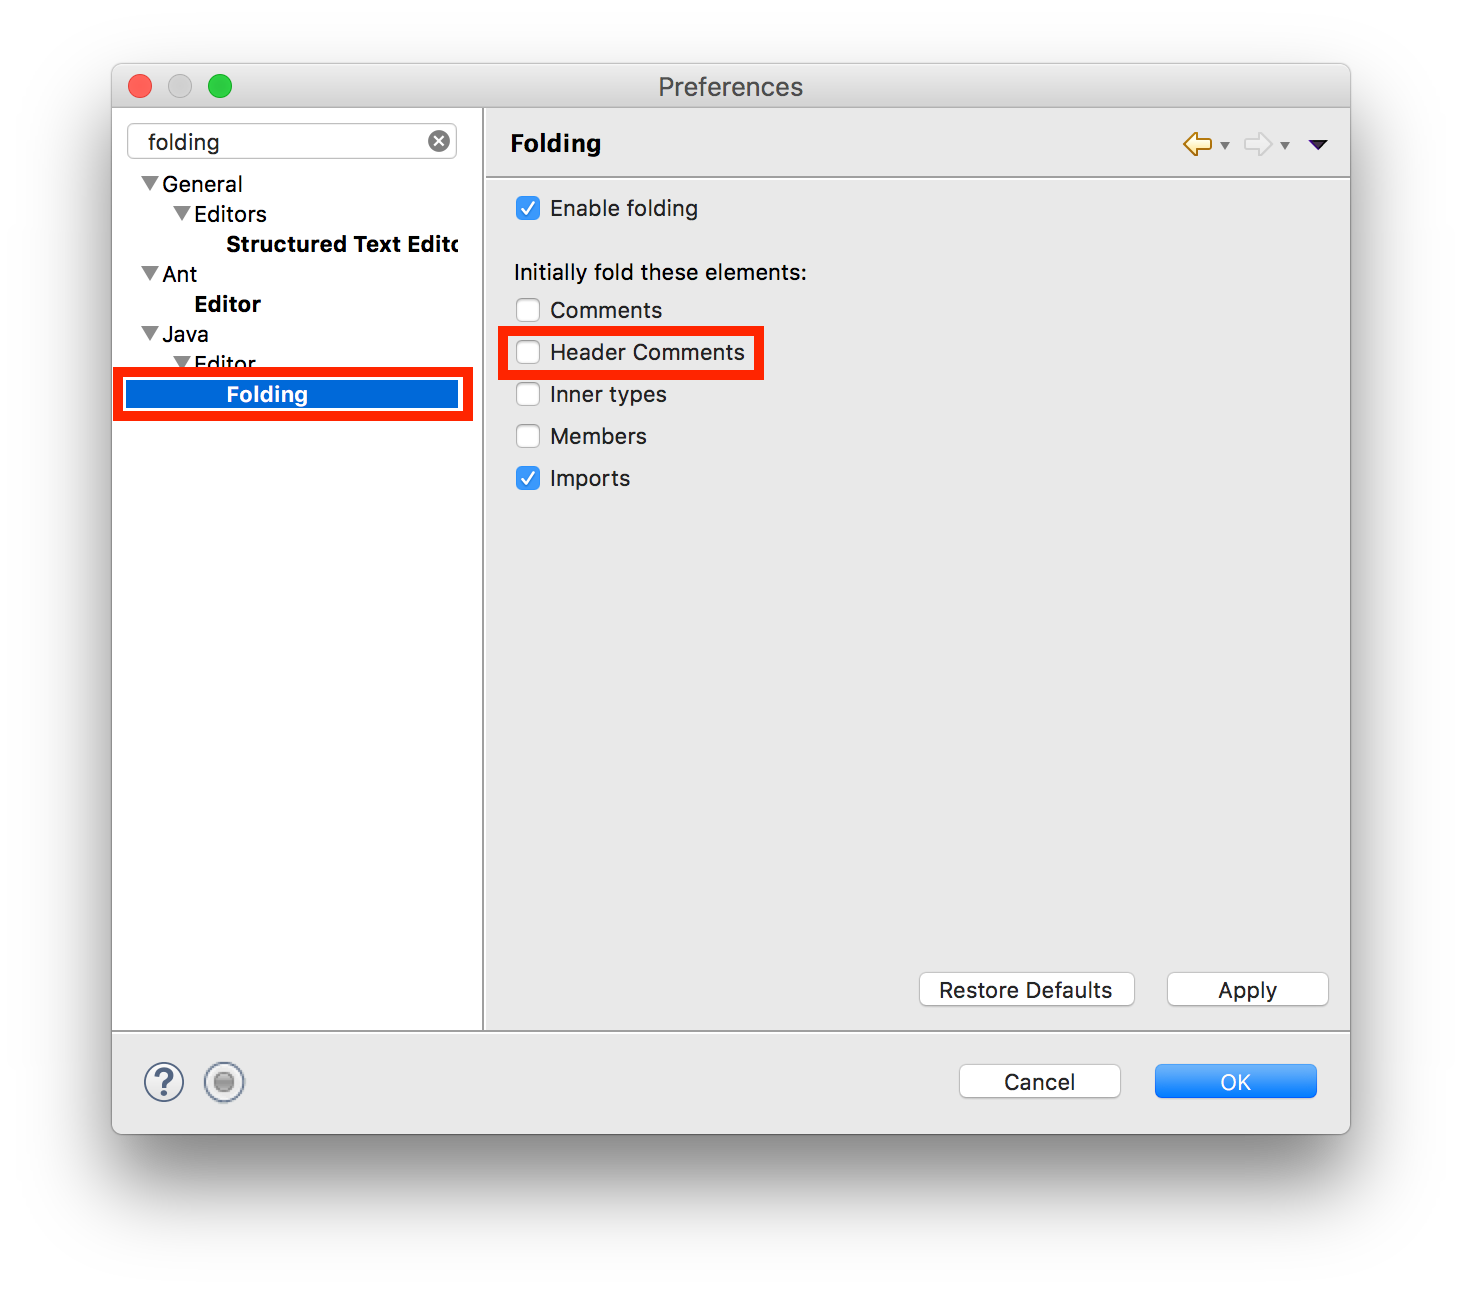
In the results on the left, underneath "Java>Editor", click Folding. In the view that appears, make sure to uncheck Header Comments. Then click Apply and OK.
- You're all set up! To get started importing and running projects, check out the "Importing and Running Projects" section of this page.


Installing Eclipse in Windows
(Note that these screenshots are for Windows, even though they were taken on a Mac) Our version of Eclipse will only work on Windows 7 (2009) or higher. If you don't have a supported version of the operating system, you'll need to either upgrade or do your class work on a cluster machine. You can check your version of Windows using these instructions.
-
Remove any older copies of the Java Runtime Environment that may be installed on your system.
-
If you have Windows 10: click on Start (the Windows icon in the lower left-hand corner), click on Settings (the gear-shaped icon), then select Apps & Features.
Otherwise: Click on Start, then click on Control Panel, then select Programs and Features. - From the list of programs you see, uninstall any occurrences of Java/J2SE Runtime Environment, Java SDK, Java SE Development Kit or Java Update. Note that the exact program name may be slightly different or include a version number, but you generally want to remove anything that includes the text: Java/J2SE Runtime Environment, Java SDK, Java SE Development Kit or Java Update. To remove a program, click on the program name to highlight it and click the the Uninstall button.
-
If you have Windows 10: click on Start (the Windows icon in the lower left-hand corner), click on Settings (the gear-shaped icon), then select Apps & Features.
- Download and install the Java SDK for Windows
- Download the Windows version of Eclipse
- Extract the contents of the file by right-clicking on it, selecting the Extract All... option and typing C:\Program Files as the location to extract the files to. Then continue following the steps in the extraction process.
- Create a shortcut to Eclipse on your Desktop for easy access: Open the C:\Program Files\eclipse directory, and right-click and drag the eclipse.exe file (the Eclipse application) to your desktop and then select the option Create shortcut here.
- Double-click on the Desktop shortcut to open Eclipse.
-
When you run Eclipse for the first time, you may get a screen that looks like this:
A workspace is just a directory that Eclipse will use to place new projects in. In CS 106A you won't have to make any new projects from scratch. We will always give you skeleton projects for your assignments, so you don't need to worry about where the workspace is. The suggested location is fine. Click the Use this as the default and do not ask again checkbox, and then click OK. - Now we need to install the "Stanford Plugin". This is what adds the "Stanford Menu" to Eclipse, as well as the icons to run, import, and submit projects. Once Eclipse has started, click Help -> Install New Software.
- In the "Work with" text box, type https://web.stanford.edu/dept/cs_edu/eclipse/plugin and press Enter.
-
Click "Select All," then click Next.
-
Click Next again.
-
Click "I accept the terms of the license agreement," then click Finish.
-
Click OK when you see the warning about installing unsigned content.
- Click Yes when asked to restart Eclipse.
-
Finally, we need to change one Eclipse setting. By default, Eclipse hides (or "folds") the program comment at the top of each code file; we want to have those always be visible. To change this, first open Eclipse preferences (Eclipse -> Preferences on Mac or Windows -> Preferences on Windows). In the filter text box, type folding.
-
In the results on the left, underneath "Java>Editor", click Folding. In the view that appears, make sure to uncheck Header Comments. Then click Apply and OK.
- You're all set up! To get started importing and running projects, check out the "Importing and Running Projects" section of this page.
Importing and Running Projects
Now that you have set up Eclipse, it's time to work on a project! For each CS 106A assignment, we will provide a skeletal framework called a starter project. Using starter projects makes your life much easier by allowing you to ignore the many details involved in creating a project from scratch. Therefore, for each assignment your first task will be to download the starter project from the class website and then import it into your workspace. Once you do that, you can work on your project. These steps also apply to code from lecture, which will also be provided via a project on the Schedule page you can import.
Importing Projects
- Download the project you wish to import. For example, assignment starter projects are accessible via the "Assignments" dropdown at the top, lecture code projects are accessible via the "Schedule" tab and section code projects at the end of each week via the "Section" dropdown.
- The starter project will download as a zip file (e.g. Assignment1.zip). Expand the zip file. In some cases, this may happen automatically when you download it. Move the resulting folder to where you would like to save it on your computer.
-
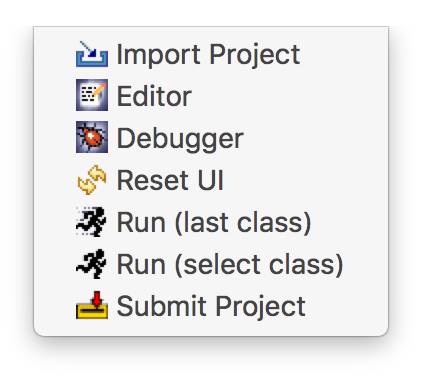
Launch Eclipse, and from the Stanford Menu at the top select "Import Project" (or look for an icon like the one below in the Eclipse toolbar). Note: if you do not see the Stanford Menu in Eclipse, please see the FAQ.
-
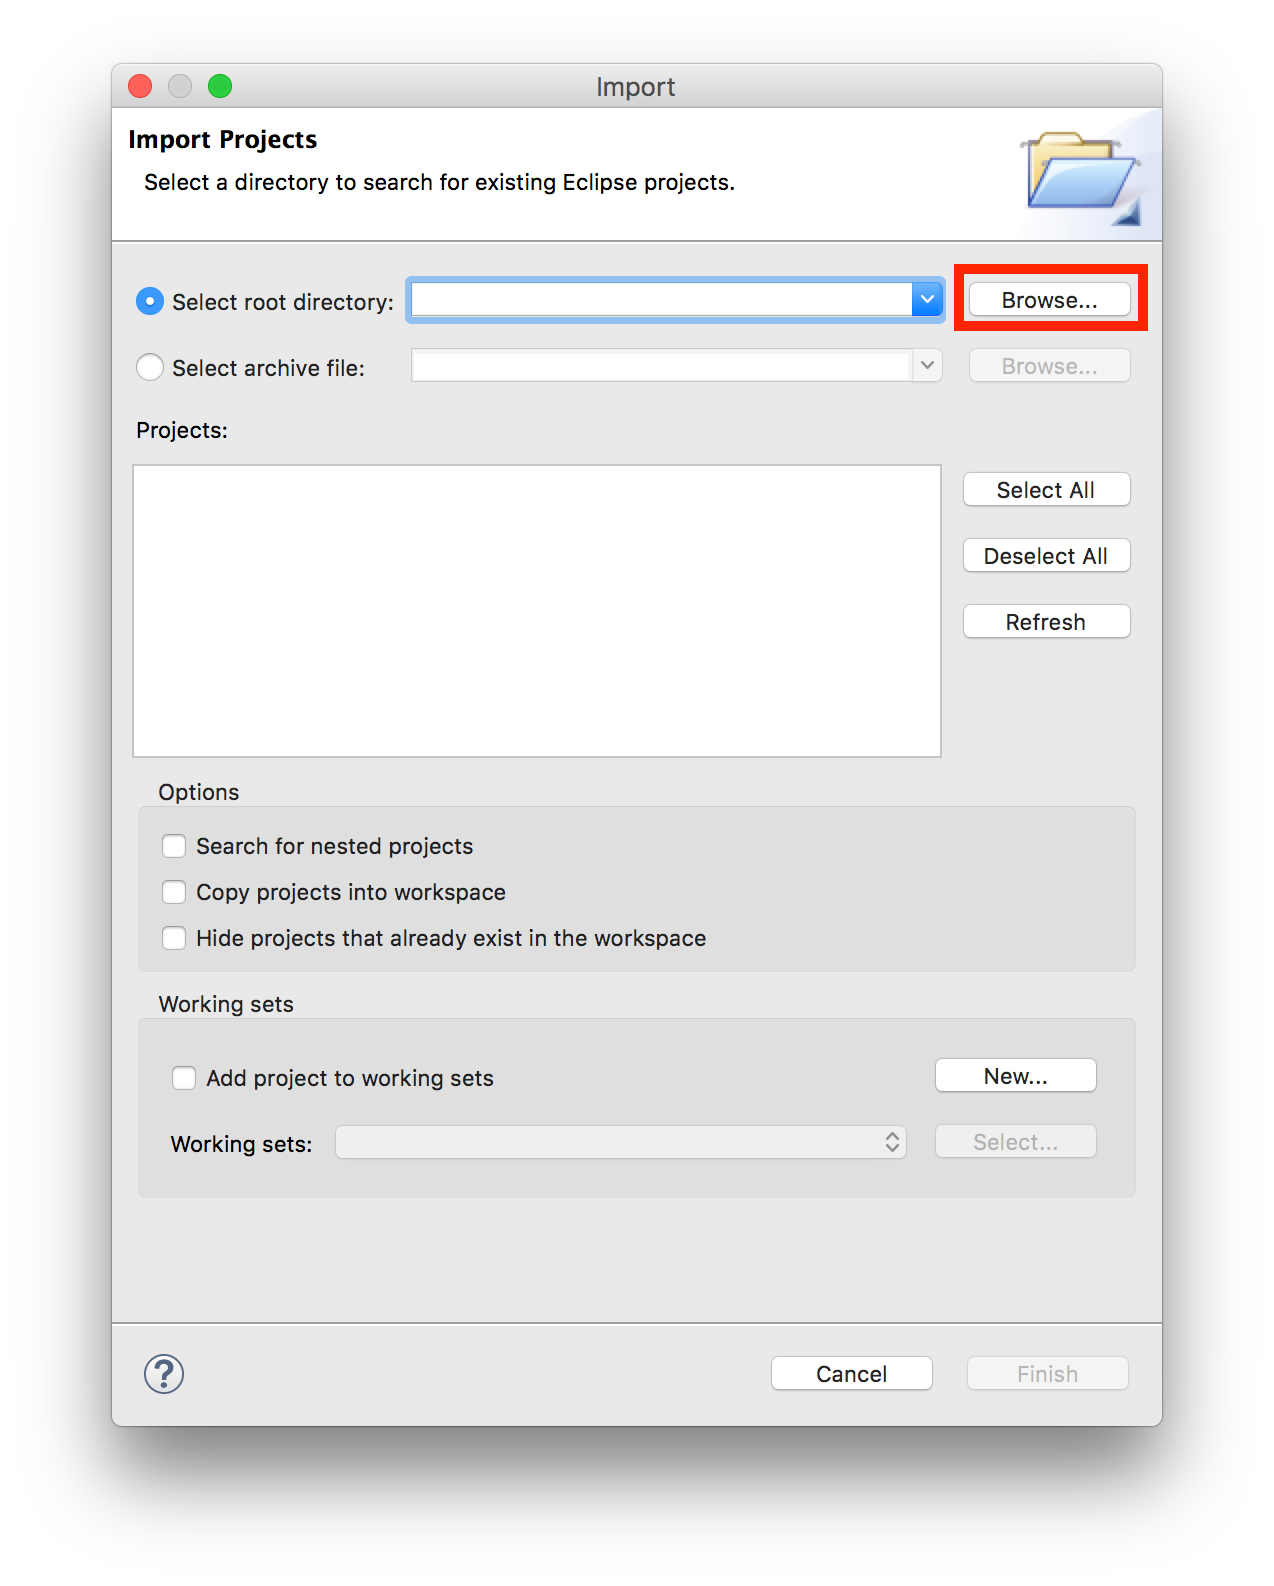
Select the project you would like to import by clicking the topmost Browse... button and navigating to the folder from the earlier steps. Then click OK.
-
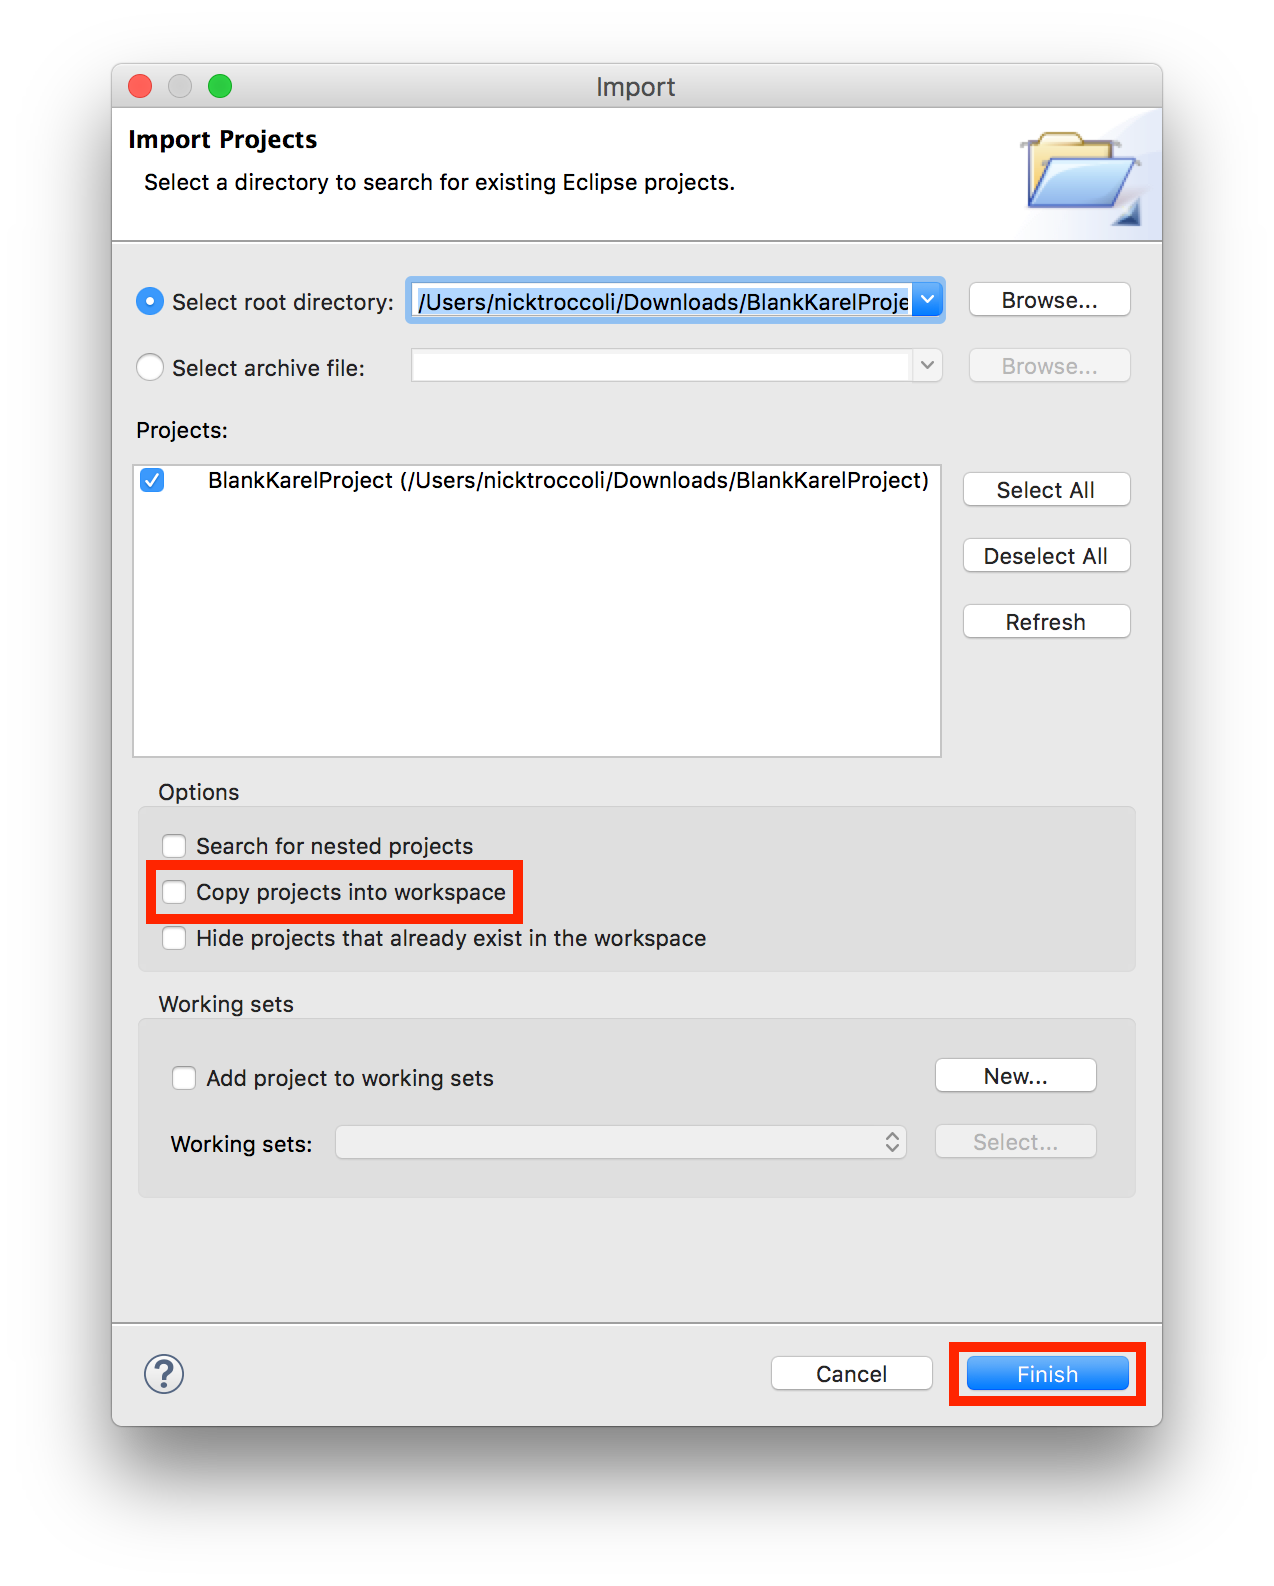
Now, make sure that the check box labeled "Copy projects into workspace" is unchecked, and then click the Finish button to import the project. Note: if Eclipse does not let you import the project, please see the FAQ.
-
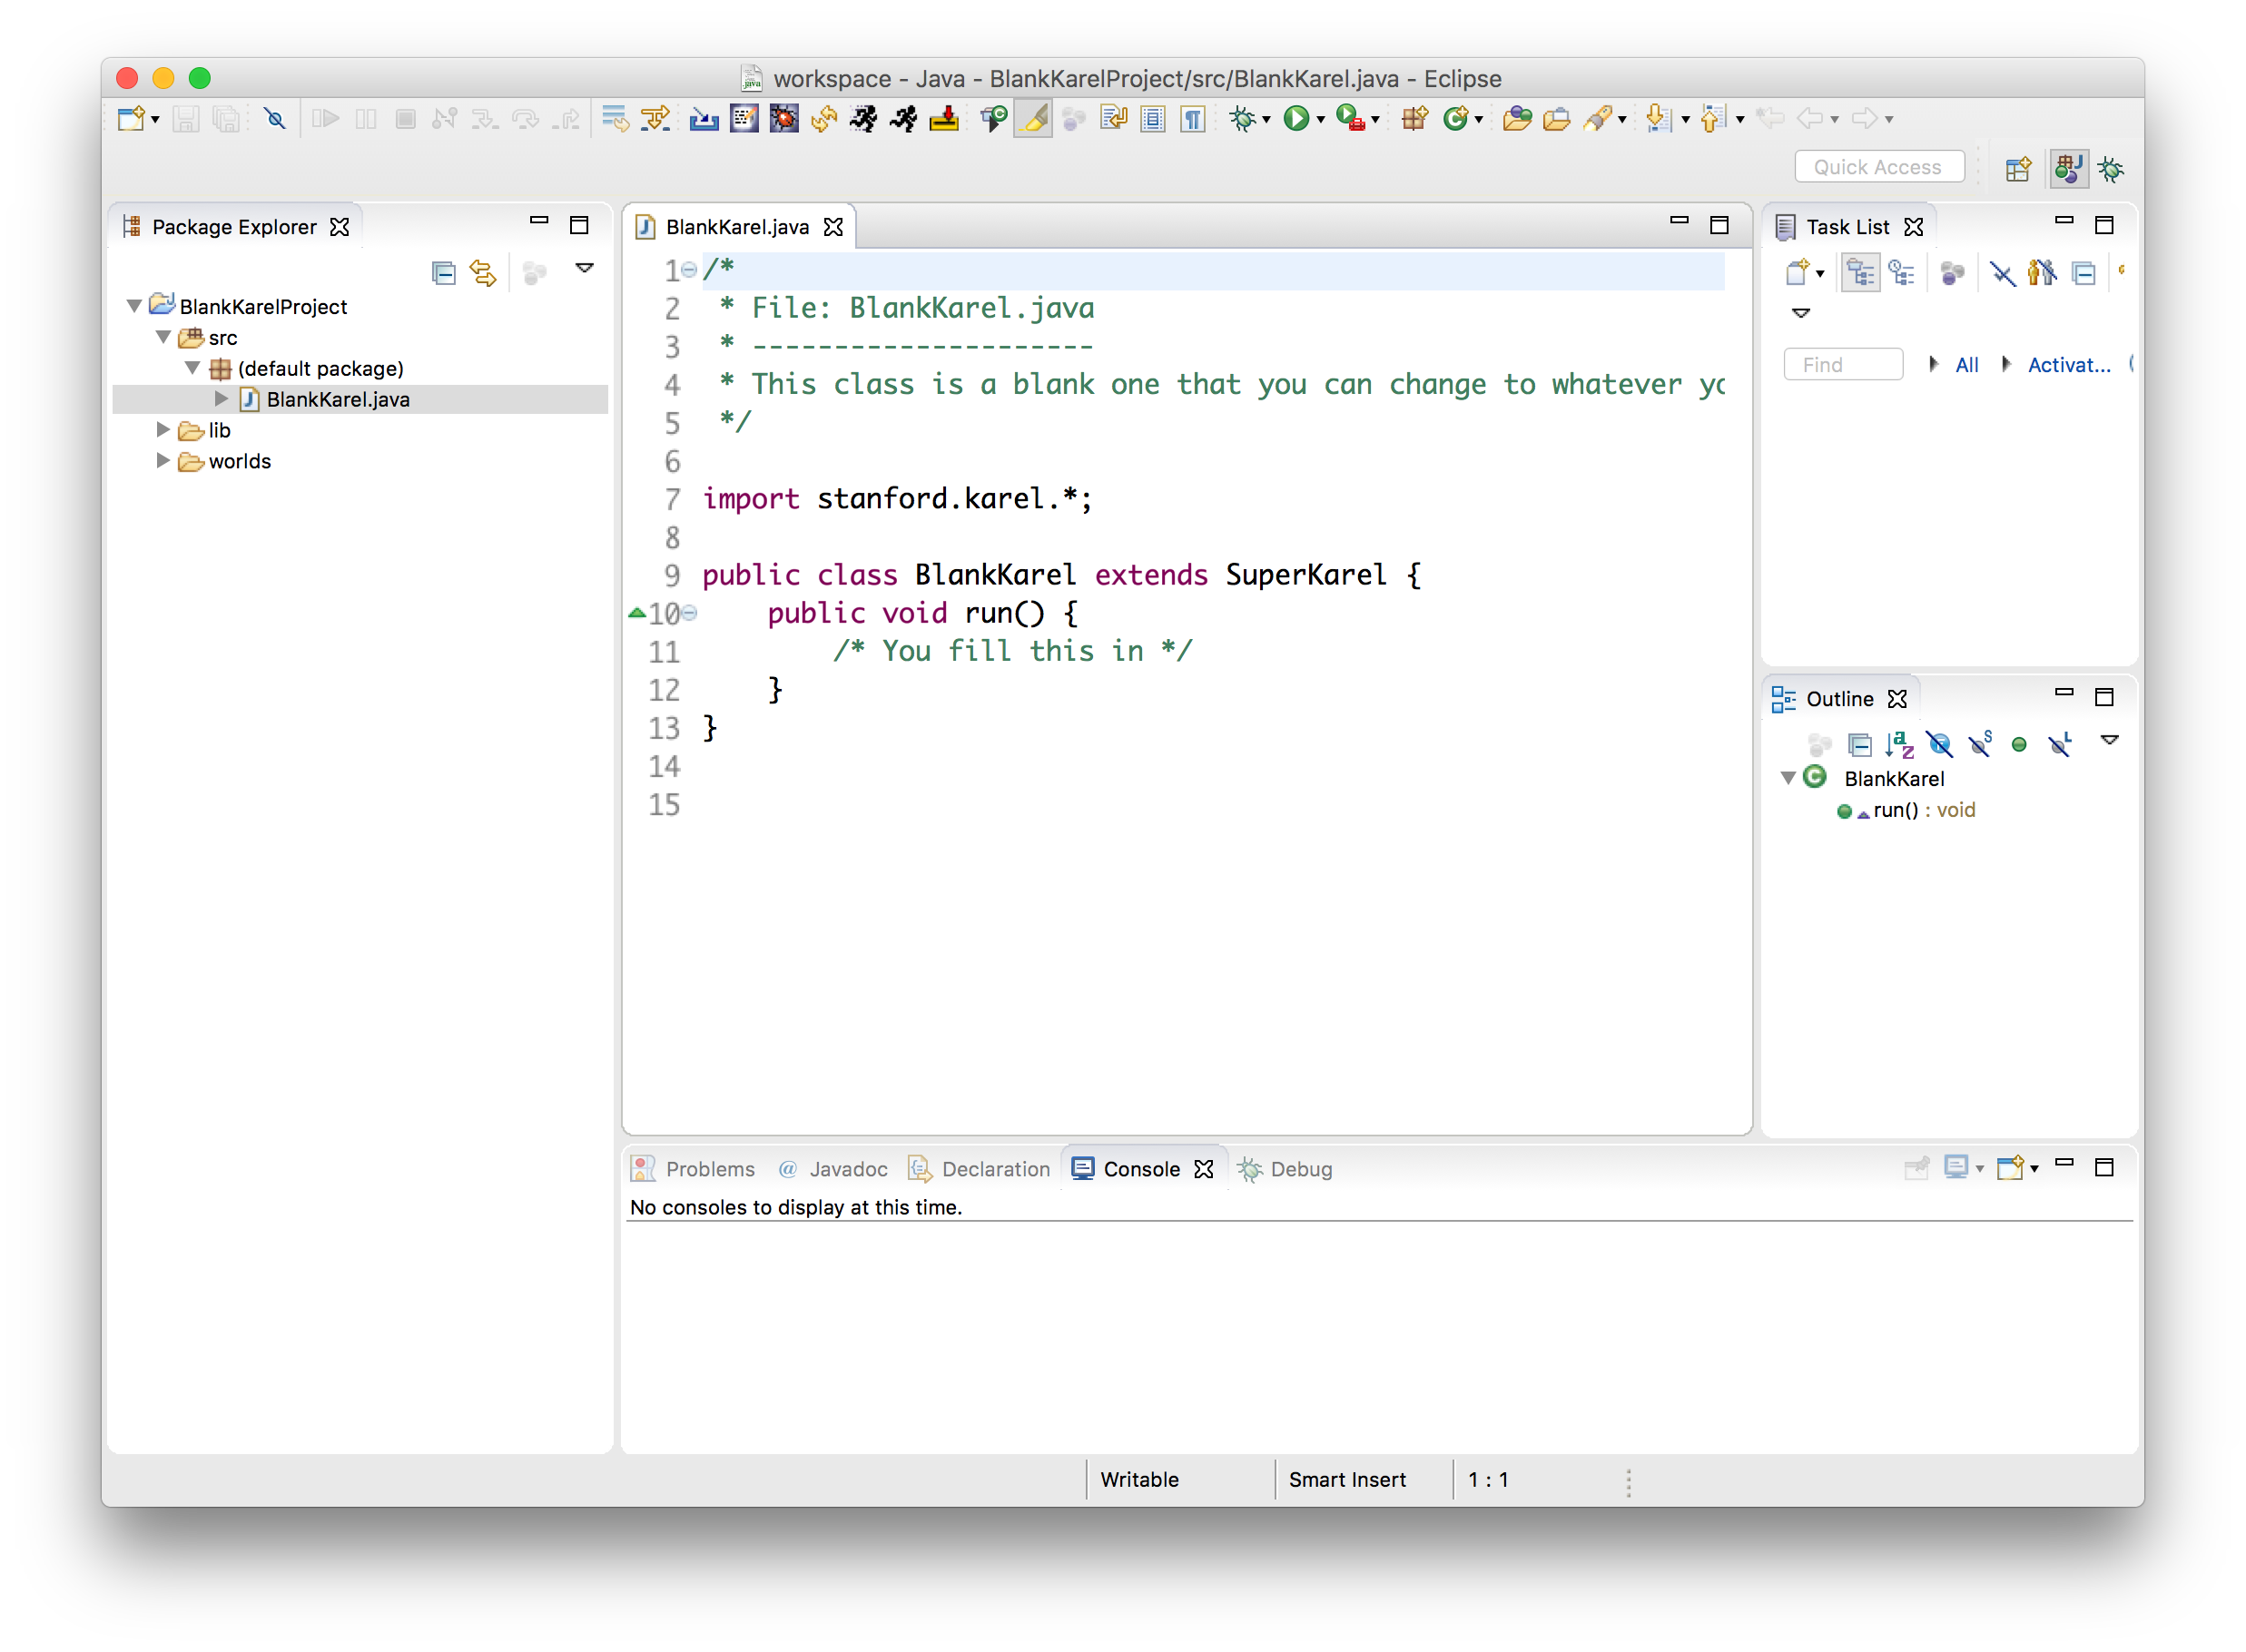
You should now see the project in the left "Package Explorer" sidebar, like in the image below. Double-click on the project folder to expand its contents.
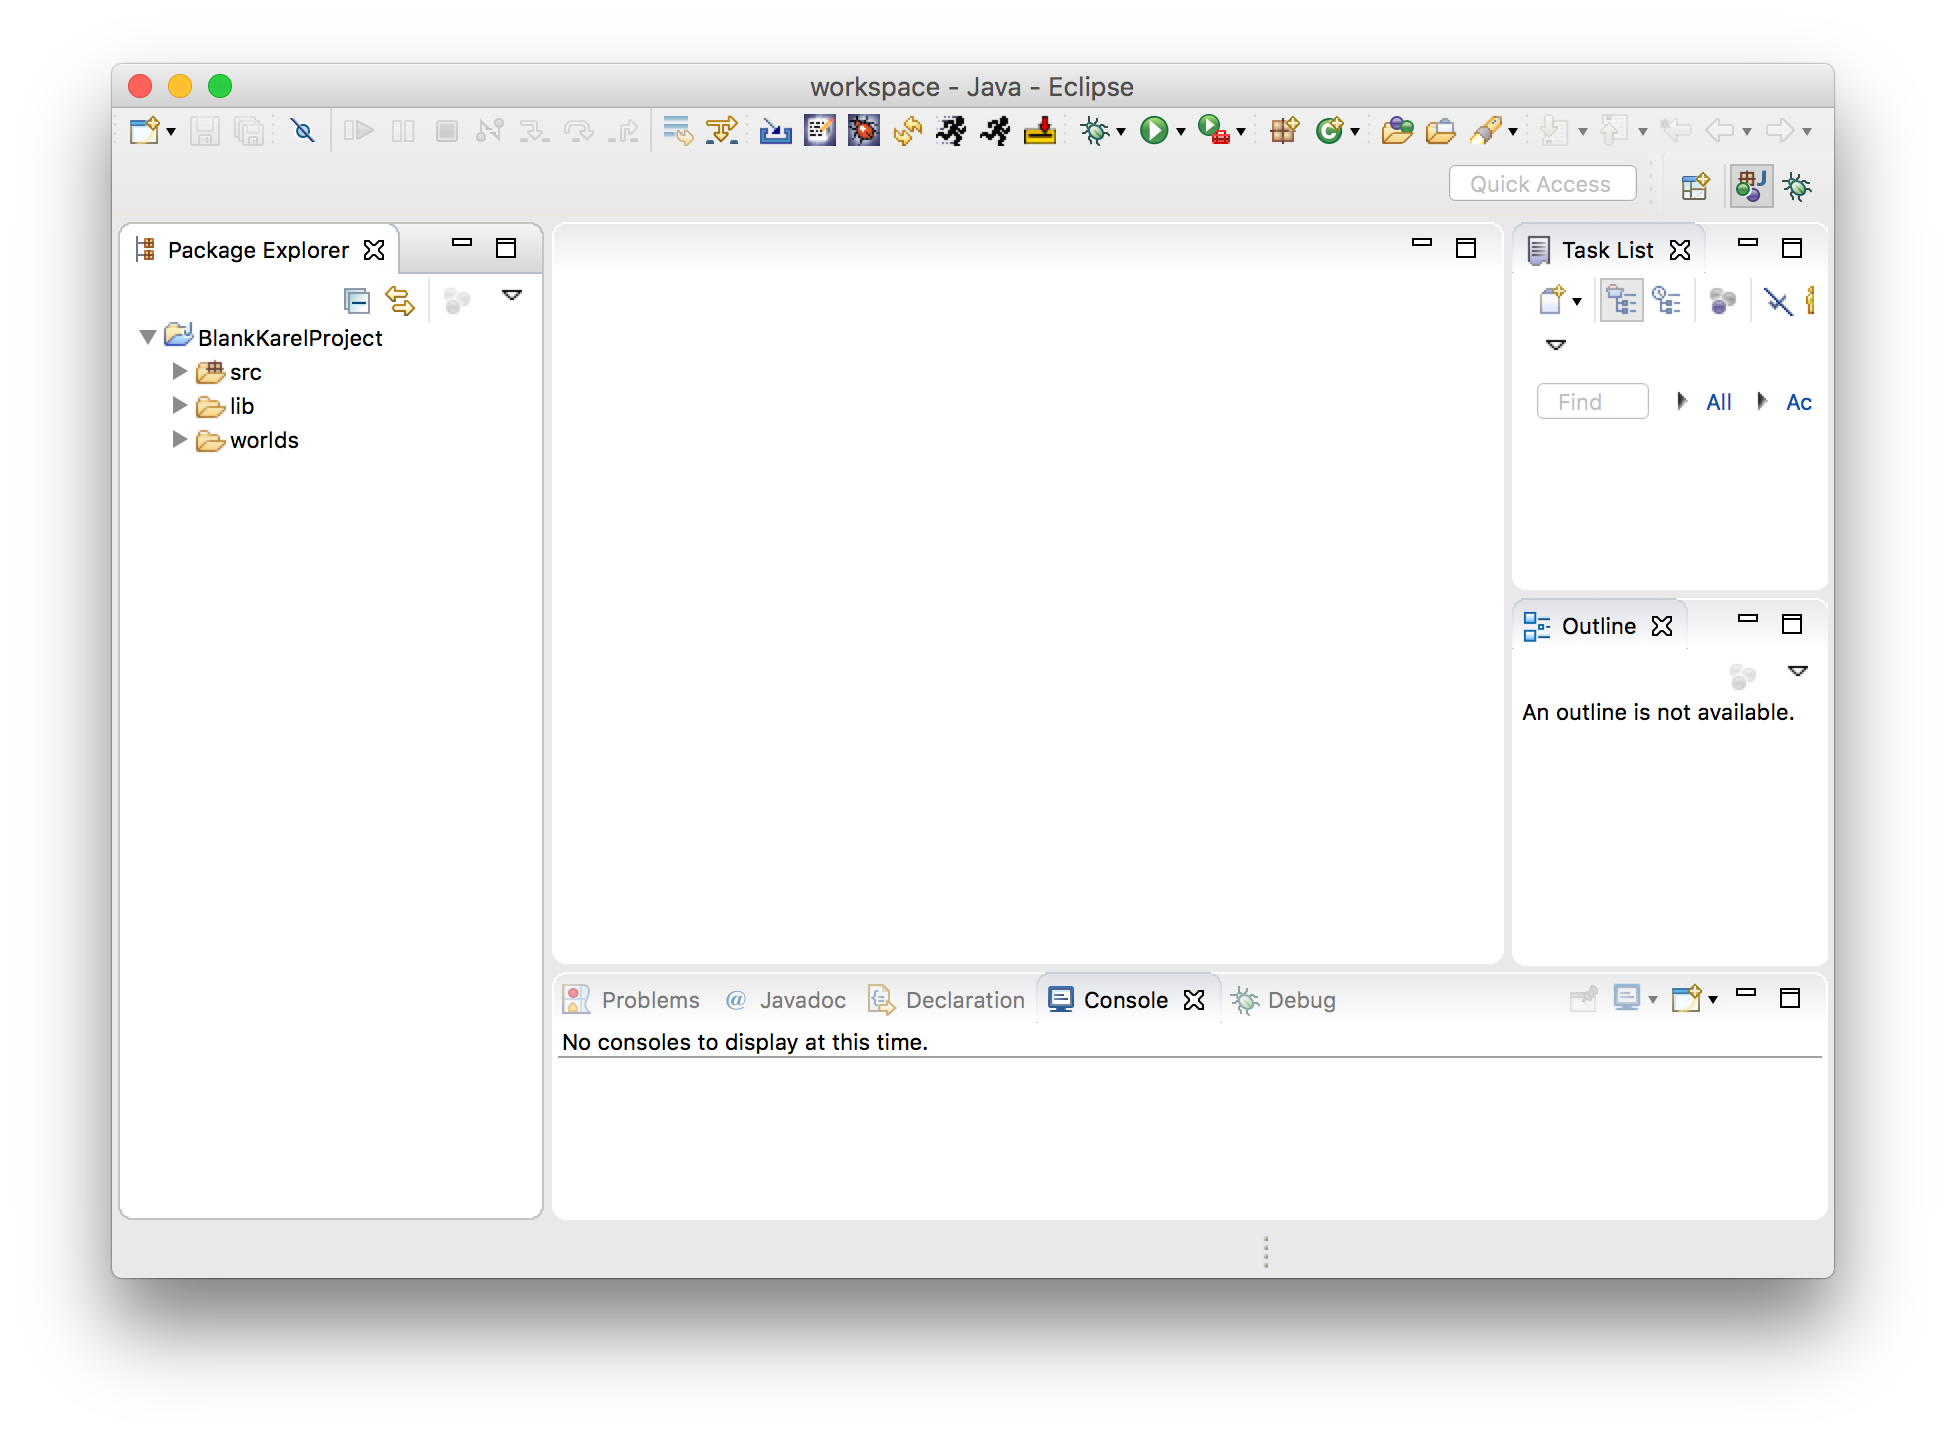
The lib folder contains the Stanford Library file, and the src folder contains the .java code files for this assignment. The res folder, if applicable, contains resources files such as images and sounds. Karel projects also have a worlds folder containing the Karel worlds for the project. -
Double-click on src, and within that double-click on the default package, to show the code files for the assignment. Then double-click on any code file to open it in the main editor window.
Now, see the next section for how to run a Java program.


Running Programs
-
A project can contain multiple programs. To run a program in your project, look for the "running person" icons in the top toolbar. Note: if you do not see these icons in your toolbar, please see the FAQ.

-
The "fast" running person immediately runs the most recently-run program (convenient when focusing on a single program), and the "slow" running person displays a list of all programs imported into Eclipse, like the following:
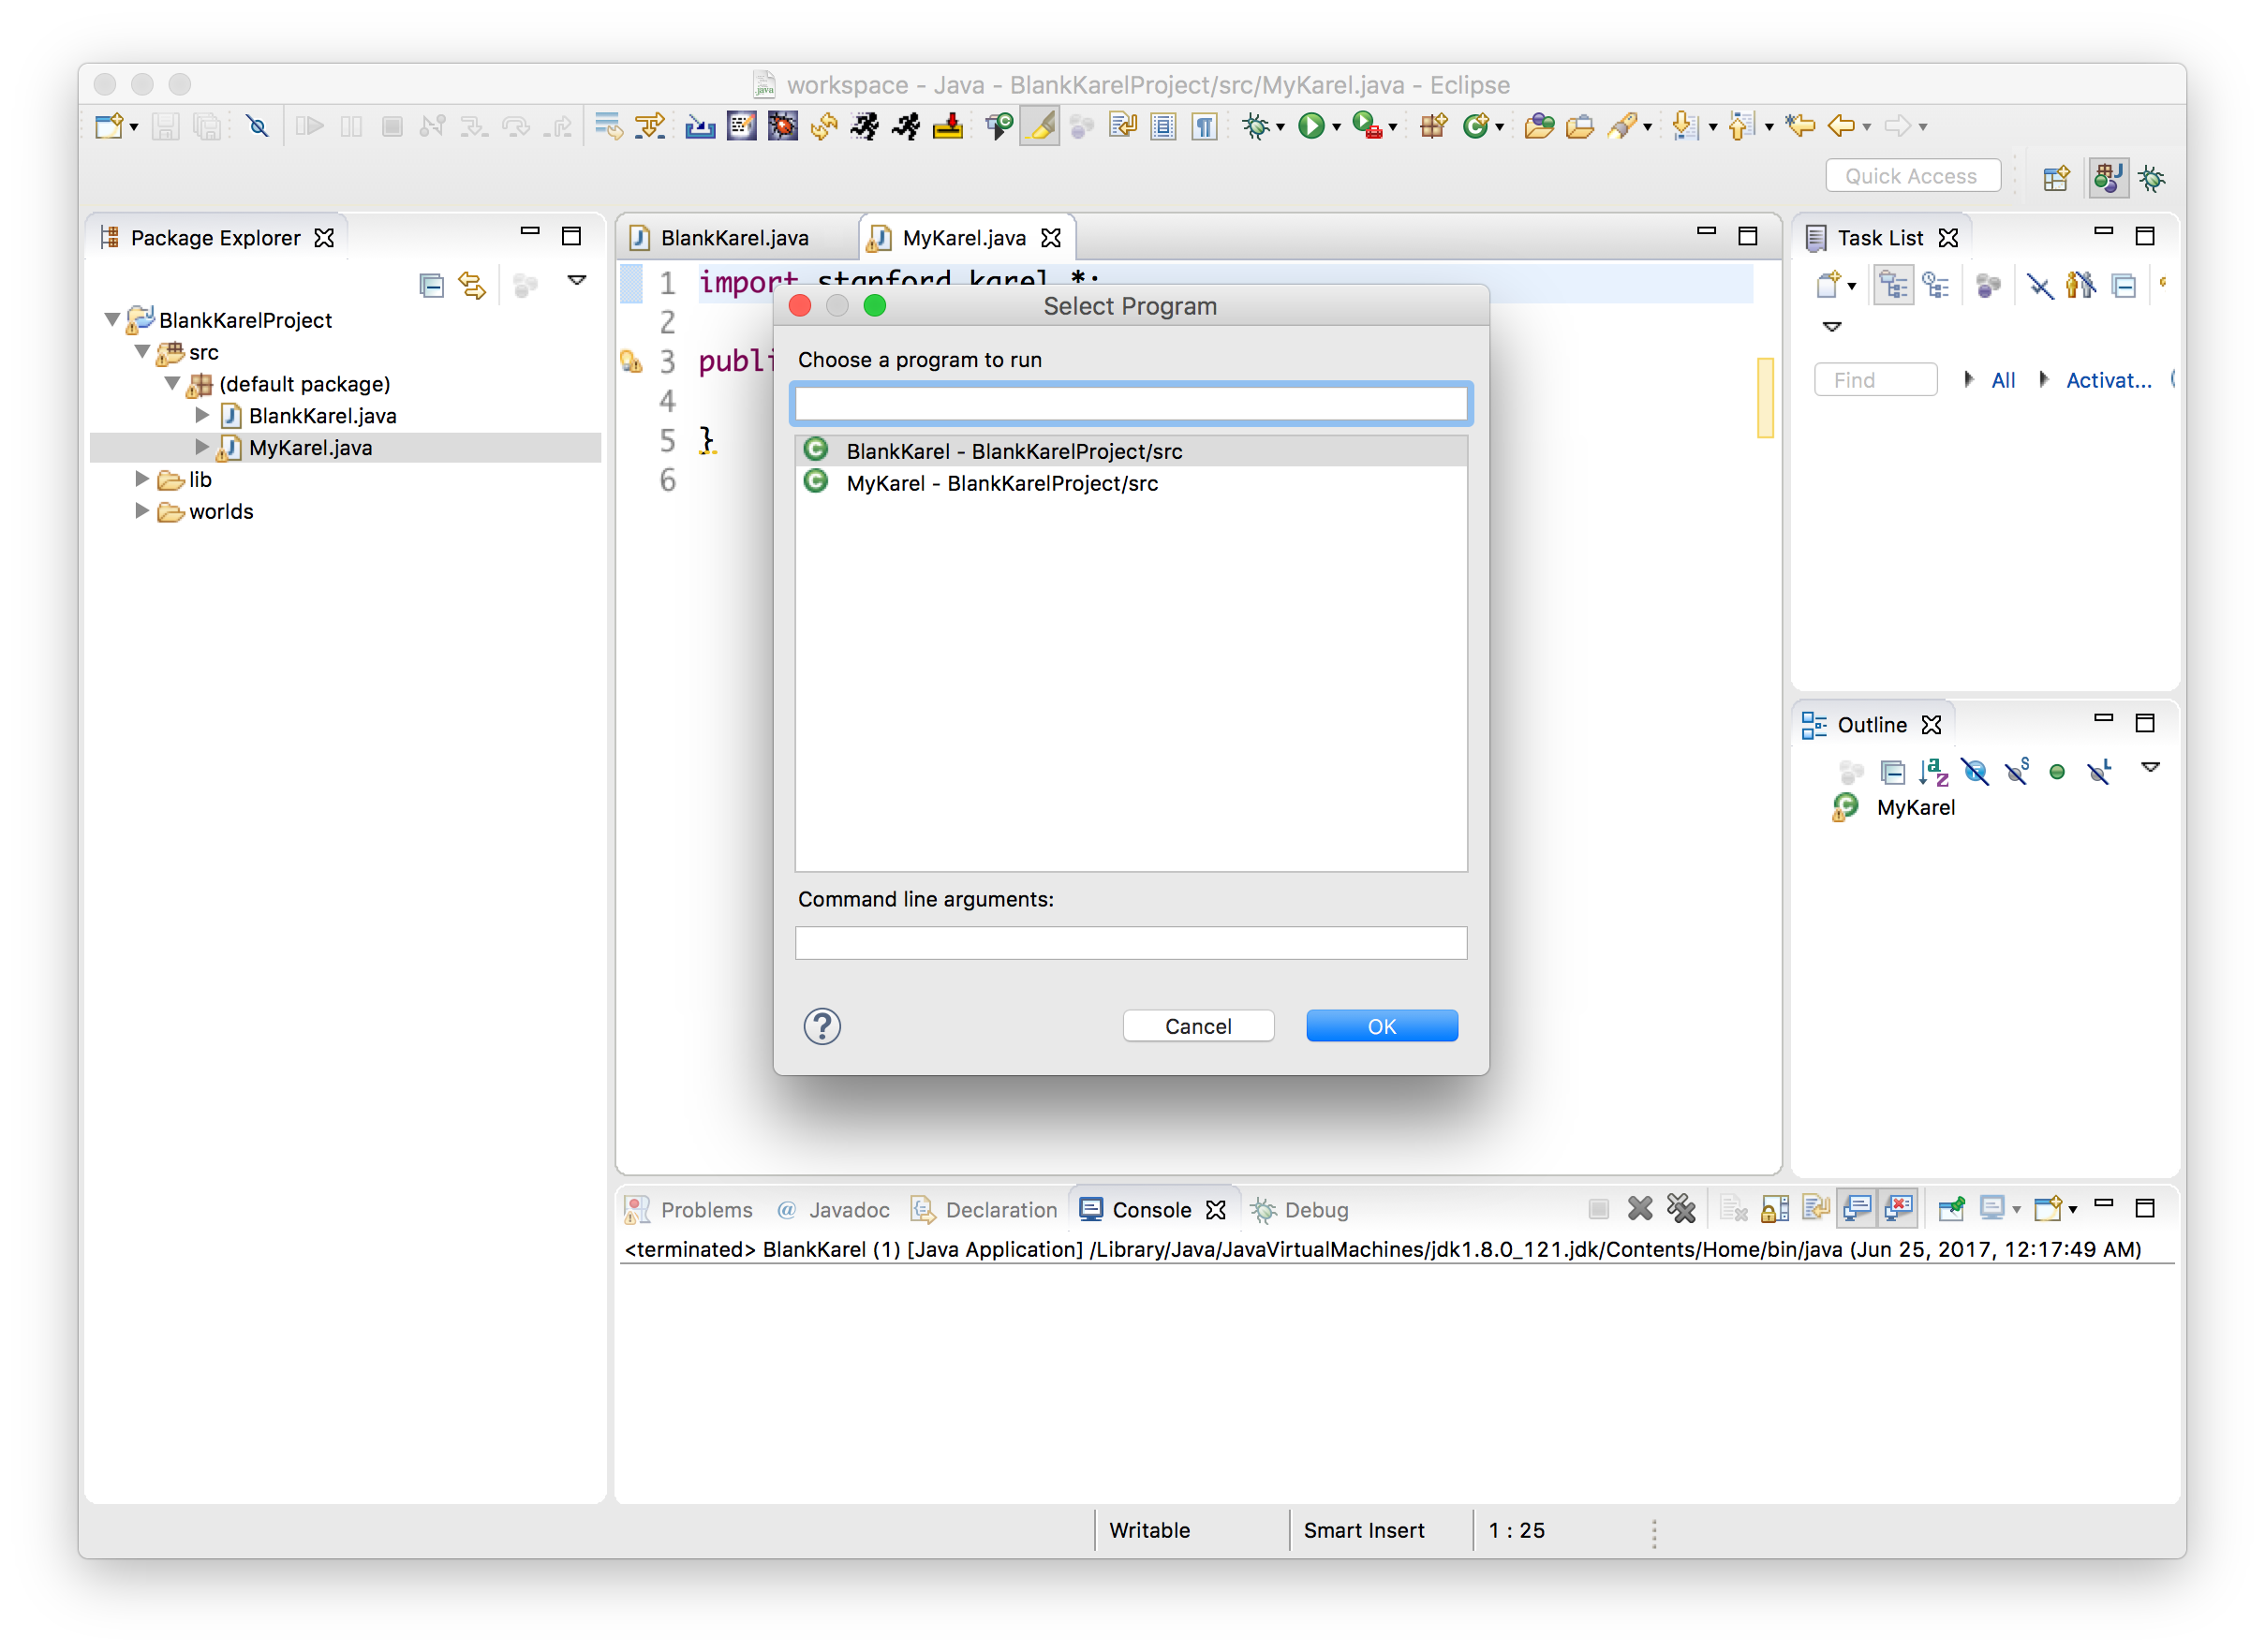
Select the program you would like to run, and it will launch! - If you make changes to your code, you must re-run your program in order for the changes to take effect.


Closing Projects
When you are done with a project and no longer wish to edit or run it, you can close it. Closing the project does not delete the project, but tells Eclipse to no longer display that project's programs in the list of programs you can choose to run. This may be helpful later in the quarter when you have several projects imported. To do this, right-click on the project in the sidebar and select Close Project.
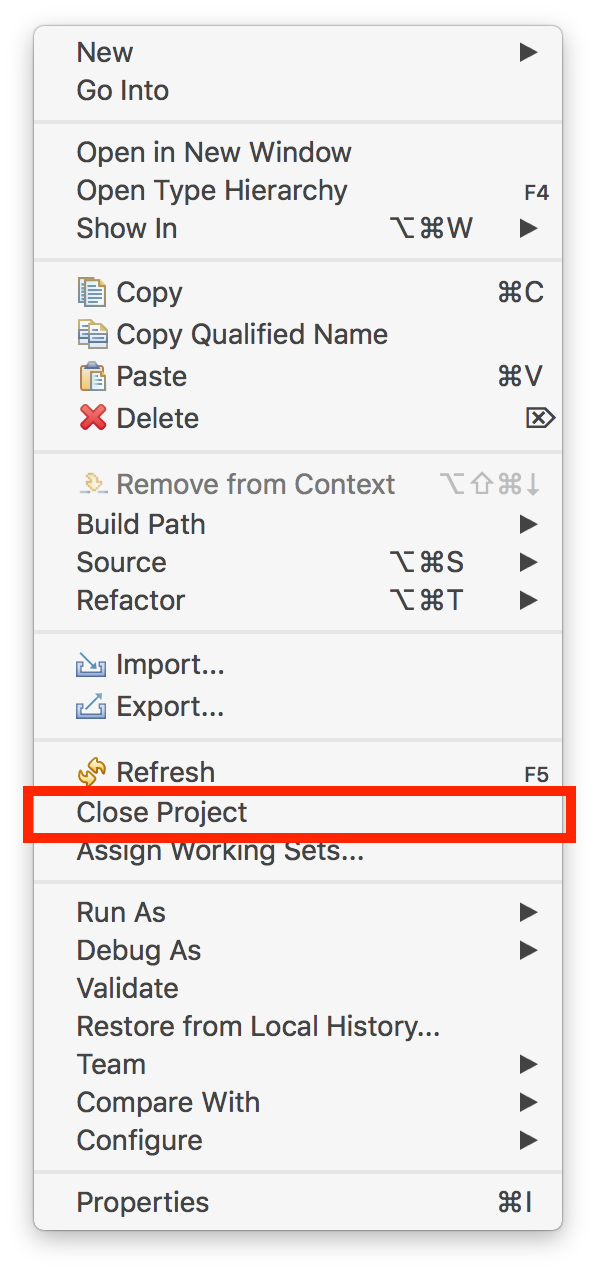
Its folder icon will change to a "closed" folder. If you would like to reopen a project later, simply double-click on its folder in the sidebar again.
Submitting Projects
You submit all assignments directly via Eclipse. We check whether an assignment is turned in on time from the time we receive your electronic submission, which is timestamped in the submission process. That time is based on the time on the server that receives the assignment, so it pays to submit things with a few minutes to spare, particularly if you discover that your computer's clock is running slow.
To submit a project in Eclipse, follow these steps:
- Save your work! Always remember to save all your work before submitting so you submit your most recent changes.
-
From the Stanford Menu dropdown at the top, select Submit Project (or look for an icon like the one below in the Eclipse toolbar).
- Enter your SUNet ID and password, and then click the Authenticate button. Then click Next.
-
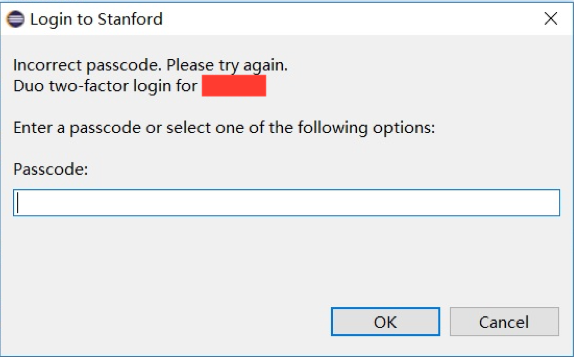
On the next screen, you may encounter a field asking for an additional "passcode". This passcode is an additional security step called "two-factor authentication", or "two-step", and is used university-wide. It provides your account with additional security as it requires you to not only have your username and password, but also a unique code, usually uniquely generated each time via text message or app. If you do not already have two-factor authentication set up, please see the Stanford online guide for help setting it up, and for answers to common questions.
- Select the assignment number for which you are making a submission, and then click Next.
- Select the project in Eclipse you would like to submit by clicking Browse... and selecting from among the current open projects in Eclipse. Select the project you would like to submit and click OK. This will submit all files in this project together.
- The name of your project should now appear in the box labeled "Project:". Click the Finish button to submit. It may take some time for your project to be fully submitted.
- Once your project is submitted, you will get a message saying the submission was successful. Click OK.
- IMPORTANT: always make sure that your files were successfully submitted. You can do this by going to paperless.stanford.edu; this will show the files your section leader will see when grading your submission. This is also where your section leader will post your assignment grades and comments. Remember that You are responsible for double-checking Paperless to make sure that your files were submitted properly. Note that Paperless's web viewer may only display your .java files; however, if you download the submission from Paperless you can confirm that your other files are submitted as well.

You can submit as many times as you'd like - your section leader will grade your most recent submission.
IMPORTANT: remember to keep a backup copy of your work. Although we work hard to keep track of all assignment submissions, on occasion assignments are not received as expected, and we will ask you to resubmit. You are responsible for keeping a backup copy of your work, in the event that a resubmission is required. We highly recommend saving redundant backup copies as well, using an external hard drive, a thumb drive, online storage services, etc. See here for other recommended ways to back up your data.
The Eclipse Debugger
When writing programs in Eclipse, you may run your program and have it behave in a way that you did not intend or expect. In cases like this, you need to "debug", or remove unintended behavior, from your program. Luckily, Eclipse comes with a built-in "debugger", or tools that can help you better understand what your code is doing. Here's how to use it.
-
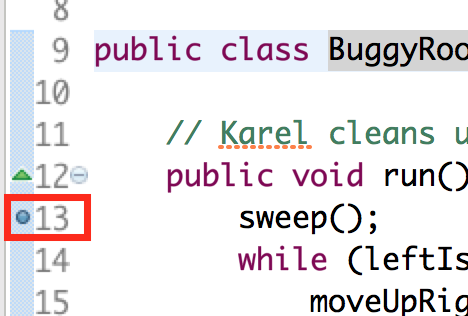
When you want to further investigate the behavior of your program, you should add a "breakpoint" to your program. A breakpoint tells Eclipse that you would like to have the program pause once it reaches a certain line so you can poke around. To add a breakpoint, double-click in the margin on the line on which you would like to add a breakpoint. A blue dot will appear, which symbolizes the breakpoint. You can add one, or multiple breakpoints, in your program. To remove a breakpoint, just double-click on it.
-
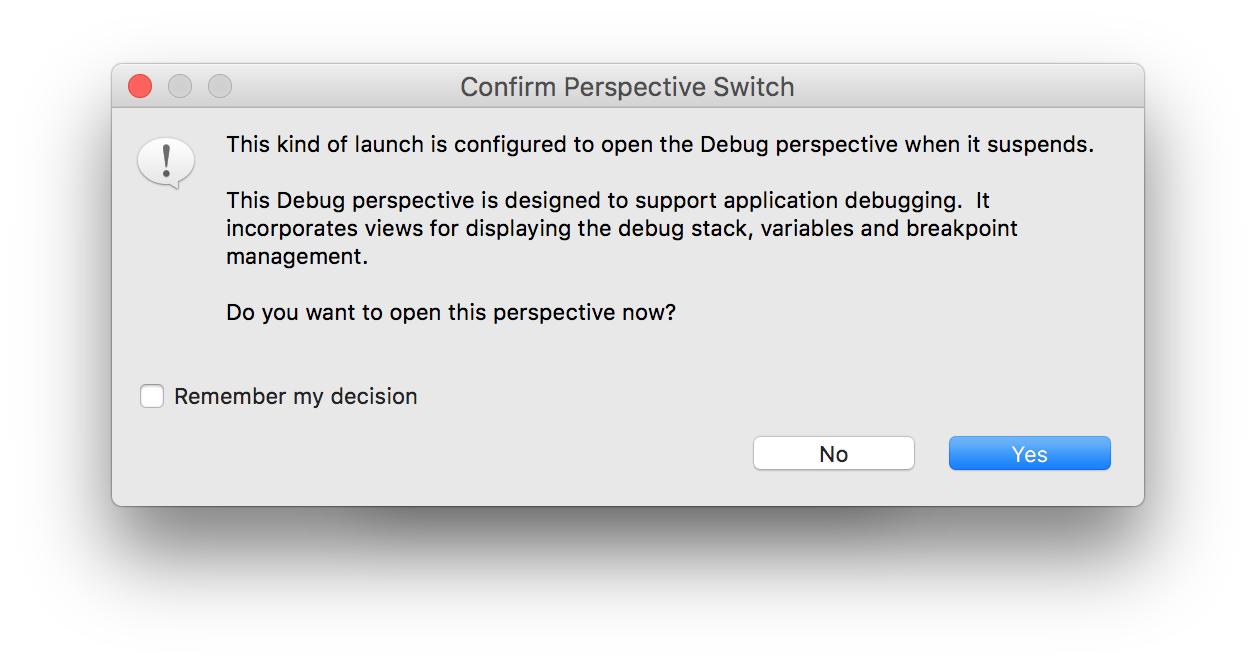
Now, run your program as normal using the "Running person" icons. When the program reaches a breakpoint, it will prompt you to enter debug mode; click "Yes".
-
Eclipse will now enter Debugger mode; it's a similar view to the "Editor" mode you are used to, but with some additional information that may help in the debugging process.
- RED: This is your program code, but you will see the line with the breakpoint highlighted in green. This tells you that Eclipse is running your program, and has paused before executing this line, waiting for further instructions from you.
- BLUE: This is called the "stack trace". This shows you where in your program you are currently paused (read from bottom to top), and why. The first few commands (such as the "Karel.main" and "Program.main" in the image above) are from your program being launched, and you can ignore them. The relevant lines start with YOUR_PROGRAM_NAME (e.g. BuggyRoomba in the image above). These lines show what methods have been executed to get to the current point. In this image, for instance, the program is paused in the run() method because of a breakpoint.
- PURPLE: This contains the debugger controls. You will learn about these in the next step.
-
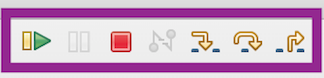
The debugger controls are, going from left to right:- "Resume" Button: resumes execution of the program (until it hits another breakpoint, finishes, etc.).
- "Suspend" Button: (Currently grayed out) Pauses the program as if it had hit a breakpoint.
- "Terminate" Button: stops execution of the program.
- "Disconnect" Button: (Currently grayed out) you can ignore this.
- "Step Into" Button: Tells the debugger to go to the first line within the method that was previously highlighted and await further instructions. This lets you "step into" a method and look further at its code. If you click this button, notice that a new entry appears at the top of the stack trace reflecting that you are going "down" a level into a method.
- "Step Over" Button: Tells the debugger to execute the currently highlighted line at the current level (does not go into the command like "Step Into"), and move to the next line. This is the option you will probably use most often.
- "Step Return" Button: Tells the debugger to finish executing the current method, and go back to the method that called this method.
-
Use these controls to execute commands step by step in order to better understand what your program is doing. When you are finished, remember to remove the breakpoints you have added by double-clicking on them. To switch back to the regular "Editor" mode, use the Stanford Menu.
If your Eclipse window does not look like the windows shown in the screenshots, please see the FAQ below. -
At some point while debugging, you might run into a view that looks like the following:
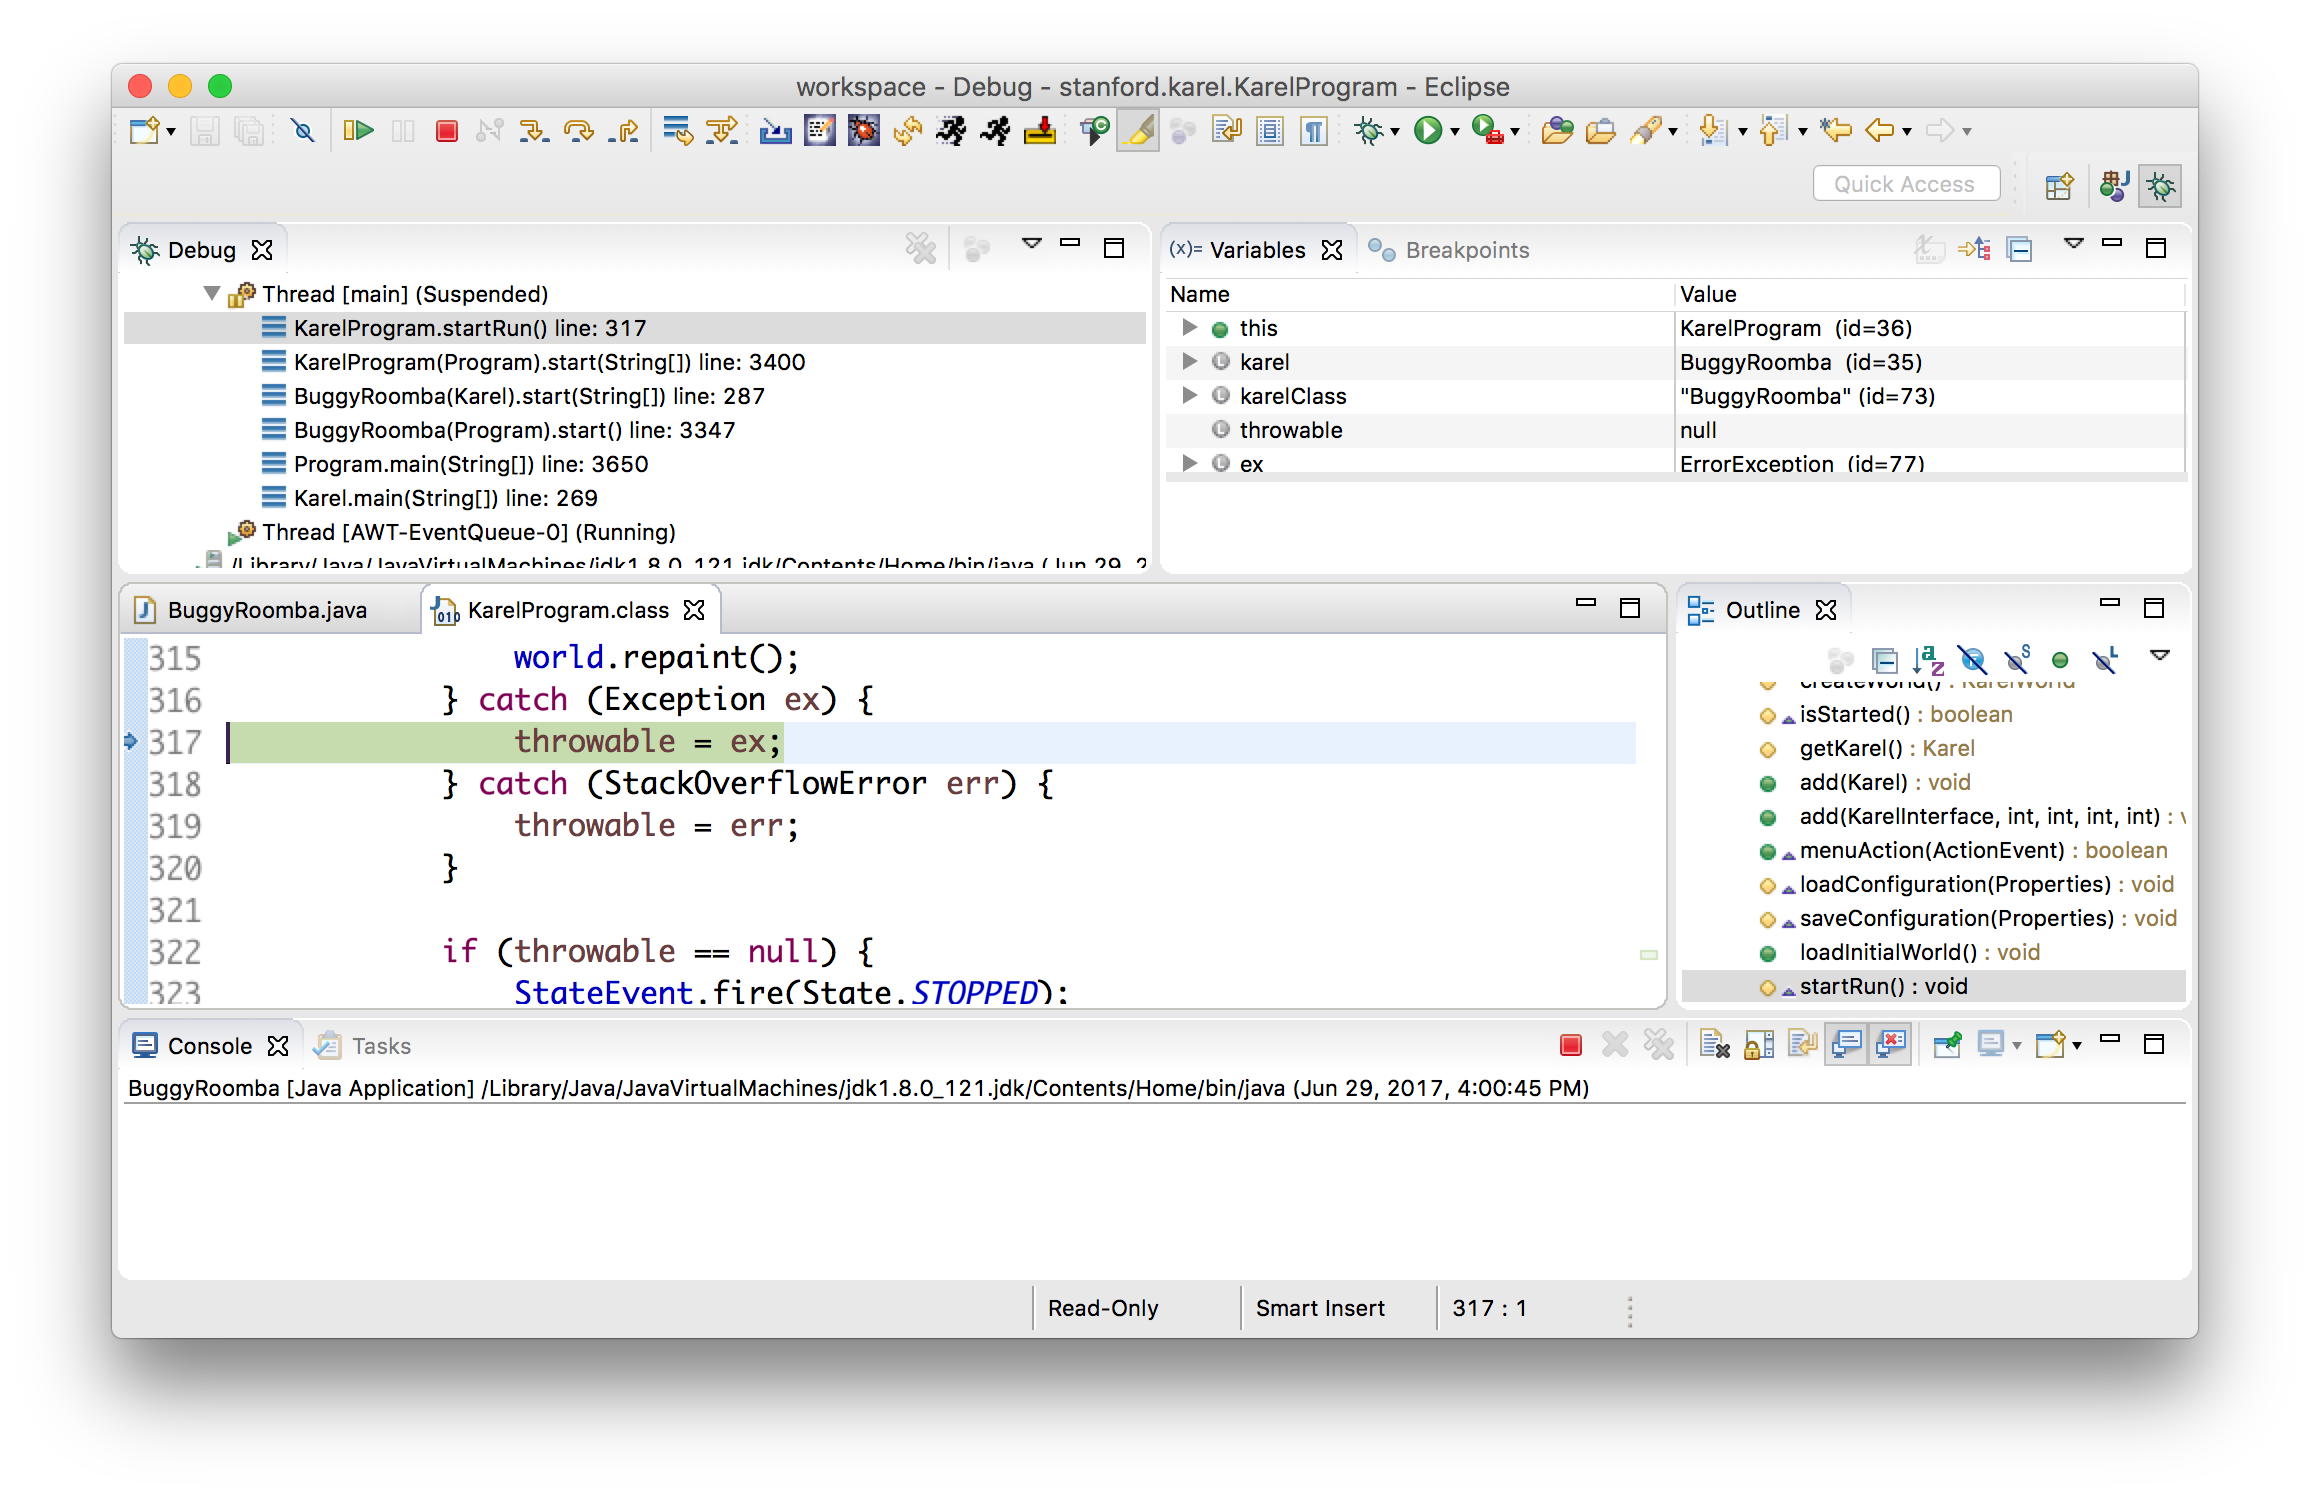
You'll notice that, in the stack trace, it now just says "Suspended"; this means that the program halted unexpectedly on its own, not because of a breakpoint. This happens when your program crashes. Eclipse also opens up the file KarelProgram.class, but you can close this tab, as it's not useful for anything. If you click the "Resume" button in the toolbar, you should see the Karel program pop up an error message with more information about the crash.


For a walkthrough of how to use these steps to debug a sample Karel program, see the "Debugging with Karel" handout in the "Handouts" dropdown in the navigation bar.
FAQ
- Q: Eclipse is showing an error in the Console "Could not save C++ lib configuration file". Do I need to worry about this?
- A: No. This error should not affect the running of your programs, and you can ignore it.
- Q: When trying to submit, after logging in with my SUNET ID and password, Eclipse is asking me for a "passcode". What is this?
- A: The submitter is asking for a two-step authentication passcode, as an additional form of security; please see the updated Eclipse submission instructions above.
- Q: I want to create another file/program within this project. How do I do this?
-
A:
- Right-click on "default package" within the
srcfolder, and go to New -> Class. -
In the "Name" field, enter the name for your new class (do not include ".java"). Click "Finish".
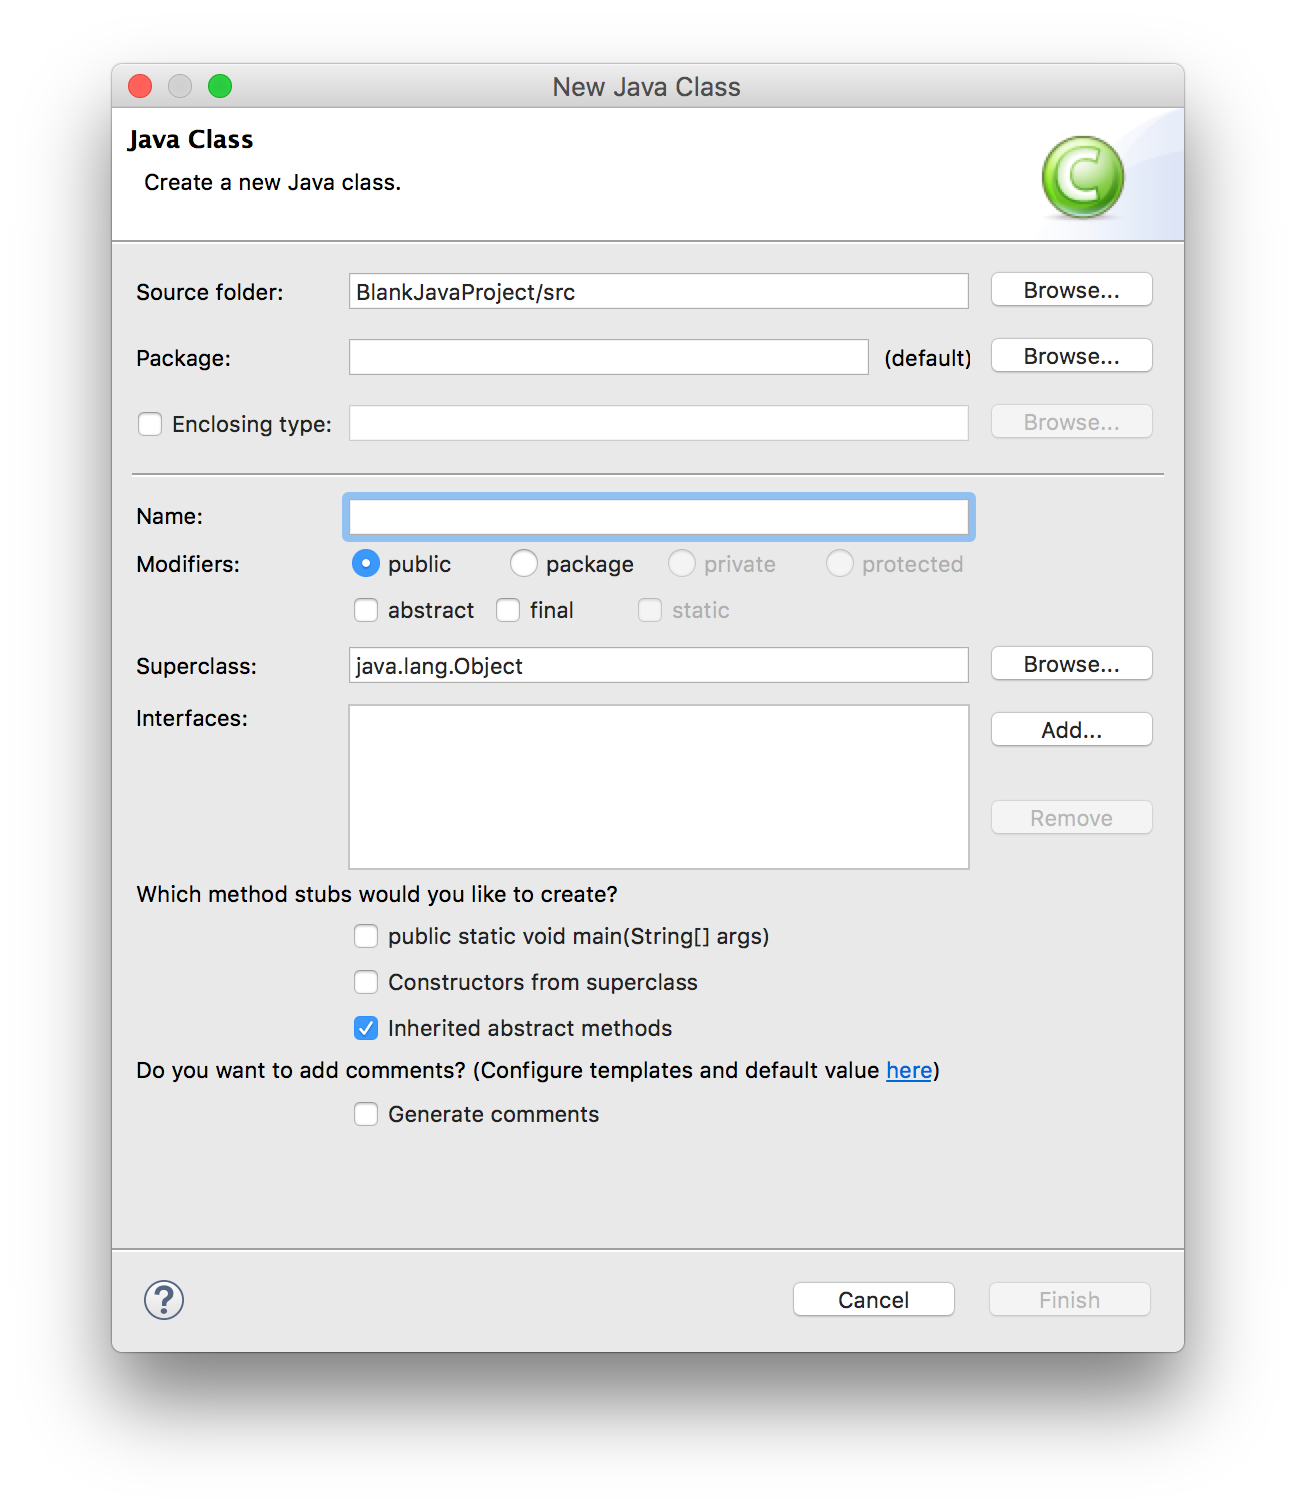
- This will create a new file in your project. Replace the code in that file with the code you would like to include.
- Right-click on "default package" within the
- Q: Help! I don't see the "running person", submit, import, etc. icons or the "Stanford Menu" in my Eclipse.
- A: This means the Stanford Plugin is not installed; please repeat steps 8 onwards in either the Mac or Windows installation instructions above.
- Q: My Eclipse window doesn't look like the ones in the screenshots or in lecture. I'm missing some of the panels (e.g. the sidebar showing all my projects). Help!
-
A: Click the "Reset" button in the Stanford Menu to reset to the default view.
You may also be in Debugger mode instead of Editor mode; use the Stanford Menu to go back to Editor mode.
-
Q: Help! Eclipse is not letting me import a project. It gives me a warning at the top that "Some projects cannot be imported".
-
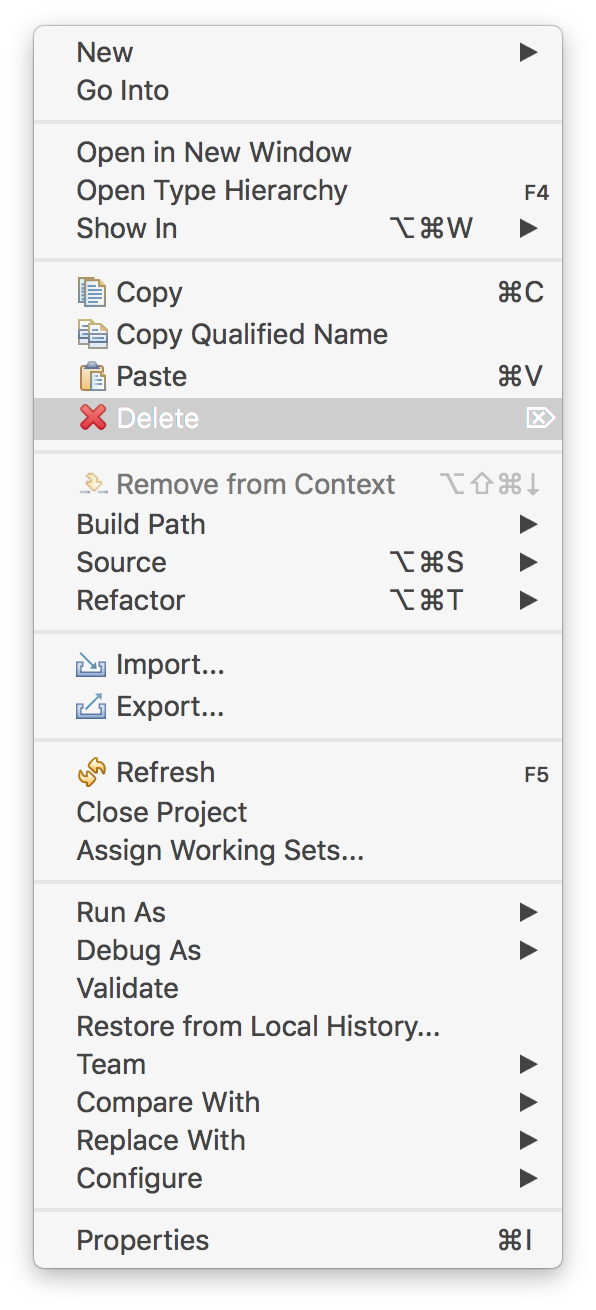
A: This is because a project with that name is already imported into Eclipse. If you would like to import this project, you must first delete the existing project by right-clicking the project in the sidebar and selecting "Delete". You can then choose whether to delete the project from your computer as well, or just delete the project from Eclipse.