QT Creator Mac
0. You can follow the instructions below starting with step "1.", or you can watch the video below and follow along (skip to step 5 to download the simple test program to test Qt).
1. Make sure your Mac OS X version is up-to-date
Before you do anything else, you'll need to update your operating system to OS X Mavericks (10.9) or later. This free update is necessary to ensure that all of the required tools install correctly. To install the update, visit the following link and click the top-right blue "Upgrade" button to upgrade your OS if needed.
If you are not sure whether you have the right version of OS X, click the top-left Apple menu and choose About this Mac... to find out.
2. Install and Run Xcode
Though we will use Qt Creator for our programs in CS 106B, Mac OS X requires you to install their Xcode system to get a C++ compiler on your machine. To install Xcode, visit https://developer.apple.com/xcode/ and click on the "View in Mac App Store" button. The app store will open, and you should download Xcode. Xcode is a large app, so the download and installation may take some time.

Once your Xcode has installed, you have to actually run the Xcode application one time in order to to install certain essential components. Open the newly downloaded Xcode application and accept the license agreement.

3. Download and install Qt Creator
Go to the Qt Creator installer download site to download this software. Choose Recommended download: Qt Online Installer for macOS and click the Download button at the bottom of the page. Your download will begin. Once you have downloaded the Qt Creator .dmg installer, double-click it to mount it and launch the enclosed installer application, which will install Qt Creator on your computer.
Click "Next" and "Skip" (to skip the Qt registration) and then "Continue." You can click "Continue" again to select the default installation location.
Important: During installation in the window that says "Select Components", click on the Qt triangle, then on the Qt 5.10.1 triangle, and then select "macOS" (see the image below). You may leave all the other options alone for the rest of the installation. Click "Continue" and then agree to the Terms and Conditions. Finally, click "Install".


4. Update Qt file
Before opening your first program, open a terminal (Type Cmd-Spacebar and then type “Terminal” to open), and paste the following line, exactly:
for FILE in `ls -1b ~/Qt*/*/clang_64/mkspecs/features/mac/default_pre.prf`; do sed -i.bu 's/xcrun -find xcrun/xcrun -find xcodebuild/g' $FILE; done
Once you paste that line, close the Terminal window, and open Qt Creator. The error the students might get looks like this if they try and open a file without the above command is as follows:
Project ERROR: Xcode not set up properly. You may need to confirm the license agreement by running /usr/bin/xcodebuild.
Error while parsing file /Users/chrisgregg/Downloads/simple-project/simple-project.pro. Giving up.
Project ERROR: Xcode not set up properly. You may need to confirm the license agreement by running /usr/bin/xcodebuild.
Error while parsing file /Users/chrisgregg/Downloads/simple-project/simple-project.pro. Giving up.
5. Try to compile/run a sample project
You can now open up Qt Creator using Spotlight (the magnifying glass at the top right of your screen) and typing in "Qt Creator".
Let's make sure that all the parts are working together properly by building and running a sample Qt Creator project that uses the Stanford C++ libraries. The Stanford C++ libraries also interact with Java, so if this project runs properly for you, then you will be sure that your Qt Creator and Java JDK are both set up properly. Here's what to do:
-
Download the following project ZIP file to your computer.
-
 simple-project.zip (linked fixed 09/21 10:30pm; sorry!)
-
- Un-zip the file's contents to a directory of your choice. You should have a directory named SampleProject with several files and folders inside.
- Open the project. In Qt Creator, choose "File" → "Open File or Project..." or press Ctrl+O (or Command+O on Mac). Navigate to the SampleProject folder and open the file SampleProject.pro.
-
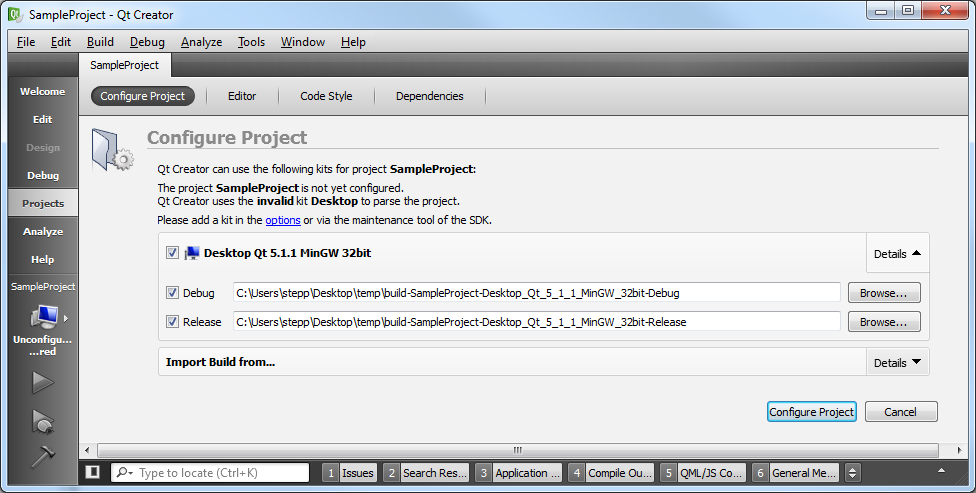
Qt Creator will ask you a few questions about how to set up the build process for this project.
You can just accept the defaults and click "Configure Project".
- Build it. Now you should be able to Build (Ctrl+B or Command+B) your project in Qt Creator. If it builds properly, your C++ compiler and the Stanford C++ libraries are at least compiling properly.
-
Run it.
Now that it's built, you should be able to Run (Ctrl+R or Command+R) your SampleProject.
This is the part where Java is needed, so if your Java isn't properly installed, this is probably where it will fail.
If it runs properly, you will see a window appear with a smiley face.
Congratulations, you're done!
Now your machine should work just fine for working on our homework assignments.


If you encounter any problems during your attempt to compile and run the sample project, check out our Qt Creator troubleshooting page. Otherwise, congratulations; you're done!