Due Friday, March 10 at 1:00 pm
Each student begins with four late days that may be used throughout the quarter. You may submit this assignment 24 hours late by using one late day or 48 hours late using two late days. No submissions will be accepted more than 48 hours after the due date without prior approval by the head TA. See the syllabus for more information about our late policies.
All due dates and submission times are expressed in Pacific time.
You are permitted to work on this assignment in pairs.
Linked structures are a fundamentally different way of encoding sequences than the array-based approaches you worked with on Assignment 5 and Assignment 6. This assignment is all about manipulating, traversing, and exploring linked structures. It’s a three-parter. The first part is a hybrid coding/debugging exercise where you’ll work the debugger to escape from a maze. The second part is a warm-up exercise intended to get you playing around with doubly-linked lists. The third part is a coding exercise in which you’ll use linked lists to build a system that can be used to make nifty 2D graphics.
You know the drill – make consistent, slow, steady progress on this assignment rather than doing everything at the last minute. Here’s our recommended timeline:
- Aim to complete The Labyrinth! within two days of this assignment going out.
- Aim to complete Doubly-Linked List Warmup within two days of this assignment going out.
- Aim to complete Particle Systems within seven days of this assignment going out.
Assignment Logistics
Starter Files
We provide a ZIP of the starter project. Download the zip, extract the files, and double-click the .pro file to open the project in Qt Creator.
Getting Help
Keep an eye on the Ed forum for an announcement of the Assignment 7 YEAH (YEAH = Your Early Assignment Help) group session where our veteran section leaders will answer your questions and share pro tips. We know it can be daunting to sit down and break the barrier of starting on a substantial programming assignment – come to YEAH for advice and confidence to get you on your way!
We also here to help if you get run into issues along the way! The Ed forum is open 24/7 for general discussion about the assignment, lecture topics, the C++ language, using Qt, and more. Always start by searching first to see if your question has already been asked and answered before making a new post.
To troubleshoot a problem with your specific code, your best bet is to bring it to the LaIR helper hours or office hours.
Part One: The Labyrinth!
You have been trapped in a labyrinth, and your only hope to escape is to cast the magic spell that will free you from its walls. To do so, you will need to explore the labyrinth to find three magical items:
- The Spellbook (📕), which contains the spell you need to cast to escape.
- The Potion (⚗), containing the arcane compounds that power the spell.
- The Wand (⚚), which concentrates your focus to make the spell work.
Once you have all three items, you can cast the spell to escape to safety.
This is, of course, no ordinary maze. It’s a pointer maze. The maze consists of a collection of objects of type MazeCell, where MazeCell is defined here:
 struct MazeCell {
    Item whatsHere;  // Item present, if any.
    MazeCell* north; // The cell north of us, or nullptr if we can't go north.
    MazeCell* south;
    MazeCell* east;
    MazeCell* west;
};
Here, Item is this enumerated type:
enum class Item {
    NOTHING, SPELLBOOK, POTION, WAND
};
For example, here is a 4 × 4 labyrinth.
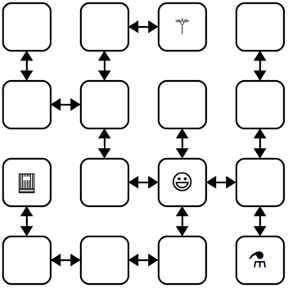
We’ve marked your starting position with a smiley face and the positions of of the three items with similarly cute emojis. The MazeCell you begin at would have its north, south, east, and west pointers pointing at the MazeCell objects located one step in each of those directions from you. On the other hand, the MazeCell containing the book would have its north, east, and west pointers set to nullptr, and only its south pointer would point somewhere (specifically, to the cell in the bottom-left corner).
Each MazeCell has a variable named whatsHere that indicates what item, if any, is at that position. Empty cells will have whatsHere set to the Item::NOTHING. The cells containing the Spellbook, Potion, or Wand will have those fields set to Item::SPELLBOOK, Item::POTION, or Item::WAND, respectively.
If you were to find yourself in this labyrinth, you could walk around a bit to find the items you need to cast the escape spell. There are many paths you can take; here’s three of them:
ESNWWNNEWSSESWWN
SWWNSEENWNNEWSSEES
WNNEWSSESWWNSEENES
Each path is represented as a sequence of letters (N for north, W for west, etc.) that, when followed from left to right, trace out the directions you’d follow. For example, the first sequence represents going east, then south (getting the Potion), then north, then west, etc. Trace though those paths and make sure you see how they pick up all three items.
There are three milestones to this problem. The first one is a coding problem, and the second two are debugger exercises. We strongly recommend completing them in the order in which they appear, as they build on top of one another.
Milestone One: Check Paths to Freedom
Your first task is to write a function that, given your starting position in the maze and a path, checks whether that path is legal and picks up all three items. Specifically, in the file Labyrinth.cpp, implement the function
bool isPathToFreedom(MazeCell* startLocation, const string& path);
This function takes as input your starting location in the maze and a string made purely from the characters 'N', 'S', 'E', and 'W', then returns whether that path lets you escape from the maze.
A path lets you escape the maze if (1) the path is legal, in the sense that it never takes a step that isn’t permitted in the current MazeCell, and (2) the path picks up the Spellbook, Wand, and Potion. The order in which those items are picked up is irrelevant, and it’s okay if the path continues onward after picking all the items up.
You can assume that startLocation is not a null pointer (you do indeed begin somewhere) and that the input string does not contain any characters besides 'N', 'S', 'E', and 'W' and do not need to handle the case where this isn’t true.
To summarize, here’s what you need to do.
isPathToFreedom Requirements
-
Implement the
isPathToFreedomfunction inLabyrinth.cpp. -
Test your code thoroughly using our provided tests. (If you’d like to write tests of your own, you’re welcome to do so, though it’s not required here.)
Some notes on this problem:
-
Your code should work for a
MazeCellfrom any possible maze, not just the one shown as an example above. -
Although in the previous picture the maze was structured so that if there was a link from one cell to another going north there would always be a link from the second cell back to the first going south (and the same for east/west links), you should not assume this is the case in this function. Then again, chances are you wouldn’t need to assume this.
-
A path might visit the same location multiple times, including possibly visiting locations with items in them multiple times.
-
You shouldn’t need to allocate any new
MazeCellobjects in the course of solving this problem. Feel free to declare variables of typeMazeCell*, but don’t use thenewkeyword. After all, your job is to check a path in an existing maze, not to make a new maze. -
Feel free to implement this function either iteratively or recursively, whichever seems best to you. You don’t need to worry about stack overflows here; we’ll never run your code on anything large enough to run out of stack space.
-
Your code should not modify the maze passed into the function. In particular, you should not change which items appear where or where the links point.
-
An edge case you should handle: it is okay to find the three items and then continue to walk around the maze. However, if the path both (1) finds all three items and (2) tries making an illegal step, then your function should return false.
Milestone Two: Escape from Your Personal Labyrinth
Your next task is to escape from a labyrinth that’s specifically constructed for you (and your partner, if you’re working in a pair). The starter code we’ve provided will use your name(s) to build you a personalized labyrinth. By “personalized,” we mean “no one else in the course is going to have the exact same labyrinth as you.” Your job is to figure out a path through that labyrinth that picks up all the three items, allowing you to escape.
Open the file LabyrinthEscape.cpp and you’ll see three constants. The first one, MyName, is a spot for your name (or your name and your partner’s name, if you’re working in a pair). Right now, it’s marked with a TODO message. Edit this constant so that it contains your name(s).
Scroll down to the first test case in LabyrinthEscape.cpp. This test case generates a personalized labyrinth based on the MyName constant and returns a pointer to one of the cells in that maze. It then checks whether the constant ThePathOutOfMyMaze is a sequence that will let you escape from the maze. Right now, ThePathOutOfMyMaze is a TODO message, so it’s not going to let you escape from the labyrinth. You’ll need to edit this string with the escape sequence once you find it.
To come up with a path out of the labyrinth, use the debugger! Set a breakpoint at the indicated line in the first test case. Launch the demo app with the debugger enabled. When you do, you should see the local variables window pop up, along with the contents of startLocation, which is the MazeCell where we’ve dropped you into the labyrinth. Clicking the dropdown triangle in the debugger window will let you read the contents of the whatsHere field of startLocation (it’ll be Item::NOTHING), as well as the four pointers leading out of the cell.
Depending on your maze, you may find yourself in a position where you can move in all four cardinal directions, or you may find that you can only move in some of them. The pointers in directions you can’t go are all equal to nullptr, which will show up as 0x0 in the debugger window. The pointers that indicate directions you can go will all have dropdown arrows near them. Clicking one of these arrows will show you the MazeCells reachable by moving in the indicated directions. You can navigate the maze further by choosing one of those dropdown arrows, or you could back up to the starting maze cell and explore in other directions. It’s really up to you!
Draw a lot of pictures. Grab a sheet of paper and map out the maze you’re in. There’s no guarantee where you begin in the maze – you could be in the upper-left corner, dead center, etc. The items are scattered randomly, and you’ll need to seek them out. Once you’ve mapped out the maze, construct an escape sequence and stash it in the constant ThePathOutOfMyMaze, then see if you pass the first test. If so, fantastic! You’ve escaped! If not, you have lots of options. You could step through your isPathToFreedom function to see if one of the letters you entered isn’t what you intended and accidentally tries to move in an illegal direction. Or perhaps the issue is that you misdrew your map and you’ve ended up somewhere without all the items. You could alternatively set the breakpoint at the test case again and walk through things a second time, seeing whether the picture of the maze you drew was incorrect.
To summarize, here’s what you need to do:
Labyrinth Escape Requirements
-
Edit the constant
MyNameat the top ofLabyrinthEscape.cppwith a string containing your name and your partner’s name if you’re working in a group. Don’t skip this step! If you forget to do this, you’ll be solving the wrong maze! -
Set a breakpoint at the indicated line in the first test case in
LabyrinthEscape.cpp, run the program in debug mode, and choose “Run Tests” to activate the breakpoint. -
Map out the maze on a sheet of paper and find where all the items are. Once you’re done, stop the running program.
-
Find a path that picks up all three items and edit the constant
ThePathOutOfMyMazeat the top ofLabyrinthEscape.cppwith that path. Run the test a second time with the debugger turned off to confirm you’ve escaped.
Milestone Three: Escape from Your Personal Twisty Labyrinth
Now, let’s make things a bit more interesting. In the previous section, you escaped from a labyrinth that nicely obeyed the laws of geometry. The locations you visited formed a nice grid, any time you went north you could then go back south, etc.
In this section, we’re going to relax these constraints, and you’ll need to find your way out of trickier mazes that look like this one:
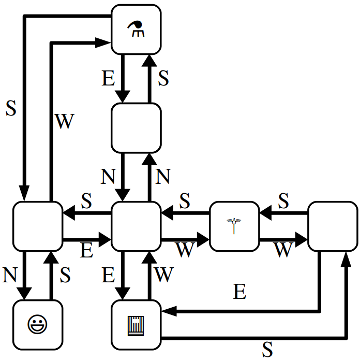
This maze is stranger than the previous one you explored. For example, you’ll notice that these MazeCells are no longer in a nice rectangular grid where directions of motion correspond to the natural cardinal directions. There’s a MazeCell here where moving north and then north again will take you back where you started. In one spot, if you move west, you have to move south to return to where you used to be. In that sense, the names “north,” “south,” “east,” and “west” here no longer have any nice geometric meaning; they’re just the names of four possible exits from one MazeCell into another.
The one guarantee you do have is that if you move from one MazeCell to a second, there will always be a direct link from the second cell back to the first. It just might be along a direction of travel that has no relation to any of the directions you’ve taken so far.
The second test case in LabyrinthEscape.cpp contains code that generates a twisty labyrinth personalized with the MyName constant. As before, you’ll need to find a sequence of steps that will let you collect the three items you need to escape.
In many regards, the way to complete this section is similar to the way to complete the previous one. Set a breakpoint in the indicated spot in the second test case and use the debugger to explore the maze. Unlike the previous section, though, in this case you can’t rely on your intuition for what the geometry of the maze will look like. For example, suppose your starting location allows you to go north. You might find yourself in a cell where you can then move either east or west. One of those directions will take you back where you started, but how would you know which one?
This is where memory addresses come in. Internally, each object in C++ has a memory address associated with it. Memory addresses typically are written out in the form @0xsomething, where "something" is the address of the object. You can think of memory addresses as sort of being like an “ID number” for an object – each object has a unique address, with no two objects having the same address. When you pull up the debugger view of a maze cell, you should see the MazeCell memory address under the Value column.
For example, suppose that you’re in a maze and your starting location has address 0x7fffc8003740 (the actual number you see will vary based on your OS), and you can move to the south (which ways you can go are personalized to you based on your name, so you may have some other direction to move). If you expand out the dropdown for the south pointer, you’ll find yourself at some other MazeCell. One of the links out of that cell takes you back where you’ve started, and it’ll be labeled 0x7fffc8003740. Moving in that direction might not be productive – it just takes you back where you came from – so you’d probably want to explore other directions to search the maze.
It’s going to be hard to escape from your maze unless you draw lots of pictures to map out your surroundings. To trace out the maze that you’ll be exploring, we recommend diagramming it on a sheet of paper as follows. For each MazeCell, draw a circle labeled with the memory address, or, at least the last five characters of that memory address. (Usually, that’s sufficient to identify which object you’re looking at). As you explore, add arrows between those circles labeled with which direction those arrows correspond to. What you have should look like the picture above, except that each circle will be annotated with a memory address. It’ll take some time and patience, but with not too much effort you should be able to scout out the full maze. Then, as before, find an escape sequence from the maze!
To recap, here's what you need to do:
Twisty Labyrinth Escape Requirements
-
Set a breakpoint at the indicated line in the second test case in
LabyrinthEscape.cpp, run the demo app in debug mode and choose “Run Tests” to activate the breakpoint. -
Map out the twisty maze on a sheet of paper and find where all the items are and how the cells link to each other. Once you’re done, stop the running program.
-
Find an escape sequence, and edit the constant
ThePathOutOfMyTwistyMazeat the top ofLabyrinthEscape.cppwith that constant. Run the tests again – this time without the breakpoint – and see if you’ve managed to escape!
Some notes on this problem:
-
The memory addresses of objects are not guaranteed to be consistent across runs of the program. This means that if you map out your maze, stop the running program, and then start the program back up again, you are not guaranteed that the addresses of the
MazeCells in the maze will be the same. The shape of the maze is guaranteed to be the same, though. If you do close your program and then need to explore the maze again, you may need to relabel your circles as you go, but you won’t be drawing a different set of circles or changing where the arrows link. -
You are guaranteed that if you follow a link from one
MazeCellto another, there will always be a link from that secondMazeCellback to the first, though the particular directions of those links might be completely arbitrary. That is, you’ll never get “trapped” somewhere where you can move one direction but not back where you started. -
Attention to detail is key here – different
MazeCellobjects will always have different addresses, but those addresses might be really similar to one another. Make sure that as you’re drawing out your diagram of the maze, you don’t include duplicate copies of the sameMazeCell. -
The maze you’re exploring might contain loops or cases where there are multiple distinct paths between different locations. Keep this in mind as you’re exploring or you might find yourself going in circles!
-
Remember that you don’t necessarily need to map out the whole maze. You only need to explore enough of it to find the three items and form a path that picks all of them up.
At this point, you have a solid command of how to use the debugger to analyze linked structures. You know how to recognize a null pointer, how to manually follow links between objects, and how to reconstruct the full shape of the linked structure even when there’s bizarre and unpredicable cross-links between them. We hope you find these skills useful as you continue to write code that works on linked lists and other linked structures!
Part Two: Doubly-Linked List Warmup
A common variant on the traditional linked list is the doubly-linked list. Unlike a traditional linked list, in a doubly-linked list each cell contains a pointer both to the cell that comes after it in the sequence and a pointer to the cell that comes before it in the sequence. This is shown here:
struct Cell {
    string value; // Or whatever type of data you'd like, really
    Cell*  next;  // Pointer to the next cell in the list
    Cell*  prev;  // Pointer to the previous cell in the list
};
Here's how we might draw a doubly-linked list:

The mechanics for working with doubly-linked lists are, in many ways, similar to those for working with singly-linked lists. There's a distinction between pointers to cells and cells themselves. We form sequences by wiring cells together, as before, though we have to do a bit more bookkeeping to keep track of the prev pointers in addition to the next pointers.
We'd like to give you some practice working with doubly-linked lists before you move on to the core of this assignment. Specifically, we'd like you to write these three functions:
int  lengthOf(Cell* list);
void freeDoublyLinkedList(Cell* list);
void prependTo(Cell*& list, const string& value);
The first of these takes in a pointer to the first cell in a doubly-linked list, then returns how many cells are in the list. You should implement this function iteratively, rather than recursively as we did in class. The second cleans up all memory used by the given doubly-linked list, and should also be implemented iteratively. The third function function prepends a new cell onto the front of a doubly-linked list. You saw how to do this with singly-linked lists in class, so this will largely be an exercise in adapting that code to work in a doubly-linked context.
Feel free to use lecture code as a reference. If you do, we strongly encourage you to reflect on what parts of the code you could use unmodified, which parts you needed to change, and why.
To summarize, here's what you need to do:
Part Two Requirements
-
Implement the
lengthOffunction inDoublyLinkedLists.cpp. Use the "Run Tests" button to confirm you're passing all the tests for that function. -
Implement the
freeDoublyLinkedListfunction inDoublyLinkedLists.cpp. Use the "Run Tests" button to confirm you're passing all the tests for that function. -
Implement the
prependTofunction inDoublyLinkedLists.cpp. Use the "Run Tests" button to confirm you're passing all the tests for that function.
Some notes on this problem:
-
All three of these functions assume that the pointer provided is a pointer to the first cell in the linked list (or
nullptrif the list has no cells). You do not need to handle the case where you're given a pointer into the middle of the list. -
You don't need to write your own tests for this section, but you may find it useful to do so.
-
Draw pictures! You don't need to write much code here, but it'll be very important to make sure you know what code you need to write.
-
See the section problems for Week Seven for more information on doubly-linked lists.
Part Three: Particle Systems
Many computer-generated visual effects - whether in blockbuster Hollywood movies or in video games - make use of particle systems. As the name suggests, a particle system is a system that consists of individual units called particles. Those particles can have attributes like position, color, velocity, etc., and by maintaining systems consisting of hundreds or thousands of particles it's possible to build some beautiful effects from simple pieces.
In this part of the assignment, you'll implement a simple 2D particle system that can be used to create a variety of aesthetically-pleasing scenes. As a preview of where you're going, here are two of those scenes: a fireworks show, and a water fountain:
 |
 |
Each of these scenes consist of some number of particles. Those are the colorful objects moving around the screen. The particle system is the overall system responsible for maintaining those particles, updating their positions in space, etc.
Your overall goal is to implement the following class:
class ParticleSystem {
public:
    ParticleSystem();
    ~ParticleSystem();

    void add(const Particle& particle);
    int numParticles() const;
    void drawParticles() const;
    void moveParticles();

private:
    // Described later
};
Let's walk through how this works. You're familiar with constructors and destructors and can probably guess what the top two functions do: ParticleSystem() creates a new, empty particle system. ~ParticleSystem() cleans up all memory allocated by the particle system.
The next four functions are where the magic happens. The add function adds a new particle to the scene. It takes as input a Particle object, which contains information about the particle (where it is in space, which color it is, etc.). We'll describe the Particle type in more detail later on. The next function is numParticles, which says how many particles there are in the system. The drawParticles function, as the name suggests, actually draws the particles on the screen so that the user can see them in all their particular glory. Finally, there's moveParticles, which moves all of the particles a tiny bit in space. How those particles move depends on what kind of particles you're dealing with, and that's described later.
Rather than sharing the remaining details all at once, we'll incrementally introduce the different components of the system. We've broken this project down into several milestones so that you can slowly add features in one at a time.
Milestone One: Implement Core Functions
Your first task is to implement basic functionality for the ParticleSystem type. Specifically, you'll implement the constructor, destructor, add, and numParticles functions.
To provide sufficient context to work through this milestone, let's talk a bit more about the types referenced above. You may have noticed that the ParticleSystem::add function takes as input an object of type Particle, so let's start there. Each particle has some information associated with it. That information is stored in the Particle struct type defined in "Particle.h". Here's what that looks like:
struct Particle {
    double x, y;   // Position
    Color color;   // Color

    /* ... four other fields we'll describe later. ... */
};
Let's walk through what these fields mean. The x and y data members tell you where in space the particle is. The coordinate system we use here is the same as for the Grid type: the upper-left corner of the scene is at (0, 0), with $x$ increasing from left to right and $y$ increasing from top to bottom. The color field, unsurprisingly, tells you what color the particle is.
When a client of ParticleSystem calls add, the particle they provide needs to be stored somewhere internally inside the ParticleSystem. To see how, let's look at the private section of the ParticleSystem type, which is shown here:
private:
    struct ParticleCell {
        Particle particle;
        ParticleCell* next;
        ParticleCell* prev;
    };
    ParticleCell* head;
The ParticleCell type represents a doubly-linked list cell that contains information about a particle. The particle field represents the actual particle. The two pointers next and prev represent pointers to the next and previous particles in the scene, respectively.
There are three types with Particle in their name. Here's how to tell them apart:
- The
Particletype represents an actual particle in 2D space. - The
ParticleSystemtype is what you're implementing. It manages a collection of particles in a linked list. - The
ParticleCelltype is used to make a linked list of particles. EachParticleCellholds aParticleand links to the cell before and after it.
Inside the ParticleSystem type, the actual linked list of particle cells is pointed at by the head data member. This should initially be set to nullptr if there are no particles, and otherwise should point to the first particle in the list.
Whenever you add a new particle to the system by calling add, that particle should be inserted at the back of the doubly-linked list. (There's a good reason for this that we'll describe later.) Your implementation of add should run in time $O(1)\text,$ though, which means that you'll need to find a good way to track where the end of the list is so that you can jump there without having to scan the entire list.
Finally, let's talk about the numParticles function. This function should return how many total particles are in the list. However, it must run in time $O(1)\text,$ meaning that the runtime of the function should be independent of the number of particles in the list. This may require you to do some extra bookkeeping somewhere.
To hit the time bounds for add and numParticles, you will need to add your own member variables to the private section of the ParticleSystem class. Our test cases aren't programmed to look at the values of those variables. You will therefore need to write at least one custom test case, and possibly more, to make sure that those values are correct.
With that all being said, let's summarize what you need to do:
Milestone One Requirements
-
Implement the constructor and destructor for the
ParticleSystemtype. These should initialize a new particle system with no particles in it and clean up all the particles in the system, respectively. -
Implement the
addfunction. This function takes as input aParticleobject, then creates a newParticleCelland wires it onto the back of the linked list. This function needs to run in time $O(1)\text.$ -
Implement the
numParticlesfunction. This function returns the number of particles in the system, and should do so in time $O(1)\text.$ -
Add at least one - and possibly multiple - custom test cases. We recommend having those test cases check that the values of any member variables you introduce are correct.
-
Click the "Run Tests" option from the top-level menu to confirm that everything is working well for this milestone.
Some notes on this problem:
-
In this part of the assignment - and more generally, throughout this assignment - you must not use any container types (e.g.
Vector,string,Map,Set, etc.) and you must do all your own memory management. After all, the purpose of this assignment is to help you get accustomed to working with linked lists, which necessitates thinking about data storage in a different way. -
Draw pictures! You don't need to write much code here, but the code you write will require a good deal of attention to detail about which objects link to which.
-
You are welcome to add as many helper functions as you'd like to the
ParticleSystemclass. -
You will need to use a mix of the arrow (
->) and dot (.) operators in this part of the assignment. Here's how to tell them apart. If you are working with a pointer to an object, you must use the->operator to select items out of the object being pointed at (this is why we seelist->nextin the context of linked lists). If you have a concrete, honest-to-goodness object and want to select a field out of it, you must use the.operator (hencemySet.containswhen working with aSet).
Milestone Two: Draw Particles
You now have a rough outline of a particle system, but right now there's no way for anyone to see the particles you're storing. How sad - you've painted your masterpiece and then hidden it from the world! Let's rectify this.
Your next task is to implement the ParticleSystem::drawParticles function. As the name suggests, this function should draw all the particles that are in the system. You should draw them in the order in which they're stored in the particle system, so older particles (toward the front of the list) should be drawn before newer particles (toward the end of the list).
We've provided you with the handy function
void drawParticle(double x, double y, Color color);
that takes as input an $x$ and $y$ coordinate and a color, the draws a particle of the given color on the screen at that location. This function is defined in the header "DrawParticle.h", which you'll need to #include at the top of ParticleSystem.cpp to use.
To recap, here's what you need to do:
Milestone Two Requirements
-
Implement the
ParticleSystem::drawParticlesfunction, which draws all the particles in the system in the order they're stored. -
Run our provided test cases to confirm that everything is working just fine. (You don't need to write any test cases for this milestone.)
Some notes on this problem:
-
You should implement this function iteratively rather than recursively, since when dealing with large particle systems there might not be enough stack space to recursively walk over all the particles.
-
Our provided test cases make use of a custom type called
ParticleCatcher. This is an object that intercepts calls todrawParticleso that instead of drawing the particles on the screen, the particles get written down for later inspection. We'll use this type more extensively in the later parts of this assignment as a way of checking that you've got all the particles in the right place.
Milestone Three: Move Particles
Your next task is to implement the ParticleSystem::moveParticles function, which moves all the particles in the system by a small amount. In order to do so, we're going to need to expose a bit more information about the Particle struct. In addition to the x, y, and color fields you've seen thus far, the Particle type has these others:
struct Particle {
    double x, y;   // Position
    Color color;   // Color

    double dx, dy; // Velocity

    /* ... two other fields we'll describe later. ... */
};
The dx and dy variables represent the velocity of the particle. Each time you call the ParticleSystem's function moveParticles, each particle's x and y fields are increased by the value of its dx and dy values, respectively. So, for example, if a particle has dx = 0 and dy = 1, then each time moveParticles is called the particle's x field will be unchanged and the particle's y field will increase by 1. This has the next effect of moving the particle down a little bit: its x position remains the same while its y position gets closer to the bottom of the screen. On the other hand, if a particle has dx = 3 and dy = -4, then whenever moveParticles is called that particle's x coordinate will be increased by 3 and its y coordinate will be decreased by 4. This has the effect of moving the particle up and to the right. Finally, it's entirely possible that a particle has dx and dy set to zero, in which case it doesn't move.
Note that in this process the values of dx and dy for each particle don't change. Later on we'll revisit this and make it possible for particles to have changing velocities - but you don't need to worry about that now.
When you create a particle with add, the Particle struct you are provided will include a dx and dy, which you should store inside your ParticleSystem. Depending on how you wrote add, you may or may not need to edit add to make this happen. You'll then use the dx and dy values of each particle to move that particle in the moveParticles function.
Once you've done this, run our tests to confirm that everything is working correctly.
Here's a summary of what you need to do:
Milestone Three Requirements
-
Ensure that
ParticleSystem::addcorrectly stores thedxanddyinformation for the provided particle. Depending on how you implementedParticleSystem::add, this might not require you to write any new code. -
Implement the
ParticleSystem::moveParticlesfunction. This function should move all the particles in the system by the amount specified in theirdxanddyfields. -
Use "Run Tests" to confirm that you're passing all of our provided tests.
Some notes on this problem:
-
By default, if an
EXPECT_EQUALfails when comparing two real numbers, it will suffix the letterdto those numbers to indicate that they'redoubles. Don't be surprised if a test case says that, say, one particle'sxcoordinate is0dor100d, for example. Just treat those as if they're0and100, respectively, but that they'redoubles. -
As with
drawParticles, don't implement this one recursively. Iteration is your friend! -
The velocity of a particle can be arbitrarily large or small, and you shouldn't make any assumptions about the sign or magnitude of
dxanddy. -
Each particle has its own velocity, which is independent of the velocities of all other particles.
-
In case you want to use helper functions here, remember that C++ has quirky syntax for helper functions that return types nested inside a class. For example, if you have a helper function in your
ParticleSystemthat returns aParticleCell*, when writing out the return type in the.cppfile you'd need to refer to it asParticleSystem::ParticleCell*. See the note about this in Assignment 6 for more details.
Milestone Four: Cull Particles
So far, your particle system only has a mechanism for adding particles, and there's no way for particles to be removed. However, particles don't live forever. Specifically, there are two circumstances where particles can be removed.
First, you should remove a particle if that particle goes out of bounds. To make sure we aren't tracking particles that can't appear on the screen, when a particle is no longer on-screen, you should remove it. Specifically, a particle is considered off screen if its $x$ or $y$ coordinate is less than 0, if its $x$ coordinate is greater than or equal to the special constant SCENE_WIDTH, or if its $y$ coordinate is greater than or equal to the special constant SCENE_HEIGHT.
Second, you should remove a particle if that particle's lifetime ends. Inside of the Particle struct is an int called lifetime, as shown here:
struct Particle {
    double x, y;   // Position
    Color color;   // Color

    double dx, dy; // Velocity

    int lifetime;  // How much longer the particle lives

    /* ... one final field we'll describe later. ... */
};
Here's how lifetime works. Each time a particle moves, its lifetime decreases by one. As soon as a particle's lifetime is negative (that is, not zero, and not positive), the particle ceases to exist. If a particle has a large lifetime, it will move for a very long time before disappearing (unless it goes out of bounds). If a particle has a small lifetime, it will only move a few times before disappearing. A particle's lifetime is initially specified by the value of the Particle passed into the add function based on the needs of whoever is using the particle system.
There are two places you need to check for particles that need to be removed, First, when moveParticles is called, a particle could either move offscreen or have its lifetime run out. In that case, as soon as your call to moveParticles realizes this, it should remove the particle. Second, it's possible that the particle's position was never onscreen to begin with when it was added in add, and similarly a particle might initially have a negative lifetime when add was called. Either way, your add function shouldn't add these particles in the first place.
You will need to make some edits to your code in order to support this functionality. The trickiest bit will be in your moveParticles code. Remember that rule is that as soon as a particle needs to be removed, you should remove it. This means that you should just have one loop in your moveParticles function, which will loop over the particles, moving each particle and adjusting lifetimes, and immediately removing particles that are out of bounds or whose lifetimes end. You will need to be careful when doing this. In particular, you'll be removing particles from the doubly-linked list at the same time that you're iterating over that list. Pay close attention to how you advance from one particle to the next to make sure that you don't try looking at a ParticleCell that's been deleted, that you don't skip over particles, etc. Draw lots of pictures as you do this; it will make it a lot easier to see what you need to do here.
This property of particle systems - that arbitrary particles might need to be removed from the system - is the reason why we're storing particles in a linked list. If we used, say, a regular dynamic array, then the cost of removing a single particle would be $O(n)$ in the worst case, since we'd need to shift all the other particles back a spot. On the other hand, using a linked list allows us to remove a particle in time $O(1)$ by just splicing it out of the list.
To recap, here's what you need to do:
Milestone Four Requirements:
-
Update your code for
addto ensure that you store particle lifetimes for later, that you don't add particles that are offscreen, and that you don't add particles with negative lifetimes. -
Update your code for
moveParticlesto adjust lifetimes and remove particles whose lifetime becomes negative or that have moved offscreen. Remember that you must remove particles as soon as you discover that they need to be removed. -
Test your code thoroughly using the "Run Tests" option.
Some notes on this part of the assignment:
-
Draw pictures! The linked list manipulations required here are not exceedingly complex, but they aren't trivial either. Having a diagram of what pointers point to which cells will help you better understand what you need to do - and debug things if something goes wrong.
-
If your code crashes, run the program with the debugger enabled. You don't need to set any breakpoints to do this - just run the program until it crashes and the debugger will pause the program at the exact spot where the crash occurs. Then, use the skills you developed in the labyrinth escape: draw out the linked list nodes in memory, see what links where, and try isolating the root cause of the crash.
-
Removing a particle will require you to update the doubly-linked list of
ParticleCells so that the cell is no longer present in the list. You will also have todeletethe memory used by theParticleCellthat you no longer need. These are two separate steps. -
Reiterating a point from above: iterating over a list while removing items from it is tricky, and you will definitely want to draw pictures here. Make sure to handle the case where the item you're removing is at the front of the list, the back of the list, and somewhere in the middle of the list. It's easy to introduce bugs into any of these places.
-
Feel free to add as many helper functions as you'd like.
Milestone Five: Support Different Particle Types
You now have a working particle system - nicely done! Your final task is to make that particle system more interesting by supporting three different types of particles.
There is one final field in the Particle type that we haven't talked about yet. It's shown here:
struct Particle {
    double x, y;   // Position
    Color color;   // Color

    double dx, dy; // Velocity

    int lifetime;  // How much longer the particle lives

    ParticleType type; // What kind of particle?
};
Here, ParticleType is an enum class defined as follows:
enum class ParticleType {
    STREAMER,
    BALLISTIC,
    FIREWORK
};
These three options correspond to the three different types of particles you will need to support.
The first type is ParticleType::STREAMER, which is the sort of particle you have seen so far. It has a lifetime that drops each step and moves according to a fixed velocity.
The second type is ParticleType::BALLISTIC. This type of particle works exactly the same way as a streamer but with one change: every time a ballistic particle moves, after it moves its dy increases by one. This tiny change means that ballistic particles feel the effects of gravity and move downward faster and faster on each frame. Ballistic particles are otherwise completely identical to streamers. (Those of you with a physics background might see why this will work, but physics is by no means necessary to code this one up!)
The final type is ParticleType::FIREWORK. A firework acts like a ballistic particle in that, after it moves, its dy increases by one. However, there is one difference between a firework and a ballistic projectile. When a firework's lifetime decreases below zero, it explodes. The firework particle is removed (as usual - it now has a negative lifetime) and is replaced by a bunch of new particles representing the explosion. Specifically, create 50 new streamer particles. Each of those particles are positioned at the firework's last position. They're then given a random dx and dy between -3 and +3 and a random lifetime in the range [2, 10] (between 2 and 10, inclusive). Each streamer is given the same color, and that color should be chosen randomly. (In other words, there will be 50 streamers of the same color, but what color that is will be chosen randomly.) You can choose a random color using the function Color::random().
A note on fireworks: the newly-added streamers should go, as all new particles do, at the very end of the list of particles. That way, if a firework explodes during a call to moveParticles, the new streamer particles will also move by one step. (In fact, that's why we had you add particles to the back of the list all the way in Milestone One!)
You probably won't need to modify much code here to get this working, though depending on your implementation you might find that you need to decompose out some of your logic into helper functions to keep things readable.
We have provided some basic test coverage here to ensure that ballistic and fireworks particles accelerate as they are expected to. However, we haven't added tests to check for the other requirements here. You should write at least one test case that checks for some property that was not described here.
To summarize, here's what you need to do.
Milestone Five Requirements
-
Update your code to support streamer particles, ballistic particles, and firework particles.
-
Add at least one
STUDENT_TESTto validate that your implementation is correct. -
Test your code thoroughly using the "Run Tests" button.
Some notes on this part:
-
Decomposition is your friend. If you try writing all the logic to manipulate particles in the
moveParticlesfunction, you are going to end up with way too much code in one place and bugs will be very, very hard to track down. -
Be careful with the ordering of events. Specifically, don't remove a firework particle and then try reading its $(x, y)$ coordinates.
-
Fireworks only explode if their lifetime ends, not if they move off-screen.
-
Consult the Stanford C++ Library Documentation for information about how to generate random numbers in C++. It's been a long time since you last used these functions in Assignment 1!
-
On some systems, you might get a warning in Qt Creator that talks about the predictability of the
Color::randomfunction. You should ignore this warning; such a warning message is meant for applications where random numbers are used in a secure context, and randomly choosing colors and directions isn't such an application.
Milestone Six: Watch the Show!
You now have a 2D particle system - nicely done! We've created a number of "scenes" (graphics demos) that use your particle system as an essential component. To see your particle system in action, select the "Scenes" option from the top-level menu. After doing so, go to the bottom of the window and use the dropdown menu to select a scene and click the button to load it. Here are the five scenes we've provided for you:
-
Fireworks: A fireworks show that illustrates your firework and streamer particles.
-
Fountain: A simulation of a water fountain that uses ballistic particles.
-
Magic Wand: Move the mouse to wave the wand and see ballistic particles. Press the mouse down to see streamers.
-
Snowy Day: A view out the window on a snowy day, made entirely of streamers.
-
Photo Exploder: Use streamer particles to "explode" an image, then reassemble it.
Take some time to reflect on your journey here - isn't it amazing what you can do with linked lists?
There are no deliverables here - just enjoy your creation!
(Optional) Part Four: Extensions
This assignment is all about linked structures, and there’s plenty of room for you to do Fun and Exciting Things with the topics we’ve covered here. Here’s some thoughts to help get you started, but the sky’s the limit here!
-
The Labyrinth!: Our provided code generates random mazes using combinations of several famous algorithms and data structures. (The normal maze is generated using Kruskal’s algorithm and a disjoint-set forest, the twisted maze is generated using an Erdős–Rényi random graph with connectivity guaranteed via breadth-first search, and the starting locations are chosen by a procedure that uses the Floyd-Warshall algorithm as substep.) There are lots of fairly accessible articles online about how to generate random mazes in other ways. For example, you can use a randomized depth-first search to build mazes with lots of long, twisted hallways, or randomized Prim’s algorithm to build mazes that branch out from a central location. Wilson’s algorithm produces mazes that are sampled uniformly at random from the space of all possible mazes. Play around with these and see what you find!
Other things you could consider: could you build a visualizer that draws the maze given a pointer to your starting location? Or could you write a program that automatically finds the shortest paths out of a maze?
-
Particle Systems: There are plenty of opportunities for extensions here. You could introduce your own particle type to create effects that otherwise can't be done with what you have. Some examples: add "wiggler" particles that act like streamers, but which have a small random amount added to their $x$ and $y$ coordinates after each step. Or add "cooling" particles whose color gets darker over time. Or add "branching" particles that have a 75% chance of disappearing when their time expires and a 25% chance of creating two new branching particles in its place, each with a different velocity, when its time expires. Or add "orbiting" particles that rotate around a fixed central point.
Each of the particle types you've seen so far move independently of all other particles. Could you introduce particles that interact with each other? For example, you could make "attractor" particles that try to move together, or "repulsor" particles that try to move away from one another. If you're up for a challenge, look up boids, a particle system that simulates flocking behavior.
You can also create your own scenes! To do so, visit the file
Scenes/MyCustomScene.hfor instructions, and check out the various scene.cppfiles to see how we put our scenes together. Each scene is represented by a C++ class that implements two functions:tick, which advances the scene forward one step, anddraw, which displays the scene. What else can you come up with? If you create something really impressive, we'll ship it with future versions of the starter files so hundreds of future CS106B students can appreciate your handiwork!
Submission Instructions
Before you call it done, run through our submit checklist to be sure all your ts are crossed and is are dotted. Make sure your code follows our style guide. Then upload your completed files to Paperless for grading.
Partner Submissions:
- If you forget to list your partner you can resubmit to add one
- Either person can list the other, and the submissions (both past and future) will be combined
- Partners are listed per-assignment
- You can't change/remove a partner on an individual submission
Please submit only the files you edited; for this assignment, these files will be:
Labyrinth.cpp.LabyrinthEscape.cpp.DoublyLinkedLists.cpp.ParticleSystem.handParticleSystem.cpp. (Don't forget the header file!)
You don't need to submit any of the other files in the project folder.
If you modified any other files that you modified in the course of coding up your solutions, submit those as well. And that’s it! You’re done!
Good luck, and have fun!