April 25, 2022
Assignment #4: Lists of Lists, Strings, Graphics, and Sand
Due: 12:15pm (Pacific Time) on Monday, May 9th
Based on problems by Nick Parlante, Eric Roberts, and the current CS106A staff.
This assignment consists of a few different programs to give you practice with list of lists (2-dimensional lists), strings, and graphics in Python. You can download the starter code for this project under the "Assignments" tab on the CS106A website. The starter project will provide Python files for you to write your programs in.
The first part of the assignment provides two sandcastle problems to give you practice writing functions with lists of lists (2-dimensional lists) and strings. The second part of the assignment is a graphics problem. The third part of the assignment is a longer program that uses 2-dimensional lists to simulate falling sand in a larger program.
Part 1: Sandcastles
Sandcastle 1: Lists of lists
In the file ziplists.py, implement the function zip2lists(list1, list2). This function is passed two lists of strings (list1 and list2), where you can assume that both lists both have the same length (number of elements). The function should return a new list that "zips" together the two lists passed in. That is, the result should be a list that contains lists that are pairs of elements, one from each of the original lists, in order. For example, calling:
zip2lists(['a', 'b', 'c'], ['d', 'e', 'f'])
should return the following new list (of lists):
[['a', 'd'], ['b', 'e'], ['c', 'f']]
The original lists passed in should [not]{.underline} be changed. If this function is passed two empty lists, it should just return an empty list, since there would be no lists (of pairs) in the result. In other words, calling:
zip2lists([], [])
should return the following empty list:
[]
You can think of that as a list that contains no lists as elements.
Doctests are provided for you to test your zip2lists function. Feel free to write additional doctests if you would like to more thoroughly test your code.
Sandcastle 2: Strings
A simple means for trying to compress text with many repeated characters is to use something known as run-length encoding. The idea is that rather than representing every character in a string explicitly, we instead simply have each character immediately followed by a digit which denotes how many times that character should be repeated. For example, the string 'B4' would represent the string 'BBBB' as the character B is to be repeated 4 times. Similarly, the string 'm1e2t1' would represent 'meet', as the character m is to be repeated 1 time, followed by the character e which is to be repeated 2 times, followed by the character t is to be repeated 1 time. Thus, the general format for run-length encoded strings is a series of pairs, where each pair contains a [single]{.underline} character followed immediately by a [single]{.underline} digit (1 through 9 only, the digit will never be 0). The digit denotes the number of consecutive occurrences of the character immediately before it in the encoded string.
Your job is to write a function named expand_encoded_string in the file encoded_string.py that takes as a parameter a called encoded, which is a string representing the run-length encoded text, and returns a string which is the expanded version of the text.
For example, if you call:
expand_encoded_string('B1o2k2e2p1e1r1!3')
your function should return the string:
'Bookkeeper!!!'
as the result.
Part 2: Graphics – drawing a Pyramid
In the file pyramid.py, write a function draw_pyramid that draws a pyramid consisting of bricks arranged in horizontal rows, so that the number of bricks in each row decreases by one as you move up the pyramid. A sample run is shown below.

The pyramid should be centered at the bottom of the drawing canvas and should use constants for the following parameters:
BRICK_WIDTH The width of each brick (30 pixels) BRICK_HEIGHT The height of each brick (12 pixels) BRICKS_IN_BASE The number of bricks in the base (14)
The numbers in parentheses show the values for the pyramid image shown above. You should write your program so that, if the constant values were different, the pyramid drawn would reflect the values in those constants (i.e., brick sizes or the number of bricks in the base could be different).
Note that in the picture above, there is a blue line at the bottom of the canvas. You do not need to draw that line. It is automatically drawn by the starter code we give you to show you where the bottom on the drawing canvas is (since it doesn't correspond to the bottom of the graphics window).
Part 3: Sand
For the third part of this assignment, you will write a program called sand.py, that uses 2-dimensional lists to to implement a kind of 2-dimensional (grid) world of sand. When the program is working, it's kind of fun to play and watch (in its low-key way).
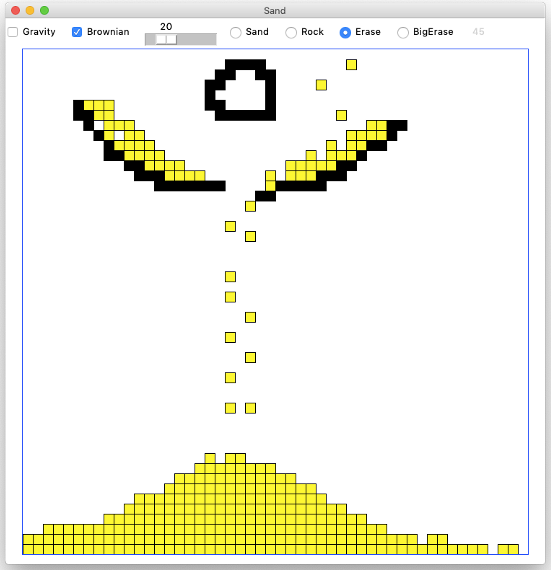
The starter code handles setting up the program window with a user interface, handling the controls and drawing, that allows the user to interact with the program, and. Although the implementation of the user interface (including the drawing) is provided for you, all the logic that makes the world work will be built by you. Here's a screen shot so you'll have some early sense of what you will be building:
Decomposition
This is a big program, and we want the advantage of using decomposition to solve this problem in bite-sized chunks. So, we will build the program up as a series of decomposed functions. We can leverage Python Doctests, testing each function in isolation before moving on to the larger functions. You need to write 5 functions to make the program work.
2-Dimensional list
The Sand world is represented using a 2-dimensional list (i.e., list of lists) that is treated as a grid to keep track of the elements in the Sand world. Each element (which you can think of as a square) in the Sand world holds one (and only one) of three things:
-
Sand, represented by the string 's'
-
Rock, represented by the string 'r'
-
Empty, represented by None. (This is the Python's None, not a string)
Here is a visual representation of a 3 by 2 grid (i.e., list of lists) with some rocks and one sand. The sand 's' is in the 0th row, 1st column (equivalently, x = 1, y = 0. Recall that y represents the row number and x is the column number). The 0th row (y = 0) is the top row.

This visual representation of a grid would actually be represented by a list of lists, as follows:
[['r', 's', 'r'], ['r', None, 'r']]
Note the use of None to denote the blank cell in the grid.
If we move the sand ('s') down from row 0, column 1 (x = 1, y = 0) to row 1, column 1 (x = 1, y = 1) the grid would looks like this:

This grid would be represented by the list of lists, as:
[['r', None, 'r'], ['r', 's', 'r']]
Moving sand down by one square like this is the central operation of this game.
You should write your code in the following five stages:
-
Task: Moving elements in the grid
Function: do_move(grid, x1, y1, x2, y2)
Write the code for the do_move function. This function is passed a grid (list of lists, representing the sand world, as described above) and two x, y coordinate pairs: x1, y1 and x2, y2. The function should update the grid by moving the contents of the grid element at position x1, y1 into the element at position x2, y2 (overwriting whatever value might have previously been there). That means you should also update the element at position x1, y1 to reflect that this cell in the grid is now Empty. You can assume that your function is only called with parameters for "legal" moves, that is, you can assume that all coordinates given to you are in the bounds of the grid and that the element at position x2, y2 starts Empty. Your function should return the updated grid. You may be wondering why your function needs to return the updated grid if changes you make to the grid parameter will persist after this function is done. The reason is that we provide Doctests for your function and these tests work by examining what is returned by the function. So, for the Doctests to work, your function needs to return the updated grid. You should use these Doctests to test that your implementation works before you move on.
The code for do_move is short, but it is good example of using Doctests to try out test cases. In this case, the two Doctests are provided. Feel free to add others to more thoroughly test your code. Doctest pro-tip: you can run a Doctest by right-clicking (on PC) or Ctrl-clicking (on Mac) on the Doctest text in PyCharm and selecting the "Run Doctest …" option from the menu that pops up. Running a Doctest again and again is the common pattern as you work out each function.
For example, the first Doctest (shown below) tests moving the 's' at the location (x = 1, y = 0) down to location (x = 1, y = 1).
grid = [['r', 's', 's'], [None, None, None]] do_move(grid, 1, 0, 1, 1) [['r', None, 's'], [None, 's', None]]
Here is what the three lines of the Doctest do:
-
grid = [['r', 's', 's'], [None, None, None]] This sets up a grid variable for the next 2 lines. The grid is tiny: width is 3 and height is 2, just enough to write a little test.
-
do_move(grid, 1, 0, 1, 1) This line calls your do_move function, moving the 's' at location (1,0) to location (1,1). The function returns the changed grid.
-
The third line shows what the grid should look like post-move: [['r', None, 's'], [None, 's', None]] The Doctest machinery verifies that the result returned by the do_move function matches this written state.
IMPORTANT NOTE (definitely read this and understand it before writing your code for this assignment): Recall that when you access elements of a lists of lists, the first index represents the row, which is the y coordinate. The second index represents the column, which is the x coordinate. That's in the reverse order than we usually think of when dealing with (x, y) coordinates. To be more explicit, to access the element at location (x = 1, y = 0), you would refer to grid[0][1]. Note that the coordinates are in reverse order from how you might think to write them (the y coordinate comes first, then the x coordinate). It's important to keep this point clear while you are developing your code for this assignment.
-
-
Task: Checking legal moves
Function: check_move(grid, x1, y1, x2, y2)
Write the code for the check_move function. The check_move function is given a prospective starting (x1,y1) location and ending (x2,y2) for a potential move, and returns True if the move is okay, or False otherwise. The grid is not changed by this operation.
Here are the comments describing what the check_move function does:
def check_move(grid, x1, y1, x2, y2):
  """
  Given grid, starting point (x1,y1) and destination (x2,y2).
  Check if it's possible to move the value at (x1,y1) to (x2,y2).
  The (x1,y1) location is always in bounds of the grid, but (x2,y2)
  may not be.
  Return True if the move is okay, or False otherwise.
  Okay move: (x2,y2) in bounds, empty, and not violating corner rule.
  """
We'll call location (x2,y2) the "destination" of the move. In the Sand world, there are five possible moves: left, right, down, down-left, and down-right. Here are the rules for a legal move:
Rule 1. The destination must be within the edges of the grid.
Three Doctests for this rule are provided. These tests build a 1 row by 1 column grid, checking that a few out-of-bounds moves return False.
>>> # Provided out-of-bounds tests
>>> # Make a 1 by 1 grid with an 's' in it to check in-bounds cases
>>> grid = [['s']]
>>> check_move(grid, 0, 0, -1, 0) # left blocked
False
>>> check_move(grid, 0, 0, 0, 1)  # down blocked
False
>>> check_move(grid, 0, 0, 1, 1)  # down-right blocked
False
Rule 2. The destination square in the grid must be empty.
Consider the situation shown below:

Note: this grid would be represented by a list of lists, as:
[[None, 's', 'r'], [None, None, None]]
Above is a picture of a single 's' at location (1,0) in a 3 by 2 grid. The move left to location (0,0) and the move down to location (1,1) are both okay (return True). The move right to location (2,0) is bad, since it's blocked the 'r' (rock) there (return False).
Rule 3. For a diagonal down-left or down-right move, the corner square must be empty (that is, it should contain None).
Consider the down-left and down-right diagonal moves of the 's' in this situation:
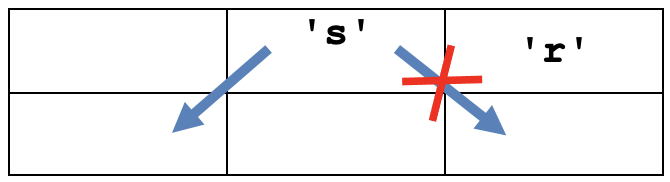
The "corner" rule: for a down-left or down-right move, the corner square above the destination must also be empty. So, in the picture above, the down-left is okay since location (0,0) is empty, but down-right is bad due to the 'r' (rock) at location (2,0). Sand ('s') at location (2,0) would also block the move.
check_move Doctests
The starter code includes five tests for left, right, down, down-left and down-right moves, respectively, in a 3 by 2 world:
>>> # check of left move from (1,0)
>>> grid = [[None, 's', 'r'], [None, None, None]]
>>> check_move(grid, 1, 0, 0, 0)  # left ok
True
>>> # check of right move from (1,0)
>>> check_move(grid, 1, 0, 2, 0)  # right blocked
False
>>> # check of down move from (1,0)
>>> check_move(grid, 1, 0, 1, 1)  # down, ok
True
>>> # check of down-left move from (1,0)
>>> check_move(grid, 1, 0, 0, 1)  # down-left ok, corner rule
True
>>> # check of down-right move from (1,0)
>>> check_move(grid, 1, 0, 2, 1)  # down-right blocked, corner rule
False
These Doctests will be very helpful for you to find bugs in your code before you move on to the next step.
check_move code
There are many reasonable ways to structure your code for the check_move function. Obviously the one requirement is that the code returns the correct answer for all cases. Our solution has a single return True at the bottom of the function, and many if ... return False statements detecting the various cases where the move is bad. Use the Doctests as you work out the code.
Note that it's fine to use == and != in comparisons like this:
if x != None:Disregard warnings PyCharm gives you about the line above. The warnings, in this case, are misguided. PyCharm is pretty good, but it's not perfect.
-
Task: Gravity
Function: do_gravity(grid, x, y)
Write the code for the do_gravity function. The do_gravity function simulates the effect of gravity in the Sand world. Here's the basic set-up. Consider an (x,y) location in the grid. This function implements one "gravity" move for whatever is at that (x,y) location as shown below. In the gravity algorithm, the moves should be handled in a specific order:
-
If there is not a sand 's' at location (x,y), do nothing, the move is over.
-
down: if the sand can move down, do it, this ends the move.
-
down-left: otherwise, if the sand can move down-left, do it, this ends the move.
-
down-right: otherwise, if the sand can move down-right, do it, this ends the move.
In all cases, return the grid when the function is done. As we talked about earlier in this assignment, you need to return the grid here so that the Doctests for this function work appropriately.
Use the helper functions you wrote in the previous steps help do the work. That is the key to this function. How can you tell if the way is clear for the sand to move, for example, down? We provide a rich set of Doctests for this function, but of course you still need to write the code to actually solve the problem. You are always free to add more Doctests if you like.
The header for the function, comments describing it, and the Doctests provided in the starter code are shown below (next page) for reference.
def do_gravity(grid, x, y): """ Given grid and an in-bounds (x,y). If there is a sand at that (x,y) location, then try to make one move, trying them in this order: move down, move down-left, move down-right. Return the grid in all cases. (tests provided) >>> # not sand >>> grid = [[None, 's', None], [None, None, None]] >>> do_gravity(grid, 0, 0) [[None, 's', None], [None, None, None]] >>> >>> # down >>> grid = [[None, 's', None], [None, None, None]] >>> do_gravity(grid, 1, 0) [[None, None, None], [None, 's', None]] >>> >>> # bottom blocked >>> grid = [[None, 's', None], ['r', 'r', 'r']] >>> do_gravity(grid, 1, 0) [[None, 's', None], ['r', 'r', 'r']] >>> >>> # rock-below down-left >>> grid = [[None, 's', None], [None, 'r', None]] >>> do_gravity(grid, 1, 0) [[None, None, None], ['s', 'r', None]] >>> >>> # sand-below down-right >>> grid = [[None, 's', None], ['s', 's', None]] >>> do_gravity(grid, 1, 0) [[None, None, None], ['s', 's', 's']] >>> >>> # sand corner: down-right >>> grid = [['s', 's', None], [None, 's', None]] >>> do_gravity(grid, 1, 0) [['s', None, None], [None, 's', 's']] >>> >>> # at bottom already >>> grid = [[None, None, None], [None, 's', None]] >>> do_gravity(grid, 1, 1) [[None, None, None], [None, 's', None]] """ -
-
Task: Loop through the whole grid
Function: do_whole_grid(grid, brownian)
The next step is to write the code for the do_whole_grid function. For the moment, ignore the brownian parameter which is handled in a later step.
Write code for the do_whole_grid function which just calls do_gravity once for every (x,y) location in the grid. The function should return the grid when it is done (again, the reason for this is to have some result returned from the function for Doctests to compare against). You might consider testing out your code for this function by writing some Doctests. For example, you could have a test that uses a 3x3 world with sand in just the top row. If you do write such Doctests, you could just use the value 0 for the brownian parameter.
Important note on looping through the grid: The standard y/x nested for loops to loop through the coordinates of a grid from the top row downward are usually fine for working with grids. However, in this case, it is important to reverse the y-direction to have the loop go bottom-up. That is, you should visit the bottom row (which is at y = height-1) first and the top row (which is at y = 0) last. In this situation, it might be helpful to use the reversed function. The reversed function can be applied to a range to generate the elements of that range in reverse order. Here is an example of using the reversed function on a range in a for loop:
for i in reversed(range(3)):
    print(i)
The code above would produce the following output:
2
1
0
What's wrong with regular top-down order of going through rows? Suppose the loops went top-down, and at row y=0, a sand moved from y=0 down to y=1 by gravity. Then when the loop got to y=1, that sand would get to move again. Going bottom-up avoids this problem.
Try testing your do_whole_grid function (with Doctest) to see that your code is working correctly.
Note: the do_whole_grid function just does one pass over the whole grid in the Sand world, calling do_gravity (and later, after you implement the next step, do_brownian) a single time for each square. The provided GUI code calls your do_whole_grid function again and again (when the gravity checkmark is checked) to run the whole simulation.
Milestone: Run sand.py
With your functions tested, you can try running the whole program. Gravity should work, but "Brownian" is not done yet. Normally when a program runs the first time, there are many problems. But here we have leaned on decomposition and testing of the pieces as they were built, so there is a chance your code will work perfectly the first time. If your program works the first time, try to remember the moment. More typically, new code is not so well tested and so exhibits many problems when run the first time.
Bring up the terminal and run the program like this (no command line arguments are required, on the Mac its "python3"):
py sand.py
When the Sand window comes up, you can click (and hold the mouse) anywhere in the window to start generating "sand" in the simulation. The radio-buttons for "Sand", "Rock", "Erase", and "Big Erase" allow you to generated different effects when you select them and the click in the window (allowing you to create rocks and also erase existing sand/rocks). You can turn on/off Gravity and Brownian motion using the respect checkboxes.
-
Task: Create Brownian motion
Function: do_brownian(grid, x, y, brownian)
Now for that last little bit of algorithm. Brownian motion (https://en.wikipedia.org/wiki/Brownian_motion) is a real physical process, documented first by Robert Brown, who observed tiny pollen grains jiggling around on his microscope slide.
We'll say that the "Brownian" move for an (x,y) location means that there is a probability that sand at that location will randomly move just a little bit — one square left or right. The "brownian" parameter is an integer (int) in the range 0 to 100 inclusive: 0 means never do a brownian move, 100 means always do a brownian move. This value is taken in real-time from the little slider at the top of the Sand application window. This function does not have tests (randomness and tests are an awkward combination).
Here are the steps for implementing Brownian motion in the sand world:
- Check if the square is sand. Proceed to the next steps only if it is
sand. If it is not sand, the square does not have Brownian motion.
- Create a random number in the range 0 to 99. Note that the Python
function random.randrange(n) (from the random library) returns a random number uniformly distributed in the range from 0 to n – 1, inclusive. So, you could use the following call:
num = random.randrange(100)Proceed to step #3 below only if num < brownian (recall that brownian is a parameter to this function). In this way, for example, if brownian is 50, we'll do the Brownian move about 50% of the time.
- To try to move left or right, set a "coin" variable like a coin
flip with the following line. This line sets coin to either 0 or 1:
coin = random.randrange(2) - If coin is 0, try to move the sand at the current (x,y) location one cell to the left. If coin is 1, try to move the sand at the current (x,y) location one cell right. Use your helper functions to check if the move is possible and then move the sand if the move is legal. Don't try both directions. Based on the coin flip, you choose one direction for the sand at this location and see if it can move (and move it if it can).
- Check if the square is sand. Proceed to the next steps only if it is
-
Task: Add Brownian motion to do_whole_grid
After you have completed Task #5 above to implement the do_brownian function, you should edit the loop body in do_whole_grid so that after calling do_gravity for an (x,y) location, it also calls do_brownian for that (x,y) location.
Now, try running the Sand program, and make sure the Brownian checkbox in the application is switched on. Hopefully, you'll see a lively, less artificial look. Play around with the slider (next to the Brownian checkbox) to create different levels of Brownian motion.
Running with Different Sizes
You can provide two command line arguments (numbers) to specify the number of squares wide and high that the grid should be in the Sand simulation. The default is 50 by 50 squares. The following line would run the Sand simulation using a grid that is 100 by 50 squares:
py sand.py 100 50
An optional third command line argument specifies how many pixels wide each square should be. The default value is 14. For example, the following line would run the Sand simulation with a 100 by 50 square grid, where each square was just 4 pixels:
py sand.py 100 50 4
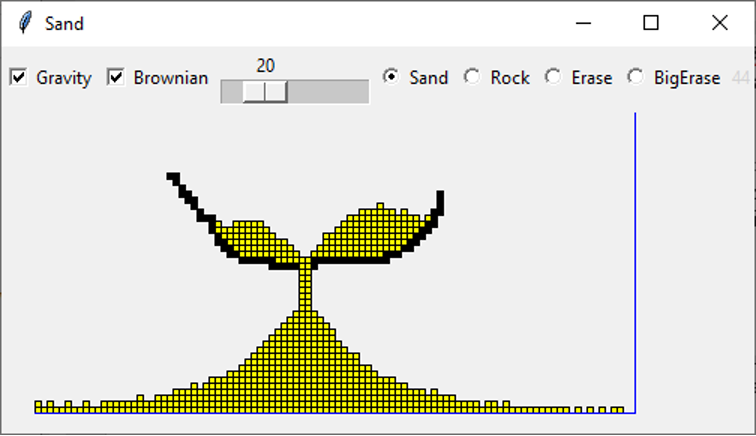
A sample picture from such a world is shown below.
Lots of Computation!
The Sand program is pretty demanding on your computer – it's a lot of computation run continuously. You may notice the fans on your laptop spinning up. At the upper right of the window is a little gray number, which is the frames-per-second (fps) the program is achieving in the sand animation at that moment (for example, it is 44 in the picture above). The animation has a nice, fluid look when the fps is higher.
The more grid squares there are, and the more grains of sand there are, the slower the program runs. For each gravity round, your code needs to at least glance at every square and every grain of sand, and we want to do that 40 times per second. Play around with different grid and pixel sizes to try out the different aesthetics.
Reflective Ethics Question:
By completing Sand, you've implemented your own computer simulation. A computer simulation is a program designed to emulate or predict the behavior of a real-world system or phenomenon using mathematical modeling. Computer simulations have been used to model natural systems in biology, physics, chemistry, climate science, etc. and human systems in economics, psychology, and other social sciences.
As in the last assignment, your new computational abilities raise interesting ethical, philosophical and social considerations. Simulating complex phenomena requires making simplifying assumptions and choosing discrete representations that can be understood and expressed by computer systems. In simulations, there are tradeoffs between expressive power, breadth of representation, and computational limitations. With this in mind, please answer the questions below. All we ask is that you think critically and answer the questions to the best of your ability in a short paragraph (a few sentences for each of part (a) and (b)) in the text file ethics.txt provided in the Assignment 4 folder.
a. What simplifying and idealizing assumptions did we ask you to make when working on the Sand portion of this assignment? How did different components of the "real-world system" we were representing get mapped to different computational representations?
b. What considerations should computer scientists keep in mind when designing computer simulations? What should the programmers of simulations communicate about the idealizing assumptions they made to allow others to understand and evaluate them?
Submitting Your Work
Once you've gotten all the parts of this assignment working, congratulations! And with the Sand program, you just built a pretty nice simulation with complex logic and some neat output.
Make sure to submit all the python files and answers for the ethics questions for this assignment on Paperless. You should make sure to submit the files:
- ziplists.py
- encoded_string.py
- pyramid.py
- sand.py
- ethics.txt
Additionally, in the Assignment 4 project folder, we have provided a file called extension.py that you can use if you want to write any extensions that you might want to make based on this assignment. The file doesn't contain any useful code to begin with. So, you only need to submit the extension.py file if you've written some sort of extension in that file that you'd like us to see.
Acknowledgements: The Sand portion of this assignment is based on the "Falling Sand" assignment by Dave Feinberg at the Stanford Nifty Assignment archive (http://nifty.stanford.edu/). Nick Parlante re-built a version of that assignment in Python, adding tests and decomposition. The assignment was then modified for use in the current CS106A class by your CS106A staff.