Due: Wed Oct 12 11:59 pm
Late submissions accepted until Fri Oct 14 11:59 pm
Assignment by Julie Zelenski, with modifications by Nick Troccoli, Chris Gregg, Katie Creel and Brynne Hurst
Along with this assignment, we've posted a page of extra bits practice problems with solutions. These are very helpful to confirm your understanding of bit operators, binary, and more as you get started with this assignment!
Learning Goals
This assignment covers topics from the first few lectures and the first lab. You will be building your skills with:
- editing, compiling, testing, and debugging C programs under Unix
- writing code that manipulates bits and integers using the C bitwise and arithmetic operators
- working within/around the limits of integer representation
- understanding the ramifications of integer representations in real-world software
You shouldn't need material related to strings/pointers for this assignment - in other words, this assignment focuses just on the material related to bits and bytes.
Overview
This assignment asks you to complete three programs and one case study. Each program explores a particular aspect of bitwise or numeric manipulation:
- Automata has you model an evolving cell colony using a bitvector.
- UTF8 has you create unicode characters by constructing bit patterns.
- Saturated Arithmetic has you detect overflow in addition operations.
- The Ariane-5 Case Study has you examine the consequences of a real-world overflow bug.
The code you will write is short, but these small passages are mighty!
- The working on assignments page contains info about the assignment process.
- The collaboration policy page outlines permitted assignment collaboration, emphasizing that you are to do your own independent thinking, design, coding, and debugging. If you are having trouble completing the assignment on your own, please reach out to the course staff; we are here to help!
To get started on the assignment, clone the starter project using the command
git clone /afs/ir/class/cs107/repos/assign1/$USER assign1
The starter project contains the following:
readme.txt: a text file where you will answer questions for the assignmentsat.c.automata.c,utf8.candMakefile: three partially-written programs that you will modify, and their Makefile for compilingcustom_tests: the file where you will add custom tests for your programssamples: a symbolic link to the shared directory for this assignment. It contains:SANITY.ini,sanity.pyandprototypes.h: files to configure and run Sanity Check. You can ignore these.automata_soln,sat_solnandutf8_soln: executable solutions for the programs you will modify.
tools: contains symbolic links to thesanitycheckandsubmitprograms for testing and submitting your work. It also contains a new codecheck tool for checking for style and other common code issues.
Assignment Support: Through TA helper hours and the discussion forum, our focus will be on supporting you so that you can track down your own bugs. Please ask us how to best use tools (like the brand-new GDB!), what strategies to consider, and advice about how to improve your debugging process or track down your bug. We're happy to help you with these in order to help you drive your own debugging. For this reason, if you have debugging questions during helper hours, please make sure to gather information and explore the issue on your own first, and fill out the QueueStatus questions with this information. For instance, if your program is failing in certain cases, try to find a small replicable test case where the program fails; then, try using GDB to narrow down to what function/code block/etc. you think is causing the issue; then, further investigate just that area to try and find the bug. As another example, if your program is crashing, take a similar approach, but try using GDB and the backtrace command (check it out in lab!) to narrow in on the source of the crash. This information is important for the course staff to effectively help you with debugging. Starting with a future assignment, we will require this information when signing up for helper hours for debugging help, so please make sure to provide as much information as possible.
Tools and Testing
Codecheck
We have added a new tool, codecheck, that can check your code for common style and other issues that are detectable at compile-time. This check is NOT exhaustive; it is only meant to identify common style and other code issues. Check the course style guide and assignment spec for more code guidelines. You can run Codecheck like the sanitycheck and submit tools, from the tools folder, by running tools/codecheck, which runs it on all .c files in the current directory. You can also run it on individual files, like this:
tools/codecheck file1.c file2.c
Note that Codecheck does check for magic numbers, but for assign1 it may not align exactly with the best approach, as it considers anything above a certain numeric value automatically a "magic number". For this assignment, it's not necessarily stylistically bad if Codecheck shows any issue messages about magic numbers. But, you should still be vigilant and evaluate each suggestion from Codecheck to decide how you can make your code as clean as possible.
Testing
This assignment heavily emphasizes testing. For each program you write below, you should also add at least 3 to 5 additional tests of your own per program (total of at least 10) in the custom_tests file that show thoughtful effort to develop comprehensive test coverage. When you add a test, also document your work by including comments (on their own line, starting with #) in the custom_tests file that remind you why you included each test and how the tests relate to one another. The tests supplied with the default SanityCheck are a start that you should build on, with the goal of finding and fixing any bugs before submitting, just like how a professional developer is responsible for vetting any code through comprehensive testing before adding it to a team repository.
The best way to approach testing on this assignment is, once you understand the expected program behavior but BEFORE you write any code, write some tests that cover various cases you can think of. This is because once you start writing code, you may start to think in terms of how your code works rather than how the code should work, meaning if you omit handling a case in your code, you may also omit covering that case in your testing. Thus, a good strategy is to write some tests before implementing anything, and then as you implement, you can add further tests. Use the tests as a way to gauge your progress and uncover bugs! We provide some testing recommendations in each problem section below.
How do you brainstorm what additional tests to consider? First review the cases supplied with default sanitycheck to see what is already covered. Then consider the full range of inputs/possibilities beyond those simple cases. If the variety of inputs is sufficiently small, you may be able to enumerate a test case for each possibility. In other situations, exhaustive coverage is not feasible, so you instead identify representative samples to validate the operation on specific cases. You should target ordinary cases as well as edge conditions and unusual inputs. For more advice, check out our guide to testing, from the assignments dropdown.
Review and Comment
When you inherit code to build on, you should first carefully review it to understand its behavior and plan how your code will fit into the existing program. You are given about 25 lines for each program and will add about a dozen lines of your own per program, so there is more starter code to review than new code to add.
Here, our provided code for each program processes the command-line arguments, handles user error in how the program is invoked, and has a few important details, particularly in converting string arguments to numbers. The triangle program from assign0 used the atoi function, which is simpler to use but has no capability to detect malformed inputs. For these programs, we are using the more robust, but complex, strtol. Read the function documentation at man strtol and review how the function is used in convert_arg.
Some questions you might consider as a self-test:
- How do the sample programs respond if invoked with missing arguments? excess arguments?
- When converting the user's string argument to a number, what base is passed to
strtol? In which bases does this allow the argument to be specified? How does the user's argument indicate which base to use? - What does
strtoldo if it encounters an invalid character in the string to convert? - How is the second argument to
strtolused for error-detection? Why is it ok that theendvariable is dereferenced when it is initialized toNULL? If you did not want that error-detection, what do you pass as the second argument instead? - What does
strtoldo if asked to convert a string whose value would be too large to be represented in along? - Do you see anything unexpected or erroneous? We intend for our code to be bug-free; if you find otherwise, please let us know!
After reviewing the code, try experimenting with it! Build and run the programs, invoking them with different arguments to see how each is treated. Run the program under the debugger (check out our Debugger Guide under "Handouts") and step through code, printing intermediate values as you go. Observing the code in action is an excellent way to better understand it. Confirm your answers to the self-test questions above to verify your understanding.
We intentionally left off all the comments on the starter code, so you should add in documentation. Add an appropriate overview comment for the entire program, document each of the functions, and add inline comments where necessary to highlight any particularly tricky details.
1. Cellular Automata
A cellular automaton models the life cycle of a cell colony, which you can think of as a 1D array of cells, each of which can be either live or empty. Starting with an initial pattern, the automaton simulates the birth and death of future generations of cells using a set of simple rules. In this part of the assignment, you will implement a cellular automaton using a bitvector so that it uses memory as efficiently as possible.
We represent a 1D cell colony as a 64-bit unsigned long, with one bit for each cell. A 1 indicates the cell is live, and 0 indicates the cell is empty. Your program will advance the cells forward 1 generation, print out what the colony looks like, and then repeat, thereby printing out the cells' lifecycle.
For a given cell, the way we know whether it is live or empty in the next generation is by looking at its neighbors, the cells to its immediate left and right. The ruleset, which is a number specified by the user when they run the program, tells us, based on the state (live or empty) of a cell and its neighbors in the current generation, whether that cell is live or empty in the next generation. Using this bit vector representation, reading and updating a single cell is implemented with bitwise operations.
The automata program prints a number of iterations of the cell colony, but stops early if the cell colony does not change further. In the output, each line represents one generation, going from the first generation at the top to the last generation at the bottom. Below shows a sample run of the program for ruleset 77 - take a moment to run the sample solution (in the samples folder) and try out the automata program for yourself!
$ samples/automata_soln 77
                               +
++++++++++++++++++++++++++++++ + +++++++++++++++++++++++++++++++
+                            + + +                             +
+ ++++++++++++++++++++++++++ + + + +++++++++++++++++++++++++++ +
+ +                        + + + + +                         + +
+ + ++++++++++++++++++++++ + + + + + +++++++++++++++++++++++ + +
+ + +                    + + + + + + +                     + + +
+ + + ++++++++++++++++++ + + + + + + + +++++++++++++++++++ + + +
+ + + +                + + + + + + + + +                 + + + +
+ + + + ++++++++++++++ + + + + + + + + + +++++++++++++++ + + + +
+ + + + +            + + + + + + + + + + +             + + + + +
+ + + + + ++++++++++ + + + + + + + + + + + +++++++++++ + + + + +
+ + + + + +        + + + + + + + + + + + + +         + + + + + +
+ + + + + + ++++++ + + + + + + + + + + + + + +++++++ + + + + + +
+ + + + + + +    + + + + + + + + + + + + + + +     + + + + + + +
+ + + + + + + ++ + + + + + + + + + + + + + + + +++ + + + + + + +
+ + + + + + + ++ + + + + + + + + + + + + + + + + + + + + + + + +
Pretty cool, huh? Since a ruleset is an 8-bit number, this means there are 256 different possible rulesets to dictate how cell generations evolve. There are some really cool outcomes you get depending on the ruleset. We'll let you explore these!
You are to implement these 2 functions for the automata program, both of which are called by the starter code.
void draw_generation(unsigned long gen);
unsigned long advance(unsigned long gen, unsigned char ruleset);
Testing recommendations: look carefully at where you have special cases in advancing the generation, and set up test cases that explicitly poke at those issues.
Step 1: draw_generation
The draw_generation function takes a cell colony gen and outputs it as text. Specifically, it should output a row of 64 characters, one for each cell. A live cell is shown as an inverted box (a provided constant), and an empty cell is shown as a blank space. The generation is ordered such that the cell corresponding to the most significant bit is in the leftmost column and the least significant bit is in the rightmost column. You will need to iterate through the binary representation of gen and print out each cell individually. The key idea is that gen is an unsigned long, but we can use bit operators to access and manipulate its underlying binary representation. Remember to print a new line character once you have fully printed the generation! Once you complete this task, if you then run the program with any ruleset, it should print out one line for the first generation, another blank line for a generation of 0 (since that is what the advance function below initially returns), and then it will stop because the generation does not change:
$ ./automata 76
                               +
$
Step 2: advance
The advance function takes a cell colony gen and returns a new cell colony bitvector which is gen advanced forward one generation. For each cell, it examines its neighborhood and uses the specified ruleset to determine the cell's state in the next generation. Here's how the process works and what you need to implement. Diagrams are taken from Daniel Shiffman's neat book The Nature of Code, Sections 7.1 and 7.2.
A cell and its two neighbors form a "neighborhood":

A neighborhood is effectively a 3-bit number, a value from 0 to 7. For instance, the highlighted neighborhood here is 110, which is the 3-bit number 6. The ruleset is an 8-bit number that dictates, for each of the 8 possible neighborhood values, whether that cell will be live or empty in the next generation. Specifically, bit 0 in the ruleset (the least significant bit) specifies whether cells with neighborhood 0 will be live or empty. Bit 1 in the ruleset (the second-least significant bit) specifies whether cells with neighborhood 1 will be live and empty. And so on. Here are the steps to determine whether a cell is alive or empty in the next generation:
- for a given cell, get its 3-bit neighborhood N
- look at bit N in the ruleset (note: bit 0 here is the least significant bit, and bit 7 the most significant)
- if that bit is 1, the cell is alive in the next generation. If that bit is 0, it is empty in the next generation.
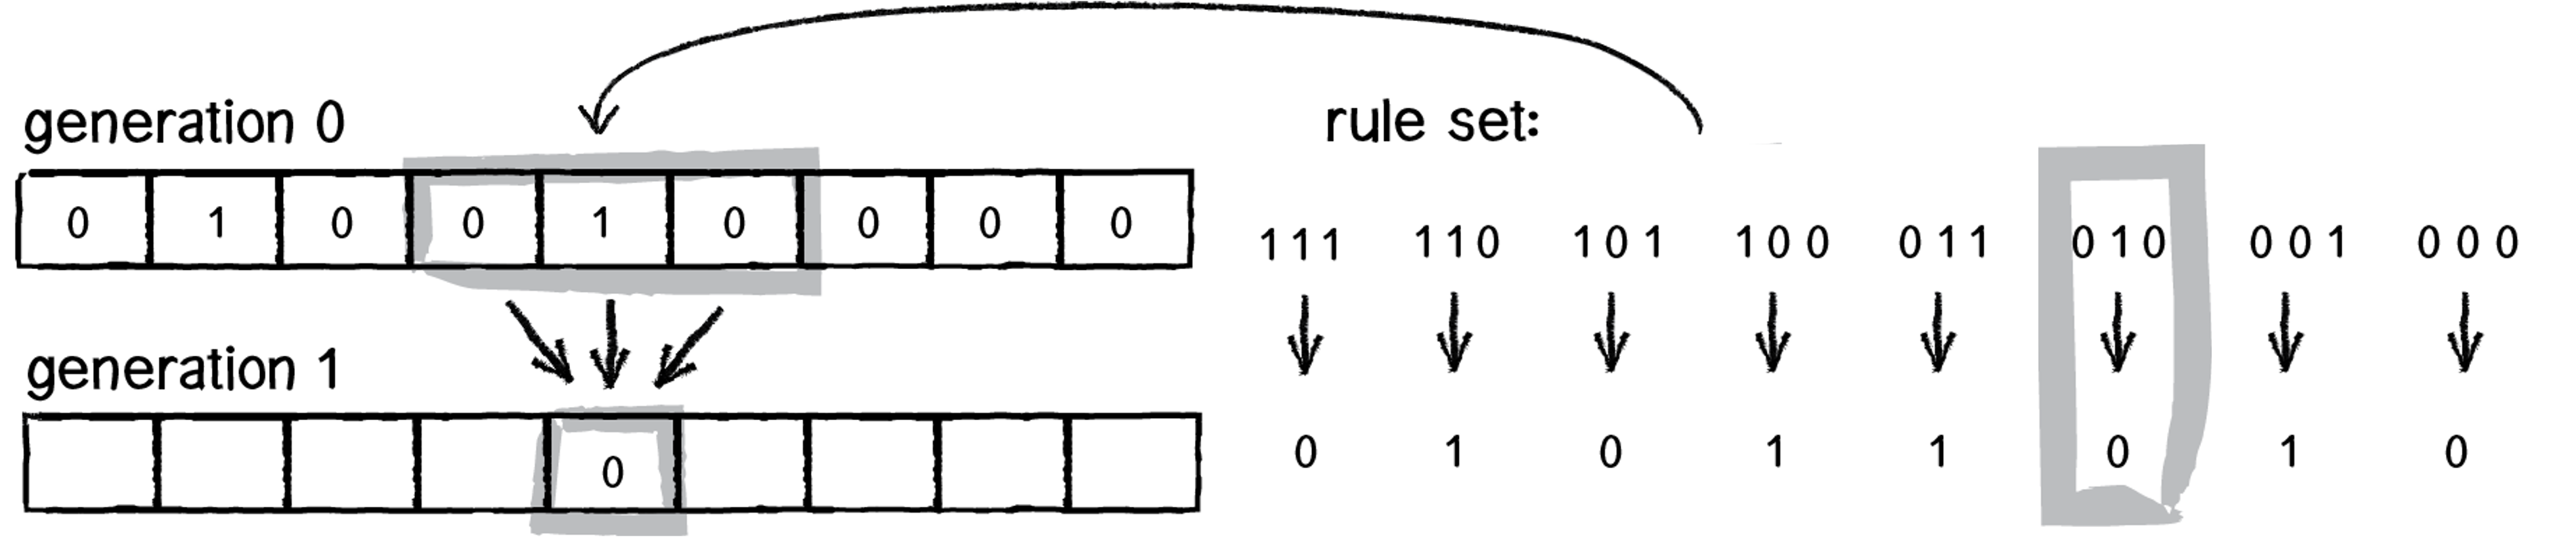
A cool observation here is that a ruleset is ultimately an 8 bit number - in this diagram, it is the01011010 which is 90. This diagram shows the possible neighborhood values along the top, and along the bottom it shows the bit in the ruleset at that index. The user specifies a ruleset number when they run the program, and this is passed in to advance, and you will use its underlying binary representation. Remember that even though ruleset is an unsigned char, it is really represented in binary, and you can access that binary representation using bitwise operators.
Another key idea is that we can alternate between treating a value as a binary representation and as a regular integer number. For example, we get a 3-bit neighborhood for a cell, but then treat it as a number to know which bit in the ruleset to look at.
Here are some final notes and tips:
- The leftmost and rightmost cells in a generation are special cases since they don't have 2 neighbors. You should pretend their non-existent neighbor is an empty cell. In other words, in the first diagram above, the rightmost cell would have neighborhood
010. - You will need to iterate through the passed-in generation and calculate each cell's updated state, adding those to a new generation you build up.
- Consider how you can use bit operations to do things like: isolating a given cell's 3-bit neighborhood as a number from 0 to 7, and looking at a specific bit in the ruleset.
- Keep in mind that cell generations are 64 bit
unsigned longs, and number literals are by default 32 bit signed integers! - Use sanity check and custom tests to compare your output to the sample solution
- If a generation doesn't match the solution, run GDB and put a breakpoint on
advance(usingcontinueto skip calls if necessary) and step through the call that returns the incorrect generation.
2. UTF-8
A C char is a one-byte data type, capable of storing 28 different bit patterns. The ASCII encoding standard (man ascii) establishes a mapping for those patterns to various letters, digits and punctuation, but is limited to 256 options, so only a subset are included. Unicode is ASCII's more cosmopolitan cousin, defining a universal character set that supports glyphs from a wide variety of world languages, both modern and ancient (Egyptian hieroglyphics, the original emoji?). This large number of characters requires a different system than just a single char, however. For this part of the assignment, you will implement the most popular Unicode encoding, UTF-8, which according to recent measurements, is used by over 93% of all websites (with known character encodings)!
Unicode maps each character to a code point, which is a hexadecimal number. There are over 1 million different code points in the Unicode standard! A character's code point is commonly written in the format U+NNNN, which signifies the hexadecimal value 0xNNNN.
However, the Unicode standard does not specify how to best encode these code points in binary. There are a variety of different possible Unicode encodings which specify, given a code point, how to actually store it. Why multiple encodings? Each may have a different priority, whether it is compatibility with other non-Unicode encodings, the locale it is intended for, space efficiency, etc. Some questions that may have different answers depending on the encoding are: should smaller code points take up the same amount of space as larger code points? If not, how can we tell how long the encoding is? And is it possible to preserve compatibility with other encodings, such as ASCII?
One of the most popular Unicode encodings is UTF-8. UTF-8 is popular partially because it preserves backwards compatibility with ASCII - in fact, it was designed such that ASCII is a subset of UTF-8, meaning that the characters represented in the ASCII encoding have the same encoding in ASCII and UTF-8. The UTF-8 encoding represents a code point using 1-4 bytes, depending on the size of the code point. If it falls in the range U+0000 to U+007F, its UTF-8 encoding is 1 byte long. If it falls in the range U+0080 to U+07FF, its UTF-8 encoding is two bytes long. And if it falls in the range U+0800 to U+FFFF, its UTF-8 encoding is 3 bytes long (there is a 4 byte range, but we'll be ignoring that for this assignment). The way UTF-8 works is it splits up the binary representation of the code point across these UTF-8 encoded byte(s).
The utf8 program accepts code points as command line arguments and prints out their UTF-8 encoding and the actual character that encoding represents.
$ samples/utf8_soln 0x41 0xfc 0x3c0 0x4751
U+0041   UTF-8 Hex: 41         Character: A
U+00FC   UTF-8 Hex: c3 bc      Character: ü
U+03C0   UTF-8 Hex: cf 80      Character: π
U+4751   UTF-8 Hex: e4 9d 91   Character: 䝑
(Note: if your Unicode characters are not printing or appear garbled, but the encoded hex bytes are correct, you may need to set your terminal to expect UTF-8. Changing the configuration is OS/terminal-specific, but within 5 minutes of Googling we found utf8 advice for Putty, MobaXterm and Xterm. The default Mac OS X Terminal.app works by default. Note that sanity check should still pass even if your terminal is showing the wrong character.)
Your task is to implement the to_utf8 function that takes a single Unicode code point and constructs its sequence of UTF-8 encoded bytes. This function is called once for every argument specified by the user.
int to_utf8(unsigned short code_point, unsigned char utf8_bytes[])
The to_utf8 function has two parameters; an unsigned short code_point and a byte array utf8_bytes. The function constructs the UTF-8 representation for the given code point and writes the sequence of encoded bytes into the array utf8_bytes. The first byte (e.g. leading byte) should go at index 0, and the remaining bytes (if any) should follow at index 1, etc. The utf8_bytes array is provided by the client and is guaranteed to be large enough to hold a full 3 bytes, although only 1 or 2 may be needed. While we will talk about C arrays in more depth later, it turns out that if you pass an array as a parameter, modifying the elements of that array parameter will modify the elements of the original array passed in, so the function above can pass back the byte(s) it creates. The function returns the number of bytes written to the array (either 1, 2, or 3). As an example, if code_point were 0xfc, utf8_bytes would be updated to store 0xc3 at index 0, and 0xbc at index 1, and to_utf8 would return 2.
Your to_utf8 function will need to be written to handle each of the 3 code point ranges and construct the corresponding UTF-8 encoding. You are allowed to use comparison operators to distinguish this. Your code will need to use bitmasks and bitwise operators to manually construct each byte for the UTF-8 encodings.
Testing recommendations: there are some 65,000 possible code points you could feed to utf8, but given that they all flow through just a few distinct paths, having a test case targeted to hit each of those paths, with a little extra attention at the boundaries, should be sufficient to give you confidence about the rest.
1 Byte Encodings
If a code point is in the range U+0000 to U+007F, inclusive, its UTF-8 encoding is 1 byte. A code point in this range can be represented using at most 7 bits - called its significant bits. The significant bits are the bits that could actually store something meaningful for the code point. It's 7 here because, for a code point from 0 to 0x7f, it would need at most 7 bits to store a value in that range, which are the 7 least significant, so those are all that we care about. The UTF-8 encoding is one byte with its most significant bit 0, and its remaining 7 bits as the seven significant bits from the code point.
Example: for code point 0x001f (which is 0001 1111), its UTF-8 encoding would be 0001 1111 (0x001f) and to_utf8 would return 1.
2 Byte Encodings
If a code point is in the range U+0080 to U+07FF, inclusive, its UTF-8 encoding is 2 bytes. A code point in this range can be represented using at most 11 significant bits. The UTF-8 encoding is:
- The first byte has a leading
110, followed by the 5 most significant bits in the code point - The second byte has a leading
10, followed by the remaining 6 significant bits in the code point
Example: for code point 0x00fc (which is 1111 1100), the first byte would be 1100 0011 (0xc3), the second byte would be 1011 1100 (0xbc) and to_utf8 would return 2.
3 Byte Encodings
If a code point is in the range U+0800 to U+FFFF, inclusive, its UTF-8 encoding is 3 bytes. A code point in this range can be represented using at most 16 significant bits. The UTF-8 encoding is:
- The first byte has a leading
1110, followed by the 4 most significant bits in the code point - The second byte has a leading
10, followed by the 6 next most significant bits in the code point - The third byte has a leading
10, followed by the final 6 significant bits in the code point
Example: for code point 0x4751 (which is 0100 0111 0101 0001), the first byte would be 1110 0100 (0xe4), the second byte would be 1001 1101 (0x9d), the third byte would be 1001 0001 (0x91) and to_utf8 would return 3.
Summary
Here is a table containing the design described above. The xxx bits store the binary representation of the code point.
| Code Point Range | Significant Bits | UTF-8 Encoded Bytes (Binary) | |
|---|---|---|---|
| U+0000 to U+007F | 7 | 0xxxxxxx |
|
| U+0080 to U+07FF | 11 | 110xxxxx 10xxxxxx |
|
| U+0800 to U+FFFF | 16 | 1110xxxx 10xxxxxx 10xxxxxx |
In a single-byte sequence, the high-order bit is always 0, and the other 7 bits are the value of the code point itself. This is so the first 128 Unicode code points use the same single byte representation as the corresponding ASCII character!
For the multi-byte sequences, the first byte is called the leading byte, and the subsequent byte(s) are continuation bytes. The high-order bits of the leading byte indicate the number of total bytes in the sequence through the number of 1s (for instance, the leading byte of an encoding for a code point from U+0080 to U+07FF starts with 110, indicating the entire encoding is 2 bytes long, since there are two 1s). The high-order bits of a continuation byte are always 10. The bit representation of the code point is then divided across the low-order bits of the leading and continuation bytes.
Walkthrough Example: (paraphrased from Wikipedia UTF-8 page)
Consider encoding the Euro sign, €.
- The Unicode code point for € is
U+20AC. - The code point is within the range
U+0800toU+FFFFand will require a three-byte sequence. There are 14 significant bits in the binary representation of 0x20AC. - Hex code point 20AC is binary
00100000 10101100. Two leading zero bits of padding are used to fill to 16 bits. These 16 bits will be divided across the three-byte sequence. - Let's calculate the leading byte. High-order bits are fixed: three 1s followed by a 0 indicate the three-byte sequence. The low-order bits store the 4 highest bits of the code point. This byte is
11100010. The code point has 12 bits remaining to be encoded. - Next, let's calculate the first continuation byte. High-order bits are fixed
10, low-order bits store the next 6 bits of the code point. This byte is10000010. The code point has 6 bits remaining to be encoded. - Finally, let's calculate the last continuation byte. High-order bits are fixed
10, low-order bits store the last 6 bits of the code point. This byte is10101100. - The three-byte sequence this results in is
111000101000001010101100, which can be more concisely written in hexadecimal, ase2 82 ac. The underscores indicate where the bits of the code point were distributed across the encoded bytes.
3. Saturating Arithmetic
The sat program performs a synthetic saturating addition operation. Saturating addition clamps the result into the representable range. Instead of overflowing with wraparound as ordinary two's-complement addition does, a saturating addition returns the type's maximum value when there would be positive overflow, and minimum when there would be negative overflow. Saturating arithmetic is a common feature in 3D graphics and digital signal processing applications.
The sat program accepts different numbers of arguments. With just one argument, it prints the representable range of numbers with that bitwidth:
$ samples/sat_soln 8
8-bit signed integer range
min: -128   0xffffffffffffff80
max:  127   0x000000000000007f
Any additional specified arguments are added together using saturated arithmetic - for instance, if we add 126 and 5, the result overflows and sticks to the maximum value of 127.
$ samples/sat_soln 8 126 5
126 + 5 = 127
You are to implement these 3 functions for the sat program. You are encouraged to call any of these functions from any of the others as needed to share logic!
long signed_min(int bitwidth);
long signed_max(int bitwidth);
long sat_add(long operand1, long operand2, int bitwidth);
For these 3 functions, you may not use the following in your implementations:
- No relational operators or
math.hfunctions. You are prohibited from making any use of the relational operators. This means no use of< > <= >=. You may use!= ==and all other operators (arithmetic, logical, bitwise, ...). You also should not call any function from the floating pointmath.hlibrary (e.g nopow, noexp2). These restrictions are intended to guide you to implement the operation via bitwise manipulation. - No special cases based on bitwidth. Whether the value of bitwidth is 4, 64, or something in between, your functions must use one unified code path to handle any/all values of bitwidth without special-case handling. You should not use
if switch ?:to divide the code into different cases based on the value of bitwidth. This doesn't mean that you can't use conditional logic (such as to separately handle overflow or non-overflow cases), but conditionals that dispatch based on the value of bitwidth or make a special case out of one or more bitwidths are disallowed. - No loops or recursion. No loops or recursion at all. (In particular, no loop increment by one and stop at max.)
A solution that violates any of these restrictions will receive zero credit, so please verify your approach is in compliance!
Testing recommendations: your custom tests should cover a variety of different bitwidths, including extreme values, and on sums within range as well as those that overflow.
Step 1: signed_min
signed_min returns the smallest value representable in bitwidth bits. bitwidth is a number between 4 and 64, inclusive. Note, however, that the function returns a long; your function needs to return the minimum value, but correctly represented in 64 bits, not just bitwidth bits. As an example, with a bitwidth of 4, the min is binary 1000 , which represents the value -8. We want to return the value -8 but represented using 64 bits, which would be 11111...1000. As a hint, try writing out what the signed min values are for different bitwidths, and see if you notice a pattern in how to go from a given bitwidth to its signed min binary representation. Your goal is to determine an expression based on bitwidth that evaluates to the correct long value. Once you implement this function, you should be able to run sat with just the bitwidth argument and see the correct value outputted for the min.
Step 2: signed_max
signed_max returns the largest value representable in bitwidth bits. It works the same as signed_min, but for the largest value instead of the smallest. Like signed_min, the function returns a long; your function needs to return the maximum value, but correctly represented in 64 bits, not just bitwidth bits. As an example, with a bitwidth of 4, the max is binary 0111 , which represents the value 7. We want to return the value 7 but represented using 64 bits, which would be 000....0111. As a hint, try writing out what the signed max values are for different bitwidths, and see if you notice a pattern in how to go from a given bitwidth to its signed max binary representation. You may also notice similarities with your signed_min implementation. Once you implement this function, you should be able to run sat with just the bitwidth argument and see the correct value outputted for the max.
Step 3: sat_add
sat_add returns the saturated addition of the two operands which are guaranteed to fit in bitwidth bits. This means:
- If the sum of the operands does not overflow, we just return the sum
- If the sum of the operands overflows past the max, return the max
- If the sum of the operands overflows past the min, return the min
Remember that you may not use relational operators such as < or >.
The key idea is to try and develop a way to examine a value's binary representation to know whether it has overflowed its bitwidth. As a hint, try picking a bitwidth such as 4, and write out some addition operations that do and don't overflow. Then ask yourself - by looking at the operands and the sum, did this addition overflow? How did I know that? When is it possible for overflow to occur?
// which ones overflowed for a bitwidth of 4?  How did you know?  When is overflow possible?
4 + 4 = -8
4 + 3 = 7
-2 + -3 = -5
-2 + -8 = 6
4 + -3 = 1
4. Case Study: Ariane-5
Once you have implemented your sat program, you will have a taste of functions that work around overflow (completing sat is not required to complete this part, but provides context). Overflow errors can cause many problems, which we saw some examples of in Lecture 2. These errors are not very common, but they can be disastrous when they occur. Read through this article explaining an issue experienced by the European Space Agency, and answer the following questions in the readme.txt file.
1) What was the cause of the Ariane 5 rocket failure, and why was it not detected before the rocket was launched? Write your answer in 3-5 sentences.
2) Imagine that you are developing software for Ariane 6. You notice that Ariane 6 takes the average of two different sensors' measurements of horizontal velocity (which are stored as ints) by adding them together and dividing by 2, as in the following code:
int average = (velocity1 + velocity2) / 2;
What issues might arise from this calculation? How would you test for other potential overflow issues that could arise before the launch date? Write your answer in 3-5 sentences. Note: There are many possible answers to this question. Your answer should rely on critical reflection about appropriate testing strategies.
Submitting and Grading
Submitting
Once you are finished working and have saved all your changes, check out the guide to working on assignments for how to submit your work. We recommend you do a trial submit in advance of the deadline to familiarize yourself with the process and allow time to work through any snags. You may submit as many times as you would like; we will grade the latest submission. Submitting a stable but unpolished/unfinished is like an insurance policy. If the unexpected happens and you miss the deadline to submit your final version, this previous submit will earn points. Without a submission, we cannot grade your work.
When you submit, you may optionally indicate that you do not plan to make a submission after the on-time deadline. This allows the staff to start grading some submissions as soon as the on-time deadline passes, rather than waiting until after the late period to start grading.
- When in doubt, it's fine to indicate that you may make a late submission, even if you end up submitting on time
- If you do indicate you won't submit late, this means once the on-time deadline passes, you cannot submit again. You can resubmit any time before the on-time deadline, however.
- If you want to change your decision, you can do so any time before the on-time deadline by resubmitting and changing your answer.
- If you know that you will not make a late submission, we would appreciate you indicating this so that we can grade assignments more quickly!
You should only need to modify the following files for this assignment: readme.txt, sat.c, automata.c, utf8.c, custom_tests
Grading
Below is the tentative grading rubric. We use a combination of automated tests and human review to evaluate your submission. More details are given in our page linked to from the Assignments dropdown explaining How assignments are graded.
Readme Answers (10 points)
Code Functionality (80 points)
- Sanity cases. (30 points) The default sanity check tests are used for sanity grading.
- Comprehensive cases. (45 points) We will thoroughly test on a variety of an additional inputs ranging from simple to complex, including edge conditions where appropriate.
- Custom sanitycheck tests (5 points) Your
custom_testsfile should include at least 10 tests of your own, 3-5 per program, that show thoughtful effort to develop comprehensive testing coverage. Please include comments that explain your choices. We will run your custom tests against your submission as well as review the cases to assess the strength of your testing efforts. - Clean compile. (2 points) We expect your code to compile cleanly without warnings.
Code Quality (buckets weighted to contribute ~10 points)
The grader's code review is scored into buckets to emphasize the qualitative features of the review over the quantitative. The styleguide is a great overall resource for good program style. Here are some highlights for this assignment:
- Bitwise manipulation. We expect you to show proficiency in bitwise manipulation through clean construction and use of masks and proper application of the bitwise operations.
- Algorithms. Your chosen approach should demonstrate that you understand how to leverage bit patterns and numeric representation to directly and efficiently accomplish the task. Avoid unnecessary divergence and special-case code; unify into one general-purpose path wherever possible.
- Style and readability. We expect your code to be clean and readable. We will look for descriptive names, defined constants (not magic numbers!), and consistent layout. Be sure to use the most clear and direct C syntax and constructs available to you.
- Documentation. You should document both the code you wrote and what we provided. We expect program overview and per-function comments that explain the overall design along with sparing use of inline comments to draw attention to noteworthy details or shed light on a dense or obscure passage. The audience for the comments is your C-savvy peer.
Post-Assignment Check-in
How did the assignment go for you? We encourage you to take a moment to reflect on how far you've come and what new knowledge and skills you have to take forward. Once you finish this assignment, you will have completed your first C programs manipulating bits, and understood more about the limitations of integer representations! This assignment may definitely have a bit of a learning curve getting used to the write/compile/debug process in C and the command line. Celebrate this important milestone; the skills you develop now will pay off throughout the quarter!
To help you gauge your progress, for each assignment/lab, we identify some of its takeaways and offer a few thought questions you can use as a self-check on your post-task understanding. If you find the responses don't come easily, it may be a sign a little extra review is warranted. These questions are not to be handed in or graded. You're encouraged to freely discuss these with your peers and course staff to solidify any gaps in you understanding before moving on from a task. They could also be useful as review before exams.
- Consider all negative
ints whose absolute value is an exact power of two (-8, -32 and so on). What do their bit patterns have in common? - How can you determine if an integer bit pattern has a pair of consecutive 'on' bits? (Straightforward to do using a loop, but there is also a clever single expression...)
- How can integer limitations manifest themselves in real-world software?
- A treasure trove of bit wizardry curated by Sean Anderson, Stanford CS PhD.
Advice
To help approach this assignment, we've compiled some tips that may help with the various problems, as well as bit manipulation in general.
Don't use 0b-prefixed literals. There is no official support in C for numbers written in binary with 0b. We used this form in lecture to explicitly write out binary numbers, but it's not something you can use in standard C programs. Instead, you should... (see the next part)
Embrace hexadecimal. The base-16 system very conveniently translates to and from binary -- each byte is expressed in two hex digits, one hex digit for the 4 high-order bits, the other for the 4 low bits. Masks in hex or expressed via their construction are more evocative of the binary representation and help you avoid mistakes. For example, a mask to extract the sign bit from a 32-bit value can be cleanly expressed as 1 << 31 or 0x80000000 and both are quite readable. The mask also happens to be decimal 2147483648U, but who can tell? Would you notice if you had accidentally mistyped 2147486348U? Say no to decimal, hex is your pal!
Learn your bitwise operators. It is wasteful to invoke the (expensive, floating-point) pow function to compute integer powers of two: 1 << 10 does a perfect job of computing pow(2, 10) and requires way fewer compute cycles. The bitwise operations are also the right tools to rearrange/isolate/change bits as opposed to the more indirect use of integer multiply/divide/mod with powers of two.
Aim for directness. There may be more direct ways to write certain bit manipulations. Here are a few:
No left-shift right-shift. In the code below, the first version right-shifts then immediately left-shifts back. This seems to just cycle the bits back to where they were originally, but in fact the right-shift will discard the lsb and the left-shift will then zero-fill. This is roundabout way to wipe the lsb, but the better approach is to just directly mask it off as in second version:
    result = (val >> 1) << 1;       // original version

     // Better version:
     result = val & ~1;             // better: directly turn off lsb
No redundant/unnecessary ops. Imagine your goal is to extract the 4 high-order bits of a byte and shift them down to the lower half-byte. You could do it with two steps (mask and shift), but in fact, the shift will already discard the low-order bits, so there's no need to mask them off first!
    result = (val & 0xf0) >> 4;  // mask off lower 4, then shift down

    result = val >> 4;            // better: directly shift,
                                  // low-order bits gone!
Know your identities/relationships. When putting together a bitwise construction, stop and consider whether there is a more direct way to accomplish the same thing, e.g.
    b = a | 0                   // this is no op!
    b = a ^ -1                  // more clearly written as b = ~a
    b = ~a + 1                  // more clearly written as b = -a
    b = (1U << 31) - 1          // INT_MAX from <limits.h>
    b = INT_MIN >> 31           // This is -1!
At first you may find yourself using a longer expression than needed, but reviewing in a later pass, you can spot these issues and make them more concise. The goal is eventually to go straight to the most direct expressions from the beginning.
Frequently Asked Questions
I'm getting the error warning: left shift count >= width of type. What does this mean?
Code such as this will produce that warning:
long val = 1 << 32;
An integer constant defaults to type int, so shifting a 32-bit int by 32 positions would effectively shift off all the bits, and thus the compiler warns about it. Assigning the result to a variable of type long (64 bits) doesn't help; you have to start with a 64-bit value if you intend to compute a 64-bit result. Read the next question!
What bitwidth and signedness does a numeric integer constant have?
An integer literal is a signed int by default. Suffixes can be added to the constant to dictate its type. A suffix of L indicates the type is long and U (either by itself or with L) indicates it is unsigned. E.g. 1UL means a literal 1 that is an unsigned long.
What are the rules for integer promotion in C?
When assigning from narrower bitwidth (e.g. char, short) to a wider one, the source bytes are copied to the low-order bytes of the destination, and the upper bytes are assigned based on the promotion rules. If the source type was unsigned, the upper bytes of destination are zero-filled. If the source type was signed, its sign bit (the msb) is replicated across the upper bytes of destination (this is called sign extension). It may help to trace through this and confirm for yourself how/why this is value-preserving. If an operation is performed on two operands of mixed type, integer promotion is implicitly applied to the narrower first. It also the case (and a bit surprising, too) that integer promotion is also applied to types narrower than int when an operation is performed on them, even if no other wider type is involved. For example, the bitshift and invert operations promote the operand to an int, so bit-shifting a char will promote to an int before shifting, bit-inverting of a char similarly promotes, and the default result type of these expressions will be int. If the bitwidth of the operand was larger than int, the bitwidth will be unchanged by these promotion rules.