Due: Mon Feb 13 11:59 pm
Late submissions accepted until Wed Feb 15 11:59 pm
Assignment inspiration and handout components from Randal Bryant and Dave O'Hallaron of Carnegie Mellon. Command line parsing tools by Truman Cranor. Also based on assignments by David Mazières, John Ousterhout and Jerry Cain. Modifications by Nick Troccoli.
Assignment 3 Overview Session: Friday, January 3 from 3:10-4PM (note: new time!) on Zoom (link on Canvas). Note that the session is recorded and will be posted to the course website shortly after it’s over. Slides here, video here.
This assignment gives you a chance to implement a core tool that you've relied on all quarter - a fully-functional shell! This assignment leverages the shell code from lecture and extends it to support pipelines and I/O redirection. There's lots of neat code to write, and we hope you enjoy implementing such a core tool - this is how real shells work!
Learning Goals
The goal of this project is for you to get practice with the fork, execvp, waitpid and pipe system calls, as well as I/O redirection. This assignment will help you:
- appreciate the complexity and functionality of a shell
- further advance your multiprocessing skills using
fork/waitpid/execvpto manage multiple processes running different executables - more fully understand pipes, pipelines, file redirection, file descriptors,
pipe,open, anddup2.
Starter Code
To get started on the assignment, clone the starter project using the command
git clone /afs/ir/class/cs111/repos/assign3/$USER assign3
This line creates a new folder called assign3 in your current working directory containing a copy of the starter code.
Note that this repo includes a fully functional sample solution at samples/stsh_soln. When in doubt about how something should work, you can run the solution to see what it does.
For this assignment, you'll only need to modify stsh.cc and custom_tests; your goal is to implement the runPipeline function that spawns child process(es) to execute the input that the user entered. However, you may need to reference other files for documentation or testing. Here are the relevant files for your work on the assignment:
stsh.ccandMakefile: the implementation file for your shell, and the Makefile for compiling it by runningmakecustom_tests: a file where you will add custom test cases for the assignment.conduit.cc,sigsegv.cc,spin.cc,split.cc,fpe.cc,open_fds.py: short test programs with various behaviors you can use while testing your shell.stsh-exception.h: definesSTSHException, the exception type you should throw for various possible errors, such as those mentioned in the specstsh-parser/stsh-parse.h: defines thepipelineandcommandtypes to represent raw command line inputssamples: a symbolic link to the shared directory for this assignment. It contains:scripts: a folder containing various.txtscript files that are test cases for testing your shellstsh_soln: a provided samplestshsolution executableinspect-fds.py: a provided utility program that can print information about your shell's currently open file descriptors
Shell Background
The main shell features you'll be implementing on this assignment are pipelines and I/O redirection. Here's more info about each.
Pipelines
You can create a pipeline of processes with the pipe (|) operator. If you want to see how many files you have whose names contain "vector", for instance, you can do this:
ls -l | grep vector | wc -l
The output of the first process is piped to the stdin of the second, and the output of the second process is piped to the stdin of the third. In other words, this lists all the files in the current directory with ls, but sends that output as input to grep, which searches its input for the word "vector", and sends that output as input to wc -l, which prints out the number of lines in the input it received. In this way, we can accomplish complex tasks by chaining together smaller commands.
I/O Redirection
You can save the output of a command to a file like this:
echo "hello, world!" > output.txt
You can also read input from a file instead of from the user. For instance, the following counts the number of lines in stsh.cc:
wc -l < stsh.cc
And you can redirect both input and output at the same time:
wc -l < stsh.cc > output.txt
This works with pipelines - the one below searches for "void" in stsh.cc and saves the number of lines with matches into output.txt:
grep void < stsh.cc | wc -l > output.txt
The shell you will implement has many, but not all, of the features of the built-in myth shell. When in doubt, try running the sample solution (/samples/stsh_soln) to see the requirements for the assignment. In particular, some things your shell is not expected to support include:
- running in the background with
& - special shell commands like
cd,jobs,fg,bg - interrupting a running command with ctl-c or ctl-z
- running full-screen text editors like
emacsorvim - redirecting in the middle of a pipeline (i.e. middle of 3 commands in a pipeline redirecting its I/O)
Testing and Debugging
This assignment heavily emphasizes testing. Sanity check provides some starting tests (and does not include all tests used in grading), and you'll need to add your own tests over the course of the assignment as you work. Make sure to develop incrementally; incremental development means implementing small pieces in isolation, thoroughly testing them, and then building on them only once you know they are correct. This ensures a working implementation at each step, and if you encounter a later bug, you can be confident it is a result of your most recent changes.
Good testing can help you uncover bugs that you can then track down and fix. As you work through the assignment, for each milestone 2-5 you should add at least 2 documented additional tests of your own (total of at least 8) in the custom_tests file that show thoughtful effort to develop comprehensive test coverage. When you add a test, document your work by including comments in the custom_tests file that explain why you included each test and how the tests relate to one another. The tests supplied with the default SanityCheck are a start that you should build on, with the goal of finding and fixing any bugs before submitting, just like how a professional developer is responsible for vetting any code through comprehensive testing before adding it to a team repository. We strongly encourage you to write some tests before you write any code, and then add additional tests as you write code.
You can test your code in 3 ways: by running your shell manually, by feeding a script file to your shell, and by writing custom_test tests.
Running Manually
You can test your shell by hand by running it (./stsh), entering commands and inspecting its behavior, and quitting when you're done by entering "quit" or "exit" or by hitting ctl-d. We provide various small test programs that you can run from within your shell to test different behavior: conduit.cc, sigsegv.cc, fpe.cc, spin.cc, and split.cc. Open these files to learn more about what these programs do. We also provide a program open_fds.py that prints out its currently-open file descriptors. You can use it to test by including it in commands, like echo word1 word2 | cat | ./open_fds.py | cat.
Script Files
However, inputting test commands manually can become cumbersome. Another way to test is by putting test commands in a file, and sending that file as input to stsh. For instance, you could create a file input.txt that contains the following:
echo "hello, world!"
ls /usr/class/cs111/samples/assign3
Then you can run the following to redirect this file as stsh's standard input:
./stsh < input.txt
This will feed each line of the file one at a time into your shell program, just as if you had typed it yourself at the prompt. As a bonus, stsh is set up to output both the prompt line itself as well as the output from the shell running that line. In other words, the file above would result in the following output:
stsh> echo "hello, world!"
"hello, world!"
stsh> ls /usr/class/cs111/samples/assign3
inspect-fds.py  SANITY.ini  scripts  stsh_soln
stsh>
You can run in this way on the sample solution too (samples/stsh_soln), to see what the expected output is.
custom_tests
When writing custom tests you can specify commands that read from your own text file as above, or if you want to test just one command you can pipe the input directly in the custom test command, like this (note the $stsh, this is required if the custom test does not start with stsh):
# great for longer test cases
stsh < myfile.txt
# good for testing a single command
echo "ls -a" | $stsh
Note however that the second option doesn't work with invalid commands, like echo "./nonexistent" | $stsh.
If you create your own script files used in your custom tests, make sure to submit them along with your assignment (by default, only the files in the original starter project are submitted). When you submit, the submit tool will prompt you to enter the names of any additional files you'd like to include - you only need to do this once per file, ever.
inspect-fds.py
When you implement pipes and redirection, you may also find the provided samples/inspect-fds.py program useful for testing. It displays all the currently-open file descriptors for all the shell processes. To use it, you need to run it in a second terminal window connected to the same myth machine as the one where you are running stsh. You can do ssh SUNET@mythXX.stanford.edu (eg. ssh SUNET@myth55.stanford.edu) to log into a particular myth. Then, run ./samples/inspect-fds.py stsh to view the file descriptors in use at that time by your running shell program. It will also color-code any pipes to show you how they are connected. You may need to run a long-running pipeline (e.g sleep 100 | ./conduit | cat > out.txt) to give sufficient time to run inspect-fds.py and see open file descriptors. Feel free to try this out on the sample solution too! Run samples/stsh_soln and enter sleep 100 | ./conduit | cat > out.txt, and in another terminal window connected to the same myth machine, run samples/inspect-fds.py stsh_soln.
Valgrind
Valgrind isn't supported on this assignment to check for memory leaks or errors (though you should still not have memory leaks or errors :) ). But you can use Valgrind to track open file descriptors, like this:
valgrind --track-fds=yes ./stsh
You can then enter commands, enter "quit" when you're done, and valgrind will show any open file descriptors. You can run it with a script as well:
valgrind --track-fds=yes ./stsh < samples/scripts/one-command.txt
You are not required to close STDIN, STDOUT or STDERR.
Note that if you're using VSCode, you may see additional file descriptors open that VSCode is using to connect to the myth machines. To confirm if an open file descriptor is coming from VSCode, you can either run the sample solution under valgrind to see if it also reports those same open file descriptors (meaning they are fine), or you can try running valgrind while SSHing from a separate terminal program outside of VSCode to see if those file descriptors no longer appear.
GDB
You can run your shell under GDB like this:
gdb stsh
Then you can set breakpoints and run it with run, at which point you'll see your shell prompt and can enter commands. You can also do run < SCRIPTFILE, specifying a script file, and it will read input from there instead.
Debugging with multiple processes requires some additional steps because GDB isn't always sure whether you want to step through the parent process or a child process's execution. Make sure to enter the following 2 commands right when you start GDB:
set detach-on-fork off
set follow-fork-mode child
The first tells GDB to capture any fork-ed processes and pause them on fork. The second says, when a child process is forked, to switch to tracing that child process. You can list all processes GDB has captured like this:
info inferiors
And switch to a different one by specifying its number, like this:
inferior 2
You can stop watching a process and continue it by specifying its number, like this:
detach inferior 2
Click here for sample GDB run.
Getting Started
The best approach for this assignment is to break up the tasks into smaller milestones that you test thoroughly at each step. We recommend following the milestones listed below. You are encouraged to decompose and unify code!
1. Review Starter Code
The starter project comes with code to handle parsing user input, and it passes the parsed input to your runPipeline function via the pipeline parameter. Before you start writing code, familiarize yourself with the pipeline and command types, which are defined in stsh-parser/stsh-parse.h:
const size_t kMaxCommandLength = 32;
const size_t kMaxArguments = 32;

struct command {
  char command[kMaxCommandLength + 1]; // '\0'-terminated
  char *tokens[kMaxArguments + 1]; // array, C strings are all '\0'-terminated
  char *argv[kMaxArguments + 2]; // combined command + tokens
};

struct pipeline {
  std::string input;   // empty if no input redirection file to first command
  std::string output;  // empty if no output redirection file from last command
  std::vector<command> commands;
  ...
Specifically, a pipeline is a list of commands, possibly with input redirection and/or output redirection. Commands are separated by the pipe | character. Input like cat file.txt is just one command, but the input cat file.txt | wc -l would be two commands. A command consists of the executable name (the command field), the arguments after the executable name (the tokens field) and a combination of both of these (the argv field), useful for calling execvp. A pipeline also stores input and output fields, which specify whether you should redirect the input of the first command or the output of the last command, respectively.
As an example, if the user entered grep void < stsh.cc | wc -l > output.txt, the pipeline would consist of two commands: grep void and wc -l. The pipeline's input would be stsh.cc and output would be output.txt.
The starter code in stsh.cc currently prints out the pipeline passed in to runPipeline. For this milestone, try running stsh and entering various commands to see how they are stored in the pipeline.
Also familiarize yourself with the different test programs you can use to test your shell. Open files like sigsegv.cc, spin.cc, conduit.cc, fpe.cc, and others to see how to use them - you can include them in commands you use for testing.
2. Single Commands
Implement runPipeline to get a pipeline of just one command (e.g. sleep 5) to run until it's finished. Use a single call to waitpid to stall stsh until the child process finishes. If the child process terminated because of a segmentation fault signal, the shell should print the message "Segmentation fault" with cerr (see man waitpid for how to check this - you can use WIFSIGNALED to check if it was signaled, and check if WTERMSIG reports the signal constant SIGSEGV).
This is just like the first-shell-soln.cc program from lecture, so check out that example to get you started. Click here to view.
With this implemented, you should be able to run single commands like ls, date, sleep, etc. with any number of command line arguments (e.g. ls -a -l, sleep 5). You should also be able to run the sigsegv program and have it report there was a segmentation fault, but not for programs that crash in other ways (such as fpe).
Error checking: if execvp fails, throw an STSHException with an error message "XXX: Command not found". You can throw an exception like this:
throw STSHException(message);
Run the sample solution (samples/stsh_soln) to see an example error message. Throwing an exception in a child process terminates it.
Testing suggestions: sleep 3 should run for 3 seconds, and then the prompt should reappear after the full sleep. ./nonexistent should print an error message. After this milestone, you should pass sanity check tests #2 - #4. Make sure to test thoroughly before moving on, as milestones build on each other!
3. Two-Process Pipelines
Add support for pipelines consisting of two processes (i.e binary pipelines like cat stsh.cc | wc), and ensure that the standard output of the first is redirected to feed the standard input of the second. Consider how you can combine / unify code with the previous milestone.
Each command should run in its own child process, and these child processes should run simultaneously. In other words, you shouldn't spawn one, wait for it to finish, and then spawn the second. You should spawn both and wait for both of them to finish. (Note that a command may internally wait for all its input to be received before doing anything, but that's up to the individual program. For instance, wc won't do anything until it's received all its input).
Make sure to close all unused file descriptors!
This should work even for processes that don't produce any output or read any input, e.g. sleep 3 | sleep 3.
If one or both of the processes terminates due to a segmentation fault, print the message "Segmentation fault" only once for the entire pipeline.
If you throw an exception in a child process, you do not need to do any cleanup (e.g. close any file descriptors or pipes) before doing so.
TIP: use pipe2 instead of pipe: pipe2 is the same as pipe, but takes a second parameter where you can specify options. One is O_CLOEXEC, which will automatically close pipe FDs when the surrounding process calls execvp. In other words, if you make a pipe and call fork, if the child calls execvp, the child doesn't need to close the pipe FDs. The parent still does, however, but this removes the need for a few close calls so is more convenient. The lecture subprocess-soln.cc example has an alternate version of subprocess using pipe2 instead of pipe - check that out to see the close calls that are no longer necessary. Click here to view.
Once you complete this, make sure your program works for pipelines of length 1 and 2, and that your shell stalls until everything in the pipeline has run to completion.
Testing suggestions: sleep 3 | sleep 3 should run for 3 seconds, not 6 - since both processes are running in parallel. echo 12345 | ./conduit --delay 1 should print the characters 1, 2, 3, 4, 5 with a one-second delay in between each. (see conduit.cc for the test program code). echo 123 456 789 | xargs factor 12 34 56 78 90 should print the prime factorization for the five two-digit numbers before the factorizations for the three three-digit numbers (xargs reads from STDIN and appends those as arguments to the specified command). After this milestone, you should pass sanity check test #5. Make sure to test thoroughly before moving on, as milestones build on each other!
4. Multi-Process Pipelines
Next, add support for arbitrarily-long pipeline chains (i.e. pipelines of >= 1 command). The standard output of each command should feed the standard input of the next. This is the most challenging milestone, so plan carefully, decompose, unify common code and test thoroughly! Consider how you can combine / unify code with the previous milestones.
Like the previous milestone, each command should run in its own child process, and these child processes should run simultaneously. For example, if we run echo 12345 | ./conduit --delay 1 | conduit, we would create 3 processes, all of which run in parallel; echo's output would be fed as input to the first ./conduit, whose output would be fed as input to the second ./conduit. This will require some particularly clever work with pipe, since a pipeline of, say, 11 processes needs to create 10 independent pipes. This diagram may help visualize:
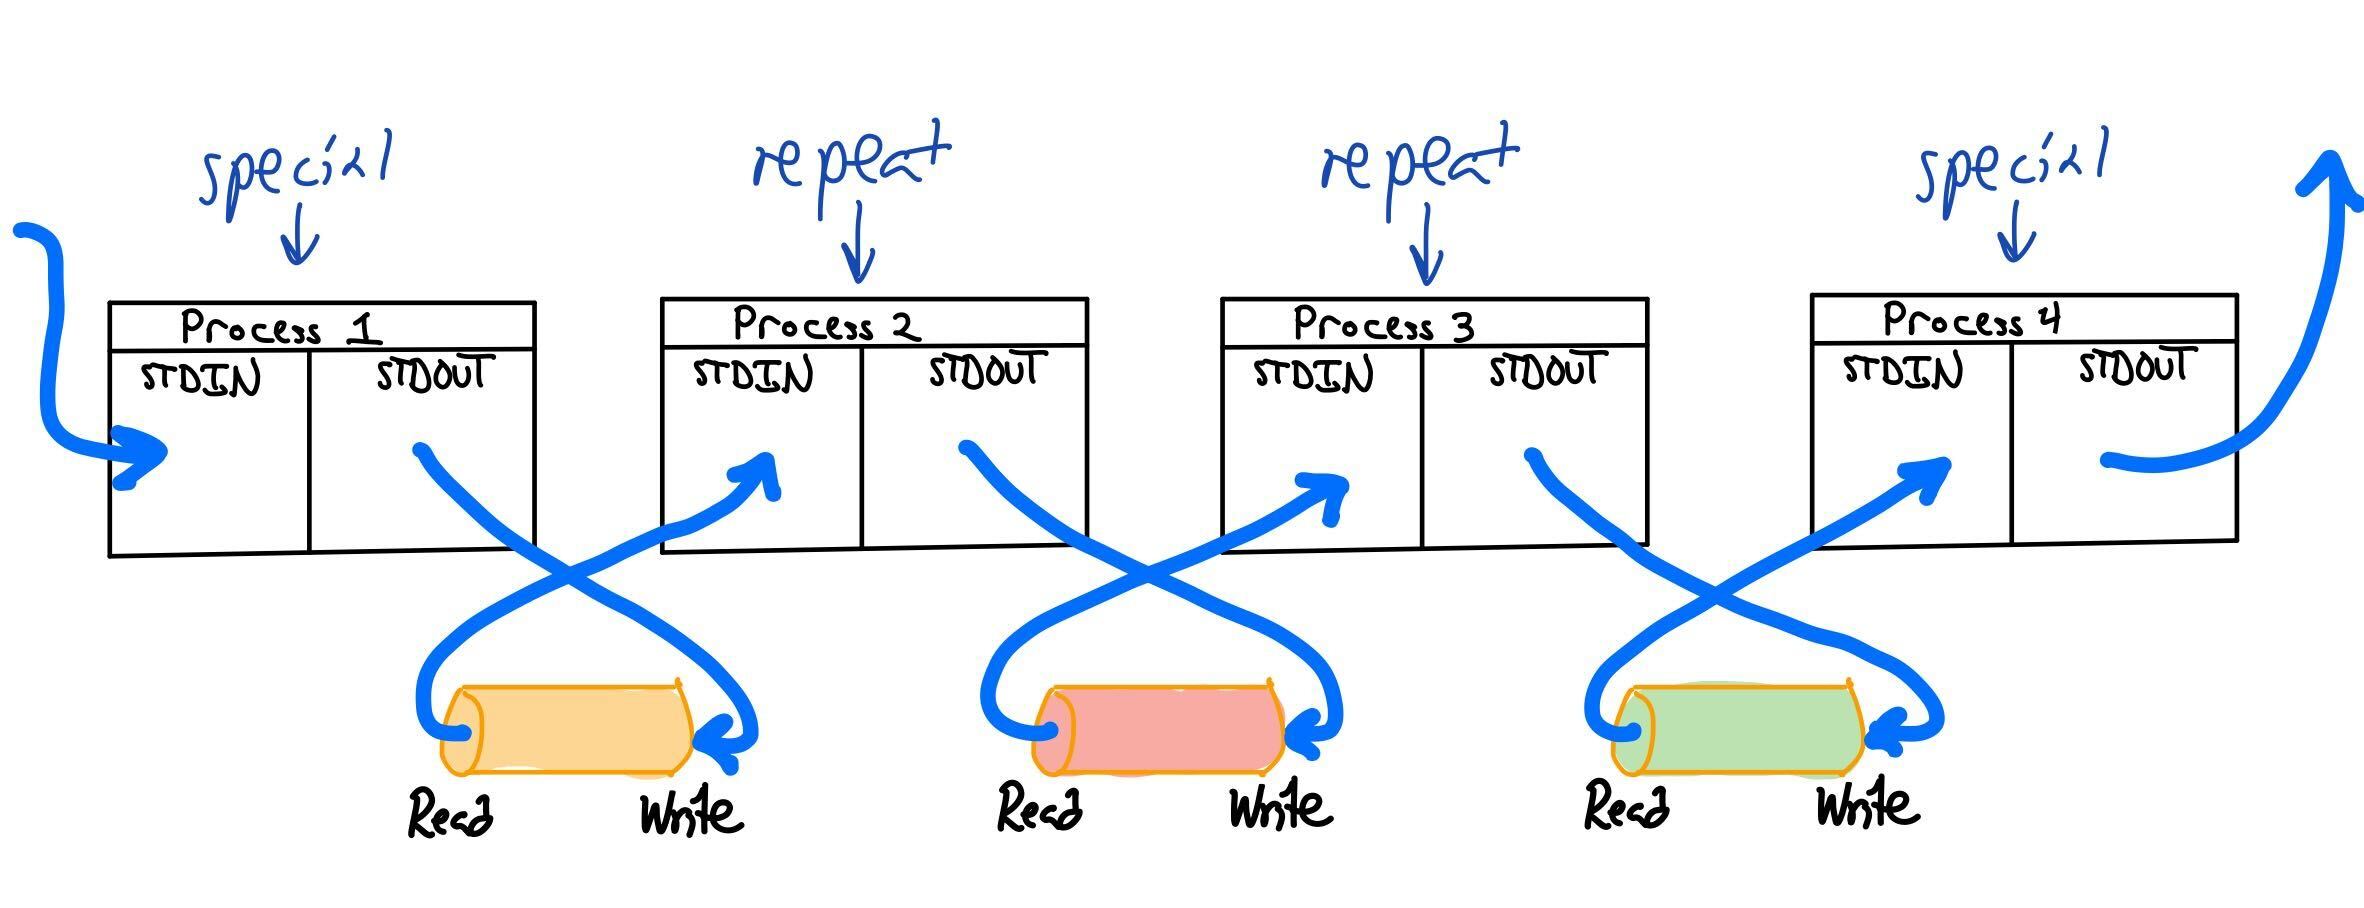
Note that we are creating N-1 pipes and N processes. However, there are also differences in how the N processes are created; the first and last are unique cases that have only their STDOUT (for the first) and STDIN (for the last) redirected, while all the middle processes have both redirected.
Make sure to close all unused file descriptors!
This should work even for processes that don't produce any output or read any input, e.g. sleep 3 | sleep 3 | sleep 3.
Once you complete this, make sure your program works for pipelines of any length, and that your shell stalls until everything in the pipeline has run to completion. Here are some example commands to try:
echo 12345 | ./conduit --count 2 | ./conduit --count 3echo 12345 | ./conduit --count 2 | ./conduit --count 3 | ./conduit --count 2 | wc
Testing suggestions: sleep 3 | sleep 3 | sleep 3 should run for 3 seconds, not 9 - since all processes are running in parallel. After this milestone, you should pass sanity check test #6.
5. I/O Redirection
Finally, incorporate file redirection for the first and last commands in a pipeline via < and > (e.g. cat < /usr/include/stdio.h | wc > output.txt). The pipeline type will give you the input or output filenames (if any) via the input and output fields. Your shell need only support input redirection for the first command, and output redirection for the last command (though note that for pipelines of length 1, the first and last process of the pipeline are the same.).
For output redirection, if the file you're writing to doesn't exist, create it (O_CREAT), and if it does exist, truncate it (O_TRUNC). Use 0644 for permissions (read-write for owner, read for all others). When calling open, you need to pass a char * (C string) as the filename parameter; you can call .c_str() on a C++ string to get a C-string representation.
This should work even for processes that don't produce any output or read any input, e.g. for sleep 3 > output.txt the file output.txt would exist but would be empty.
Error checking: if open fails for either input or output redirection, throw an STSHException with an error message Could not open "FILENAME". Run the sample solution (samples/stsh_soln) to see an example error message. If the input file is invalid, note that the leading process should not run because we are throwing an exception. E.g. for sort < invalid.txt | wc, it should not run sort, but should run wc (with nothing fed to its STDIN).
Testing suggestions: Test with single commands and pipelines, for both input and output redirection (and both at the same time). Also test with files that don't exist. Here are some example commands that should work: echo aeiou > vowels.txt should write "aeiou" to "vowels.txt". cat vowels.txt | ./conduit --count 3 > output.txt should write "aaaeeeiiiooouuu" to "output.txt". cat < /usr/include/stdio.h > local.h should make a copy of /usr/include/stdio.h called local.h in the current directory. After this milestone, you should pass sanity check tests #7 (output redirection) and #8 (input redirection). Woohoo!
Submitting and Grading
Once you are finished working and have saved all your changes, submit by running the submit tool in the tools folder: ./tools/submit. We recommend you do a trial submit in advance of the deadline to allow time to work through any snags. You may submit as many times as you would like; we will grade the latest submission. Submitting a stable but unpolished/unfinished is like an insurance policy. If the unexpected happens and you miss the deadline to submit your final version, this previous submit will earn points. Without a submission, we cannot grade your work. You can confirm the timestamp of your latest submission in your course gradebook.
Your assignment will be graded using the tests we expose via sanitycheck plus additional unpublished tests. The breakdown below represents a tentative summary of the grading categories:
-
Simple Tests
- Clean Build
- Ensure that basic single-command processes work
-
Advanced Tests
- Ensure that pipelines with two processes work well
- Ensure that pipelines with three or more processes work well
- Ensure redirection works for pipelines of just one process
- Ensure redirection works for pipelines with two or more processes
- Ensure required error checking is implemented
- Additional stress tests
-
Custom Tests
- Your
custom_testsfile should include at least 8 tests of your own (at least 2 per milestone, excluding milestone 1) that show thoughtful effort to develop comprehensive testing coverage. Please include comments that explain your choices. We will run your custom tests against your submission as well as review the cases to assess the strength of your testing efforts.
- Your
Style Code Review
Here are some tips for this assignment:
- your implementation should be in C++ unless there's no way to avoid it. By that, we mean you should use C++ strings unless you interface with a system call that requires C strings, use
coutinstead ofprintf, and so forth. - unification of code; do your best to combine / unify code for each milestone; there are similarities in the tasks per milestone!
For more information about style guidelines to use for assignments, take a look at the Style Guide, linked to from the Assignments dropdown.